Import Journal Entries into QuickBooks Desktop
This article will comprehensively guide you on importing journal entries into QuickBooks Desktop.
Can you import journal entries into QuickBooks Desktop?
Yes, you can import journal entries into QuickBooks Desktop. The built-in method involves using Intuit Interchange Format (.IIF) files. However, this approach has limitations:
Complexity: Creating and formatting IIF files can be intricate, requiring precise structuring to ensure successful imports.
Error Handling: QuickBooks provides limited support for troubleshooting IIF import errors, making it challenging to identify and correct issues during the import process.
Data Integrity: Improperly formatted IIF files can lead to data inconsistencies or corruption within your QuickBooks company file.
Due to these challenges, many users prefer third-party solutions like SaasAnt Transactions. SaasAnt offers a more user-friendly and efficient way to import journal entries:
Versatile File Support: Import data from various formats, including Excel, CSV, and TXT, eliminating the need to convert files into IIF format.
Bulk Processing: Efficiently handle large volumes of journal entries, streamlining the import process and saving time.
Error Management: Provides detailed error reports, allowing for easy identification and correction of issues before finalizing the import.
Additional Features: Beyond importing, SaasAnt enables bulk export and deletion of transactions, offering comprehensive data management capabilities within QuickBooks Desktop.
Import Journal Entries into QuickBooks Desktop: Quick Instructions
For individuals seeking a straightforward method to import their journal entries into QuickBooks Desktop, here's a simplified procedure to follow:
Install and Launch SaasAnt Transactions Desktop.
Connect SaasAnt Transactions with your QuickBooks company.
Navigate to the ‘Import’ screen in SaasAnt Transactions & upload your Excel/ CSV file.
Map the file header fields with the corresponding QuickBooks fields on the mapping screen.
After a thorough review of the mapping, initiate the import process.
Validate the imported data in QuickBooks Desktop to ensure accuracy.
How to import journal entries into QuickBooks Desktop: Step-by-Step Guide
Step 1: Preparing Your Journal Entry Data for Import
Ensure a smooth process when importing journal entries into QuickBooks Desktop; it's essential to have your journal entry data in the proper format, including all the necessary details like account numbers, amounts, and dates. Refer to the SaasAnt Transactions template to help organize your data effectively.
Step 2: Installing and Launching SaasAnt Transactions
To install and activate the free trial of SaasAnt Transactions Desktop, first download the latest version by clicking on the free trial. Run the "SaasAntTransactions-Setup.exe" file with administrative privileges, accept the license agreement, choose your installation path, and complete the setup.
After installation, launch the application, navigate to Subscription > Register, and enter the license key provided in your confirmation email to activate the software. Ensure your computer has an active internet connection during this process.
Step 3: Connecting to QuickBooks Desktop
In SaasAnt Transactions, click 'File' and select 'Connect to QuickBooks.’ You can choose your preferred connection method, and if you wish, you can set it to connect automatically.

Step 4: Selecting Import Type - Journal Entry
In this step, select 'Import' and 'QuickBooks Transaction Type' as 'Journal Entry.' Then, select the journal entry file from your computer using the' Browse File' option. SaasAnt Transactions provides sample templates to make this process error-free.

Step 5: Mapping Your Data
Precision in field mapping is vital when importing journal entries into QuickBooks Desktop. It entails aligning details like transaction descriptions and account codes with QuickBooks fields. SaasAnt Transactions simplifies this process with a user-friendly interface that prevents errors. For guidance, consult the SaasAnt support portal for a seamless and accurate import process.
Now, match the fields in your journal entry with the corresponding fields in QuickBooks Desktop. It ensures that the data aligns correctly during the import process. Data mapping is crucial for accurately placing details like names, dates, amounts, and account numbers.

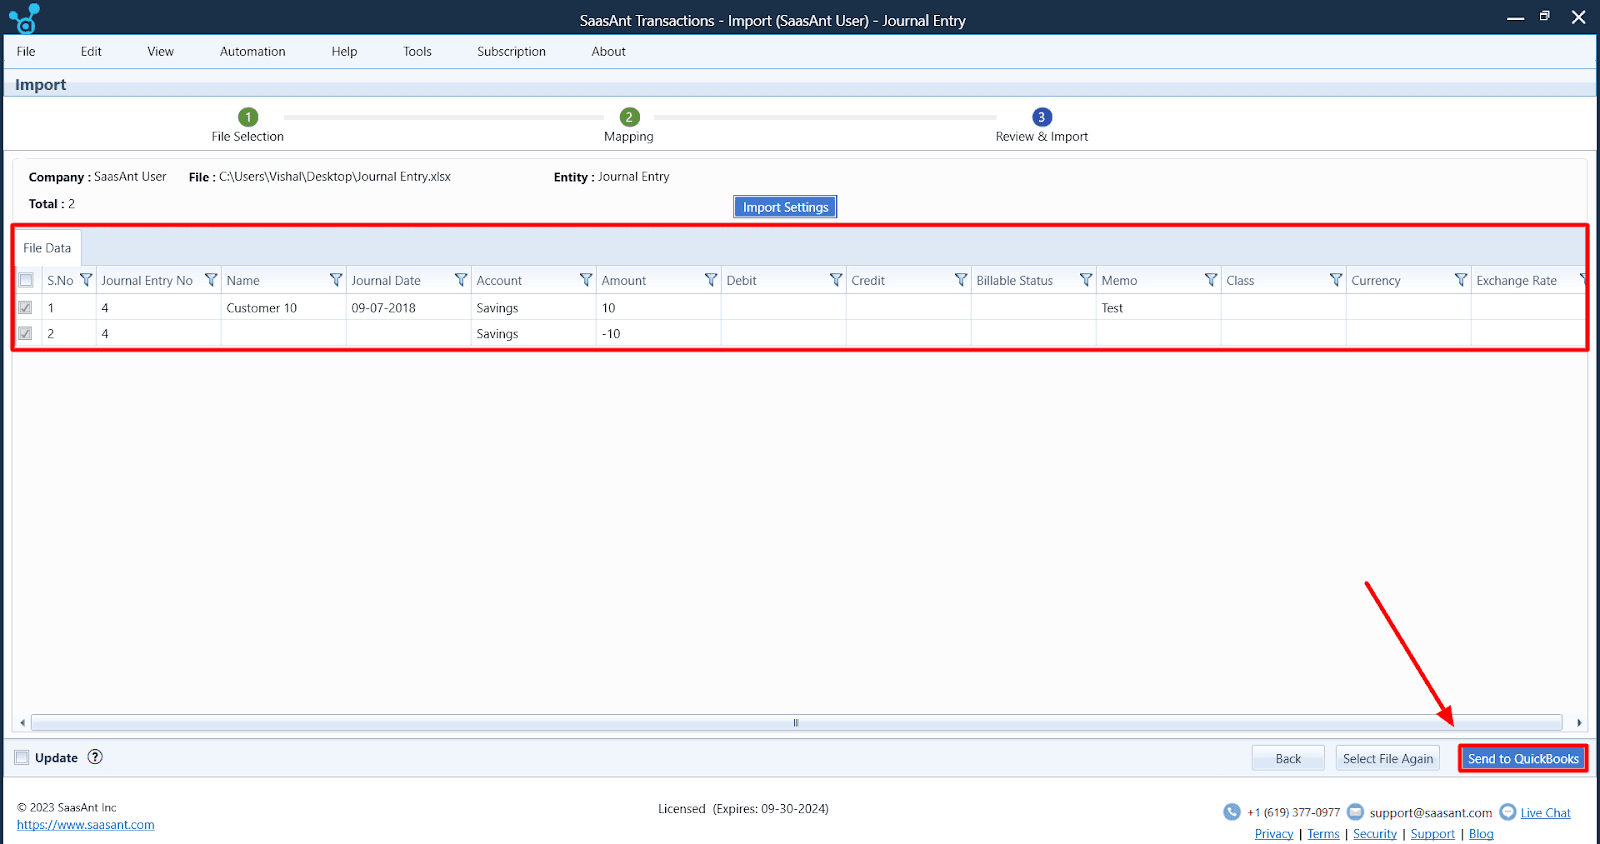
Step 6: Review and Import Journal Entry
Review the mapping to ensure everything looks accurate, and then click 'Send to QuickBooks.' This step finalizes the import process. Open QuickBooks Desktop to verify that your imported journal entries are correct.
Step 7: Confirming the Imported Journal Entries
To ensure the accuracy of your imported journal entries, click on the 'Number with QuickBooks icon' to access the data in your QuickBooks account. This final verification step instills confidence in the imported data.
Conclusion
Importing journal entries into QuickBooks Desktop through SaasAnt Transactions offers a straightforward and efficient solution. Beyond automation, SaasAnt Transactions provides comprehensive support and guidance to make your financial operations smoother and more efficient. Don't hesitate to embrace a streamlined file automation process with QuickBooks today.
FAQ
Is SaasAnt Transactions compatible with all versions of QuickBooks Desktop?
Yes, SaasAnt Transactions is compatible with various versions of QuickBooks Desktop, ensuring seamless integration across different editions, including QuickBooks Pro, Premier, and Enterprise.
Can I import journal entries from external software applications into QuickBooks Desktop using SaasAnt Transactions?
Absolutely! SaasAnt Transactions can handle data imports from various external software applications, making it a versatile solution for integrating financial data into QuickBooks Desktop. Whether your data originates from spreadsheets, other accounting software, or custom applications, SaasAnt Transactions can efficiently facilitate the transfer.
What if I have a substantial volume of journal entries to import? Will SaasAnt Transactions manage it efficiently?
Yes, SaasAnt Transactions is specifically optimized to manage and process large volumes of journal entries efficiently. It can handle substantial data loads while maintaining efficiency and accuracy throughout the import process. Whether you have dozens or thousands of journal entries, SaasAnt Transactions is up to the task.
Before finalizing the import, can I review and adjust the field mappings?
Indeed, SaasAnt Transactions allows you to thoroughly review and fine-tune field mappings before proceeding with the import. It means you can ensure your data is accurately aligned with QuickBooks Desktop fields, minimizing the risk of discrepancies and errors during the import process.
Does SaasAnt Transactions offer error logs or reports in case of discrepancies during the import process?
Yes, SaasAnt Transactions offers comprehensive error logging and reporting capabilities. The application generates detailed error logs and reports if there are any discrepancies, errors, or issues during the import process. These reports provide granular insights into the nature of the problem, enabling you to swiftly identify and rectify any issues, ensuring the integrity and accuracy of your imported data.
How to upload journal entries in QuickBooks Desktop?
To upload journal entries into QuickBooks Desktop, you can utilize the built-in Intuit Interchange Format (.IIF) import feature. However, this method can be complex and may lead to data integrity issues if not executed correctly. For a more streamlined and user-friendly experience, consider using SaasAnt Transactions, which simplify the import process and offer additional features such as data validation and error detection.
How to run a journal entry report in QuickBooks Desktop?
To generate a report of your journal entries in QuickBooks Desktop, follow these steps:
Access the Journal Report:
Navigate to the Reports menu.
Select Accountant & Taxes.
Choose Journal.
Customize the Report:
In the Customize Report window, go to the Filters tab.
Search for and select Transaction Type.
Set the filter to Journal to display only journal entries.
Adjust the Date range to specify the period you want to review.
Run and Review the Report:
Click OK to apply the filters.
The report will display all journal entries matching your criteria.
Tags
Read also
Import Journal Entries into QuickBooks Online: Step by Step Guide
How to Delete Journal Entries in QuickBooks Desktop?
How to Import Invoices into QuickBooks Desktop
Understanding QuickBooks Migration: From Desktop to Online