How to Setup QuickBooks Online? 10 Easy Steps for Beginners
You must be new to QuickBooks searching for a QuickBooks Online setup. You’ll likely encounter countless guides and videos promising a step-by-step approach. However, the QuickBooks Online setup doesn’t end there. To truly harness its power, you’ll need a reliable tool to import your existing accounting data, perform a QuickBooks cleanup, and ensure proper backups. If you’re in eCommerce, automatic syncing of fees, taxes, and refunds will make things so much easier.
This blog will walk you through everything you need to know about QuickBooks Online setup, featuring SaasAnt Transactions a highly-rated QuickBook add-ons with 4.9 stars. Read on for an effective QuickBooks Online setup for efficient financial management.
10-Step QuickBooks Online Setup
1. Enter Your Business Information
First things first, select a plan that best suits your business. Head over to the pricing page and explore the plans available to find the one that best fits your needs. Once you've made your choice, you'll need to create an Intuit account.
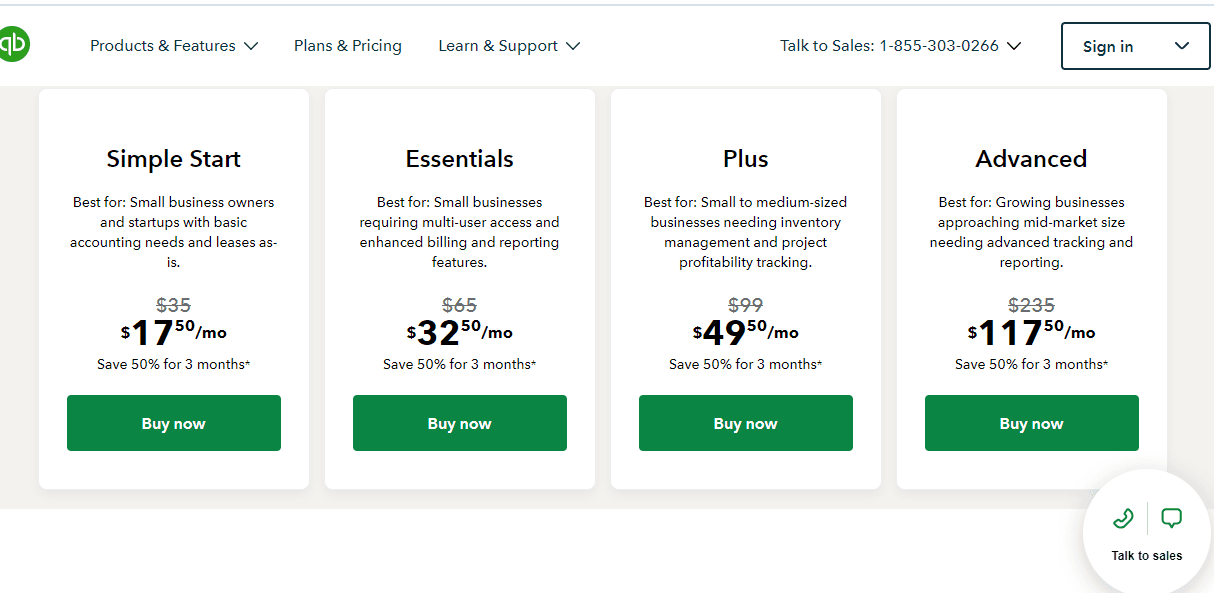 Next, enter your basic business information to get started. You can link your credit cards and bank accounts now, or if you prefer, you can skip this step and do it later.
You can also download the QuickBooks mobile app to snap pictures of your receipts and bills, and QuickBooks will automatically match them to your records.
If you send invoices through QuickBooks and your customers pay using the integrated payment processor, you’ll be able to track payments directly from the app.
However, if you’re using an external payment processor, keep in mind that the app won’t notify you when payments are received. So, make sure to stay on top of your transactions!
2. QuickBooks Setup Checklist
Once you’ve completed entering your basic business information, you’ll be directed to the home page, where you’ll find the QuickBooks setup checklist where you can:
Review Your Business Information
Take a moment to revisit your business details to ensure everything is accurate and ready to go.
Set Up Your Invoices
Customize your invoices by adding your company logo and personalizing the invoice template to match your brand’s identity.
Enable Online Payments
Make it easy for your customers to pay you! You have two options: generate a payment link or create an invoice that includes a payment option.
Track Your Income and Expenses
Get a clear picture of your financial health by linking your business account. Organize your expenses and categorize your transactions to see what you’re earning and spending.
3. QuickBooks Dashboard
One of the essential steps for QuickBooks Online setup is the QuickBooks dashboard customization, which is the central hub for all your accounting needs. It features three main tabs: Home, Cash Flow, and Planner, allowing you to focus on essential tasks and monitor your business performance efficiently.
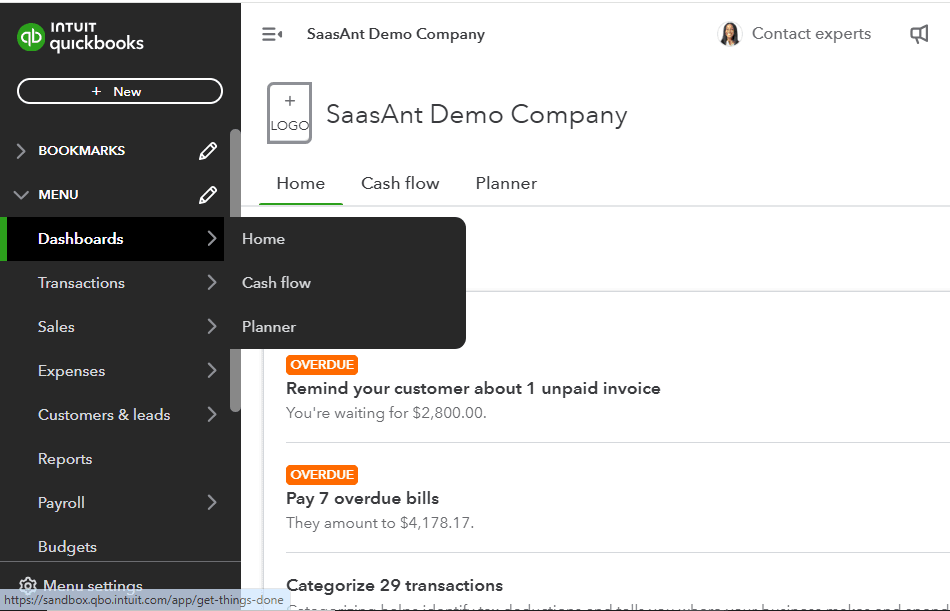
You can customize the homepage to showcase the information that matters most to you. By selecting "Customize Layout," you can add, resize, and reorder widgets to gain valuable insights at a glance. Track your cash flow, profitability, expenses, income, and sales, all while viewing your connected bank account balances in one place.
Additionally, modify the Shortcuts widget to include your most frequently used transactions, making it easy to create invoices, review banking transactions, and manage your payroll. This is key to an effective QuickBooks Online setup!
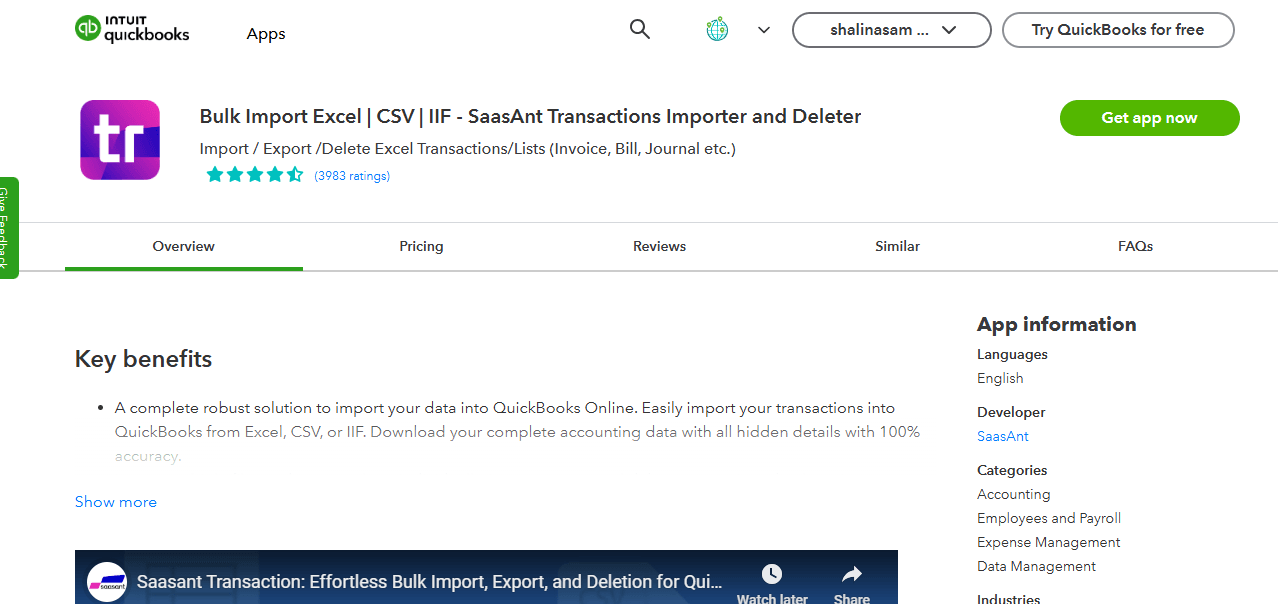
4. Integrate SaasAnt Transactions
If you're a new QuickBooks user, you know how overwhelming the setup process can be. That’s where SaasAnt Transactions becomes an essential, affordable add-on for your QuickBooks online setup. It simplifies importing your existing financial data, allowing you to focus on what truly matters—growing your business.
With SaasAnt Transactions, you can easily import all your QuickBooks entities, from invoices and expenses to customer and vendor lists, eliminating tedious data entry. Plus, if you need to export your financial data for safekeeping or sharing, it’s a breeze to create a local copy on your flash drive.
Managing financial data can be daunting, especially when you need to make bulk changes or deletions. SaasAnt Transactions allows you to do just that, giving you the flexibility to manage your data effectively. You can also create secure backups via Email or FTP/SFTP folders, ensuring your information is safe.
And for added convenience, SaasAnt Transactions supports automated data imports through email, Zapier, or FTP/SFTP. Best of all, you can try it risk-free with a 30-day free trial. Let SaasAnt Transactions be your trusted partner in achieving a smooth QuickBooks online setup!
Quick Instructions for Bulk Import Using SaasAnt Transactions
Integrate SaasAnt Transactions from the QuickBooks app store.
Upload the file. It can be anything from XLS, XLSX, CSV, or IIF. In case you have a PDF file, you can convert it to Excel within the application.
Map the fields in your file to the QuickBooks fields.
Review and Import.
Rollback (undo) if needed.
Here’s a detailed guide with screenshots for how to import Excel into QuickBooks.
5. Setting up Chart of Accounts
A chart of accounts is essential for organizing your transactions in QuickBooks. It contains every account or category you use for transactions. To access it, simply select Transactions -> Chart of Accounts.
Every transaction you record affects at least two accounts: the bank or credit card account involved and the category that explains the transaction. For example, if you purchase office supplies, you’ll see that transaction on your banking screen. After clicking Review, assign it to the correct bank account and enter the appropriate category for the expense. This will decrease your bank account balance while reflecting the spending in the office supplies expense account.
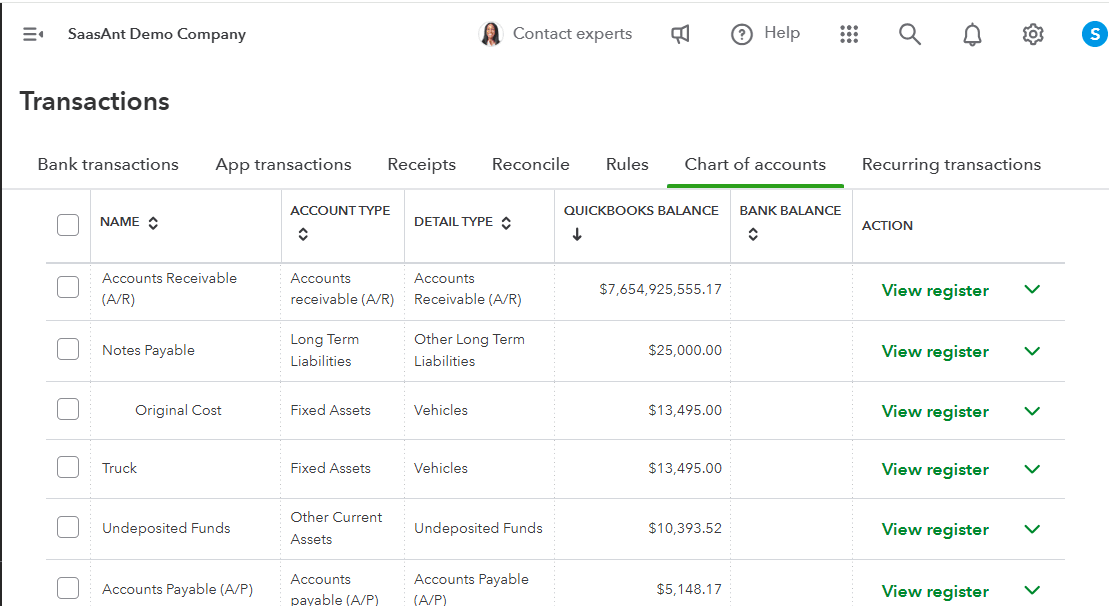
Each account has a specific type that tells QuickBooks what to track—whether it’s the balance of the account or total transactions over a period. Accounts at the top show what you own or owe, like bank accounts and credit cards, while fixed assets indicate the value of items you own. Liabilities show what you owe, and equity accounts reflect the business's worth.
To add new accounts, click the New button in the top right corner. The QuickBooks Simple plan allows up to 250 accounts.
Note: When you have to add multiple accounts, you can use SaasAnt Transactions for easy bulk import of accounts into QuickBooks.
6. Customizing QuickBooks’ Invoice Templates
To customize invoice style, select Settings -> Custom form style -> Click the New Style button and select Invoice. In the Design tab, you can modify the template layout, including adding your logo, by selecting Make Logo Edits. Change font colors and styles and adjust page margins to fit your brand.
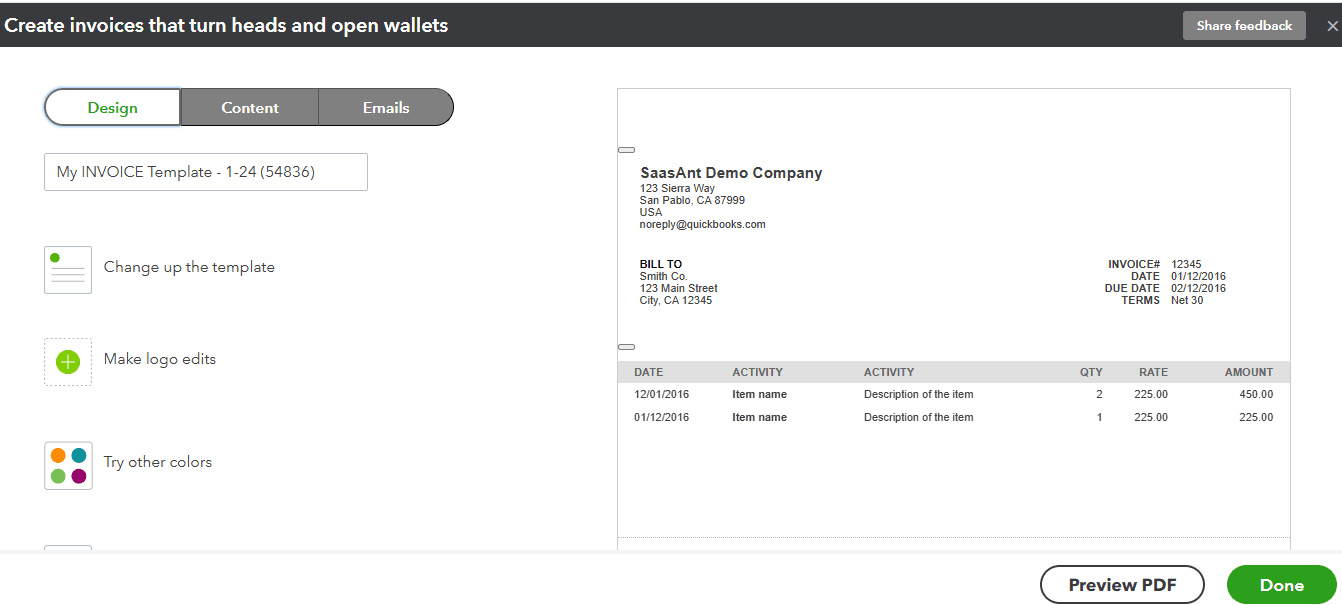
In the Design tab, edit the header, footer, or table content. You can include an account summary to inform customers of any outstanding balances. With the Show on Invoice option enabled, customers will see their previous balance alongside new charges.
In the Content tab, you can customize the Activity Table which is the details about the products and services you’re charging for. Here, you can edit and reorder fields like service date, product name, description, tax, quantity, total amount, and SKU. Use checkboxes to show or hide fields and drag to reorder them. In the Footer, include information about discounts, deposits, or tax summaries. If creating an invoice from an estimate, you can add a summary.
In the Emails tab, you can customize email settings to send the full invoice or a summary, attach a PDF, and personalize the subject line and greeting.
Finally, when you create invoices, you can easily bulk import invoices using SaasAnt Transactions.
7. Set Up Expense Settings
To configure your expense settings in QuickBooks Online setup, follow these steps:
Navigate to Settings -> Accounts and Settings -> Expenses.
Check the box for Show the item table on expenses if you manage inventory and want to mark an expense, bill, or check as an inventory purchase.
Enable Track expenses and items by customer to monitor expenses per customer or project—ideal for project-based businesses.
If you want to charge customers for expenses related to your work, check the box ‘Make expenses and items billable.’ You can also set a default markup rate for these expenses, which can be adjusted later.
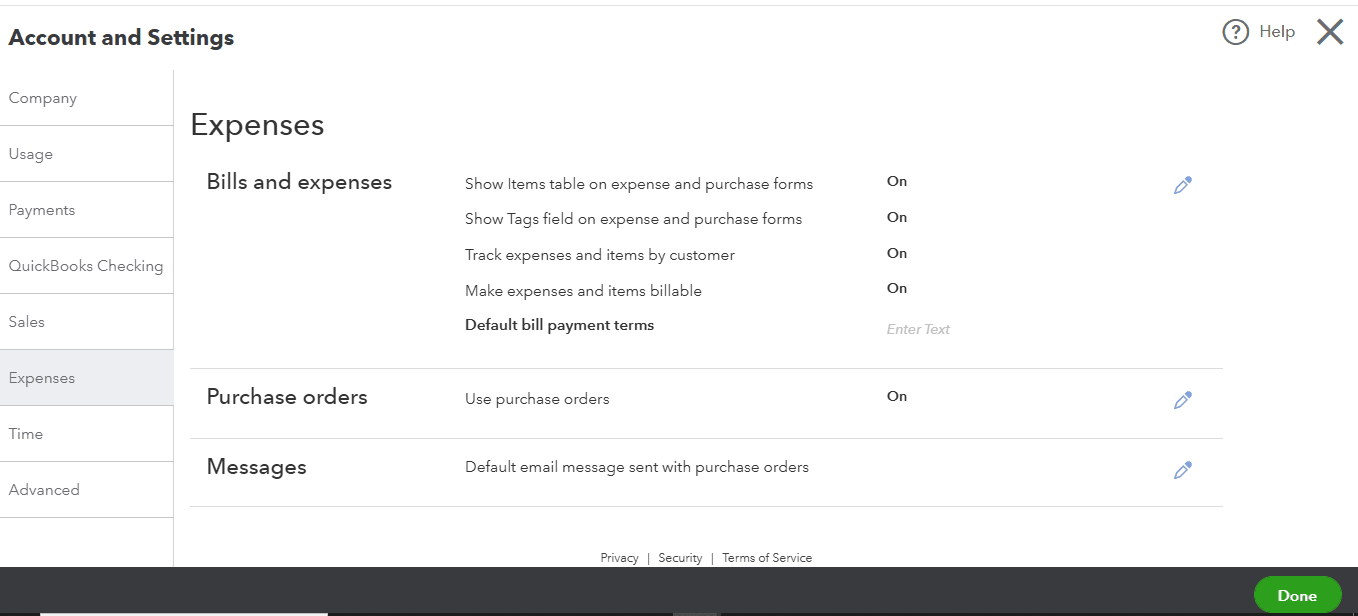
By default, customer repayments are tracked as income, allowing you to see both the reimbursement and the original expense. If you uncheck this option, QuickBooks will track everything under the same expense account, keeping your financial statements unaffected.
If you charge tax on billable expenses, make sure to check that box.
Use the Terms field to select standard payment terms from vendors so QuickBooks automatically applies them when entering new bills.
Finally, enable the Purchase Orders checkbox to send orders to your vendors and customize transaction numbers and email messages for purchase orders.
With these settings, you’ll enhance your QuickBooks Online setup for better expense management!
Note: You can also quickly bulk import expenses into QuickBooks using SaasAnt Transactions.
8. Add Users and Manage
Another important QuickBooks Online setup step is adding users. Inviting users to your QuickBooks Online account can be a great way to share the responsibility of managing your finances, depending on the access levels you choose to provide. QuickBooks offers five user types to fit your needs: Primary Administrator, Company Administrator, Standard Users, Reports Only Users, and Time Tracking Only Users.
To get started, simply click on Settings and select Manage Users. The person who originally set up the account will automatically be the Primary Administrator, but you can easily transfer that role to someone else if needed.
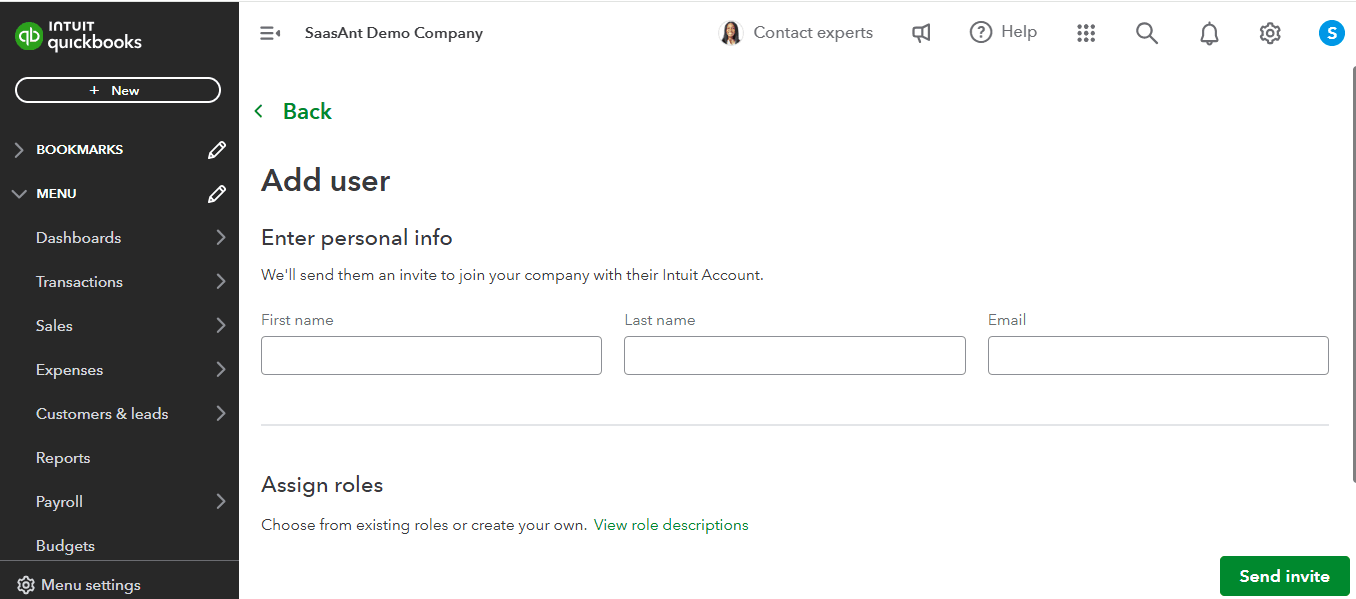
You have the flexibility to customize each user’s access level, allowing you to adjust permissions whenever necessary. This means you can tailor the experience based on what each user needs to do.
Additionally, QuickBooks Online includes an Audit Log feature, which is handy for tracking user activities. To check what a specific user has been up to, go to Settings, select Manage Users, find the user in question, and then choose View User Activity from the dropdown menu under the Action column. This way, you can keep an eye on everything while collaborating effectively with your team.
9. Connect Your Bank and Credit Card Accounts
The bank feed feature is a QuickBooks Online setup that can save you a lot of time. By linking your bank and credit card accounts, you can automatically download and categorize recent transactions, giving you real-time insights into your sales and expenses without the hassle of manual data entry.
If you need to include older transactions, you can easily upload historical data manually. This step is necessary if you want to capture any information that predates the connection of your bank accounts to QuickBooks Online. Just remember to check that your bank supports Open Banking before you start the linking process.
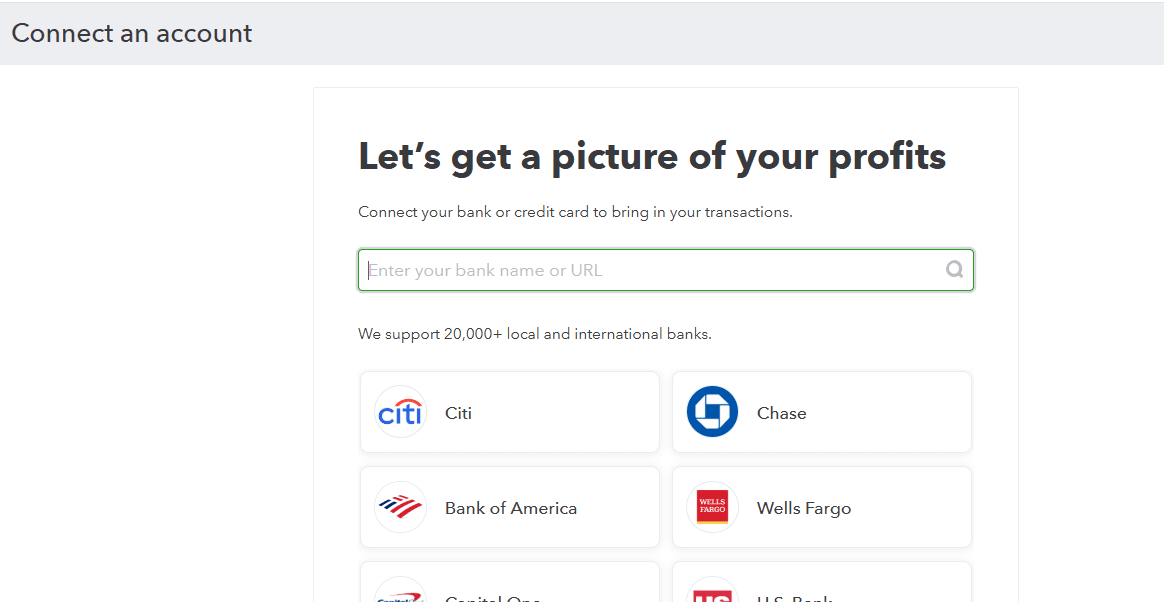
To connect your accounts, head to Transactions, select Bank Transactions, and then click on Connect Account. Choose your bank, login, and follow the prompts to complete the setup. If your bank isn’t compatible yet, you can still manually import your transactions. Once connected, you can also create bank rules to simplify the categorization process, making your bookkeeping even more efficient.
10. QuickBooks Payment
QuickBooks Payments is an integral part of QuickBooks setup. You can easily accept a variety of payment methods from your customers, including credit cards, Apple Pay, and bank transfers. You can add online payment options directly to your invoices or send a simple payment link. QuickBooks takes care of processing the payment and recording the transaction for you, all in one go! Your first payment should appear in your bank within five days, and after that, deposits are usually much quicker.
To get started, just go to Settings-> Account and Settings, and then click on the Payments tab. From there, hit Learn More to set up payments. You’ll need to enter your business details and save your progress. Remember, only the primary admin of your QuickBooks account can apply for payments.
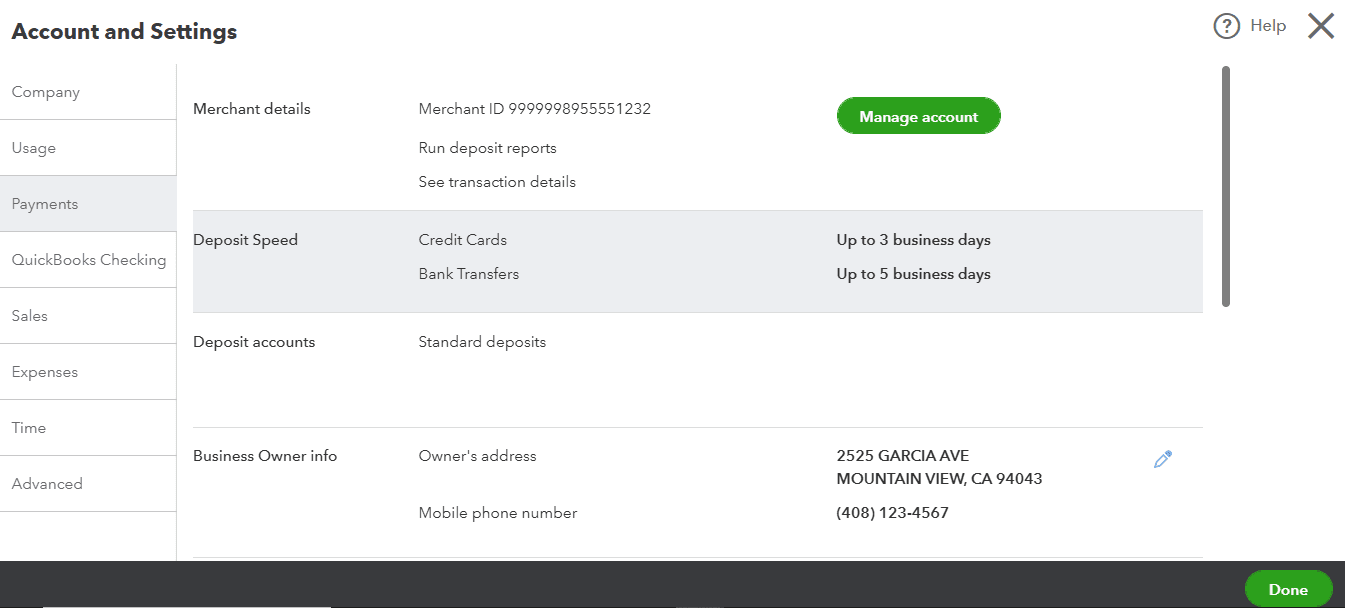
Next, decide where you want your payment deposits to go by adding your bank information. Once you’re done, click Review and Finish, then Get Set Up. You’ll receive an email from QuickBooks once you’re approved, usually within a couple of days. After that, you can manage your payment settings right from the payments tab.
Make QuickBooks Online Setup Efficient with SaasAnt Transactions
And that’s how you set up QuickBooks Online. Once you set up QuickBooks Online, your next step will be to import your financial data into QuickBooks. That’s when you need SaasAnt Transactions. You could have your financial statements in XLS, XLSX, CSV, IIF or PDF, and you still can bulk upload in QuickBooks. If you are migrating from another accounting software to QuickBooks, you can always contact SaasAnt’s support team for assistance. You can also get started with a 30-day free trial immediately.
FAQ
How to set up a QuickBooks Online account?
Begin by selecting a pricing plan that aligns with your business needs. Next, create an Intuit account and enter your basic business information. Connect your bank account and add any users who need access. Finally, use SaasAnt Transactions to import your existing accounting data into QuickBooks Online.
What is the first thing to do in QuickBooks Online?
The first step in QuickBooks Online is to set up your account. Begin by entering your basic information and connecting your bank account. After that, you can start importing your existing financial data into QuickBooks using SaasAnt Transactions.
Is QuickBooks Online easy to set up?
Yes, setting up your QuickBooks Online account is straightforward. Simply choose a plan that fits your business needs, create an Intuit account, enter your basic business details, connect your bank account, and import your existing financial data using SaasAnt Transactions.
What do I need to run QuickBooks Online?
To run QuickBooks Online effectively, you need accurate data for your business. Maintaining this data manually can be difficult, so it's best to integrate SaasAnt Transactions with QuickBooks Online. This allows you to bulk import your financial data, ensuring accuracy and saving time.