WooCommerce QuickBooks Integration
Why Automate Your WooCommerce Accounting? Running an e-commerce store comes with its share of challenges: from managing sales and inventory to keeping your financial records accurate. Manual data entry often leads to errors, wasted time, and frustration — which is why automating your bookkeeping with PayTraQer is a game-changer. By seamlessly connecting WooCommerce with QuickBooks Online, you can save hours each week, gain financial clarity, and focus on scaling your business.
How Does PayTraQer Help? Through a simple and secure integration process, PayTraQer automates the transfer of data between WooCommerce and QuickBooks Online. With customizable settings and advanced features, it adapts to your unique business needs, ensuring every transaction is synced accurately.
What Will You Achieve?
Real-time syncing of sales, refunds, and payouts.
Effortless reconciliation and error-free reports.
Peace of mind with up-to-date, compliant records.
WooCommerce QuickBooks Integration: A Step-by-Step Guide
Step 1: Connect QuickBooks Online to PayTraQer
Connecting your QuickBooks Online account to PayTraQer is the first step toward automating your WooCommerce store's financial processes. Follow these instructions to establish the connection:
1. Log in to QuickBooks Online
Go to QuickBooks Online.
Enter your master administrator credentials and access your QuickBooks Online company file.
2. Search for PayTraQer in the Intuit App Store
Navigate to the Apps section in QuickBooks Online or visit the Intuit App Store.
Search for PayTraQer in the search bar.
Select PayTraQer from the results and click on Get App Now.
3. Authorize PayTraQer to Access QuickBooks Online
You will be redirected to the PayTraQer application. Log in using your QuickBooks Online credentials.
A QuickBooks Online authorization screen will appear, asking you to grant access to PayTraQer.
Click the Connect button to grant permissions.
Once the connection is successful, a confirmation message will be displayed on the screen.
4. Activate the Free Trial
If this is your first time using PayTraQer, you can activate a 30-day free trial to explore its features.
Follow the prompts to complete the activation process.
5. Verify Connection
Open PayTraQer and ensure that your QuickBooks Online company file is listed as connected.
If there are any issues, check for error messages and troubleshoot using PayTraQer’s support resources.
Step 2: Connect WooCommerce to PayTraQer
With your QuickBooks Online account connected to PayTraQer, the next step is to link your WooCommerce store to enable seamless synchronization of e-commerce transactions. Follow these instructions to establish the connection:
1. Access PayTraQer’s E-Commerce Integration
Log in to your PayTraQer dashboard.
From the main menu, navigate to Settings (gear icon) > E-commerce Accounts.
Click the Add E-commerce Account button to start the integration process.
2. Select WooCommerce as Your E-Commerce Platform
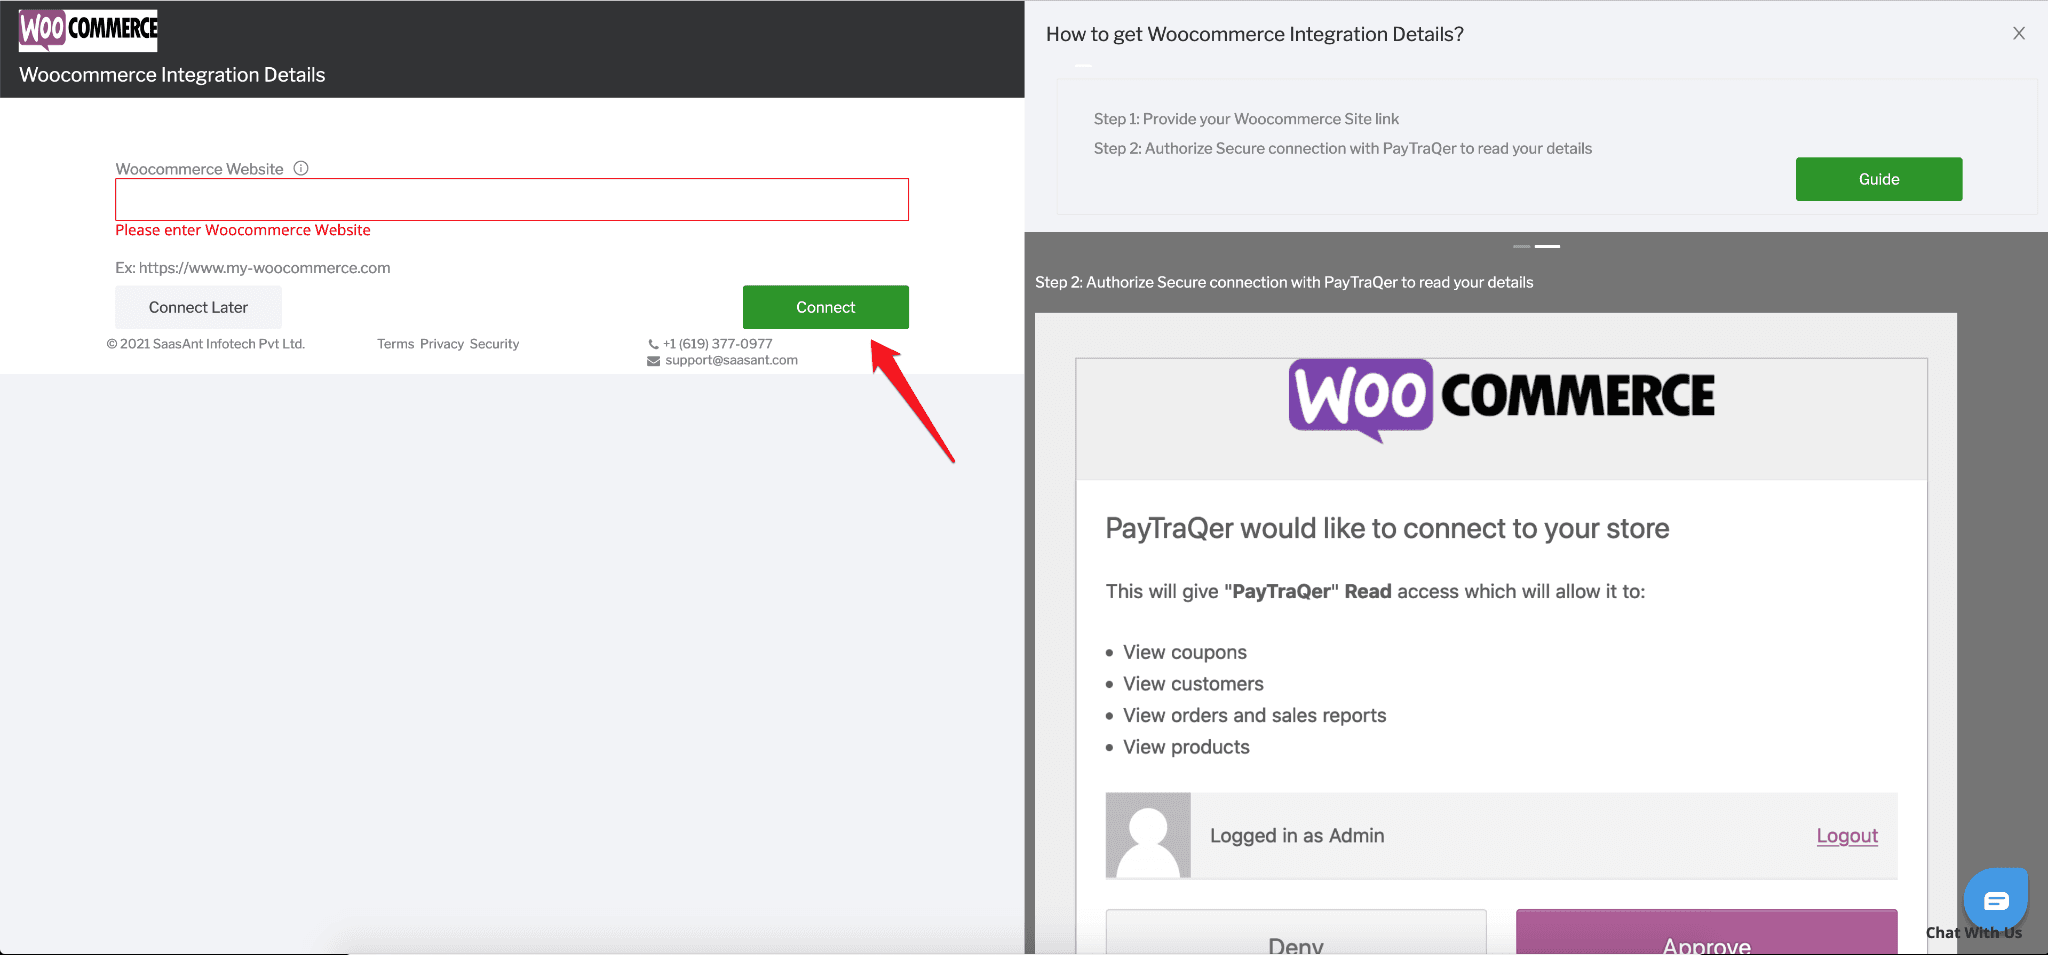
On the "Connect to E-Commerce" screen, find and select the WooCommerce tile.
Enter your WooCommerce store URL (e.g., https://yourstore.com) and click Connect.
3. Authorize the Connection
You will be redirected to the WooCommerce login page.
Log in to your WooCommerce account using your administrator credentials.
On the permissions screen, click the Approve button to grant PayTraQer access to your WooCommerce data.
Note: This connection is private and read-only, meaning PayTraQer will only retrieve and sync data but cannot make changes to your WooCommerce store.
4. Confirm the Connection
Once the connection is successfully established, you’ll see a confirmation message in PayTraQer.
Click Next to proceed to the settings configuration.
What’s Next?
After successfully linking WooCommerce to PayTraQer, you can move on to configuring the integration settings. This includes choosing between Express Settings (recommended defaults) or Detailed Settings for a more customized experience.
Step 3: Customize Your Integration Settings
Once your QuickBooks Online and WooCommerce accounts are connected to PayTraQer, the next step is to configure your settings. PayTraQer offers two setup options: Express Settings for quick and seamless integration or Detailed Settings for users with specific preferences.
Option 1: Express Settings
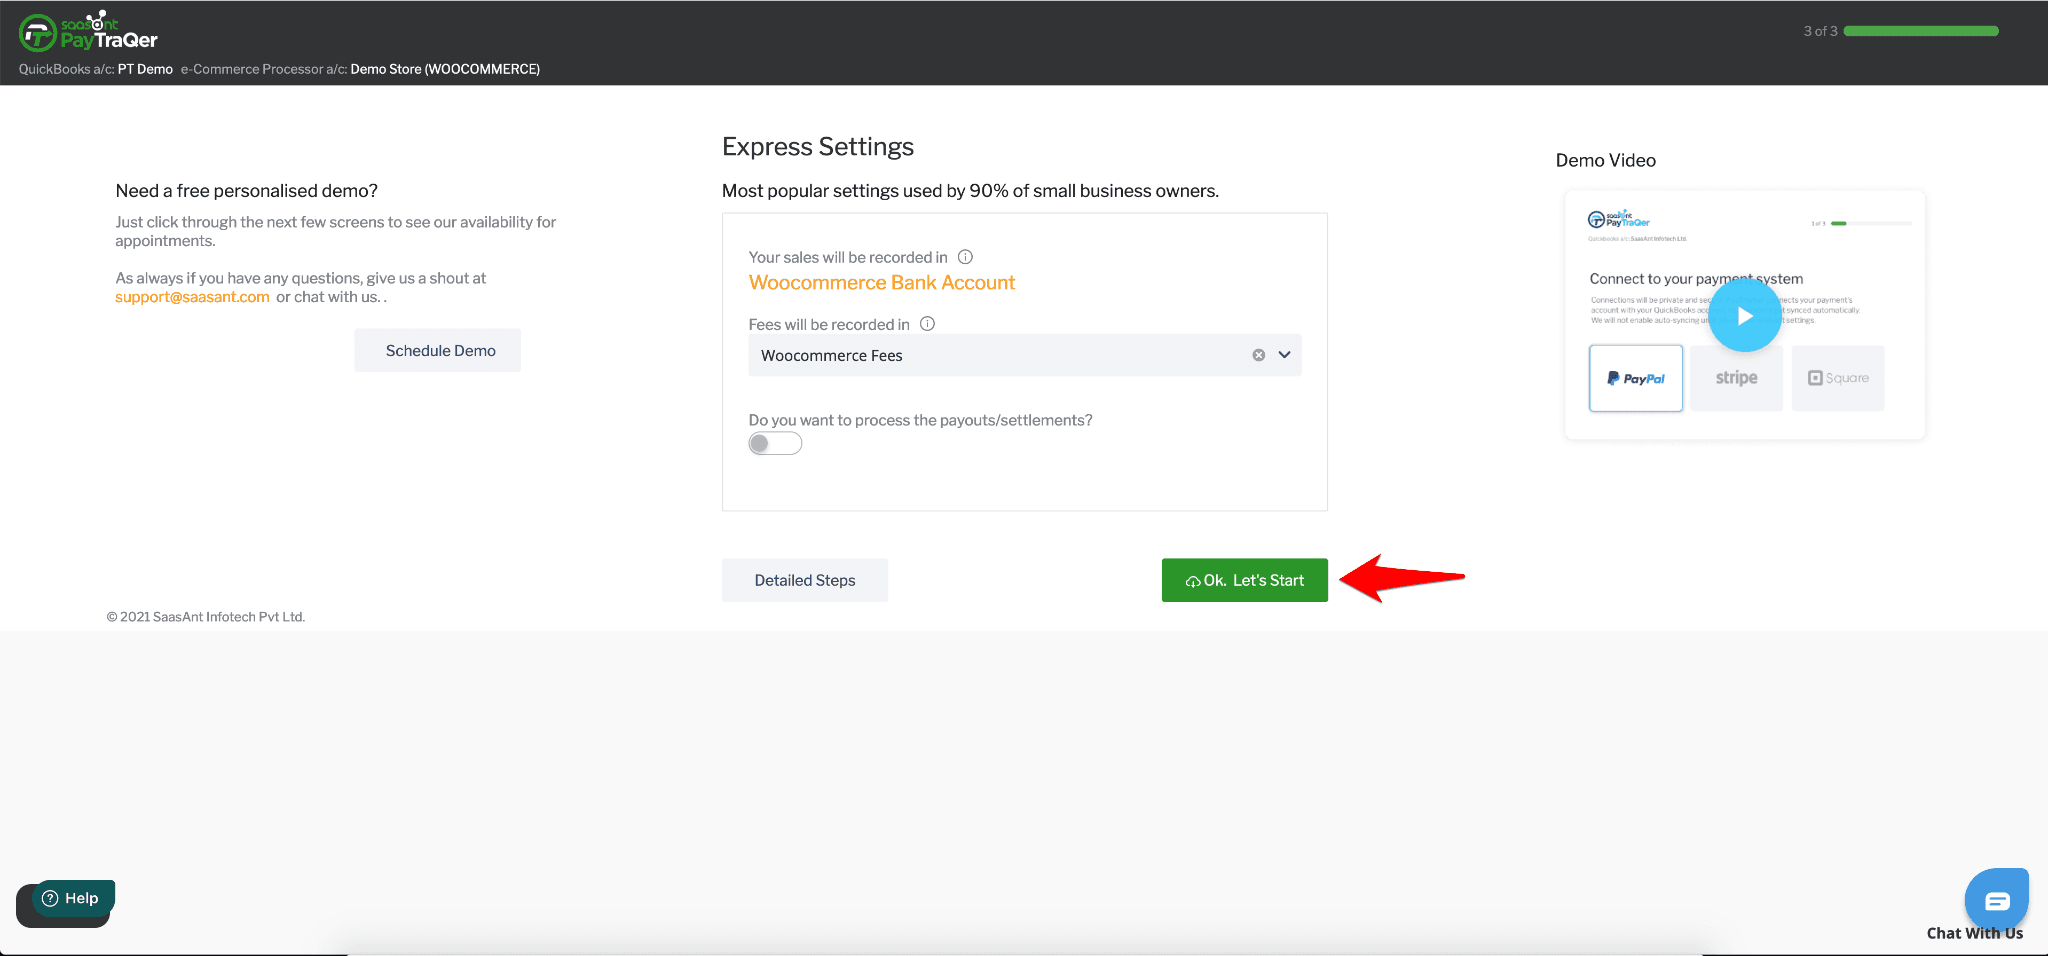
What It Is:
A default configuration designed by accounting experts for most WooCommerce-QuickBooks integrations.
How to Enable:
On the settings screen, click Ok, Let’s Start to apply Express Settings and begin syncing immediately.
Who It’s For:
Ideal for users looking for a quick start without needing customization.
What It Configures:
Sales transactions will be synced to QuickBooks Online with default mappings.
Missing products/services are auto-created during the sync process.
Option 2: Detailed Settings
What It Is:
A customizable setup allowing you to fine-tune how PayTraQer handles sales, products, fees, and payouts.
How to Access:
Click Detailed Steps on the settings screen to open the customization options.
Who It’s For:
Suitable for users with specific accounting or business requirements.
Detailed Settings Overview
Here’s how you can configure each setting in detail:
1. Sales Settings
Purpose: Defines how sales transactions are recorded in QuickBooks Online.
Options:
Default account mappings for accurate bookkeeping.
Specify how refunds and discounts are managed.
2. Product Settings
Purpose: Determines how WooCommerce products/services sync with QuickBooks Online.
Options:
Auto-Create Products: Automatically create missing products in QuickBooks Online during sync.
Product Matching: Match products by SKU or name between WooCommerce and QuickBooks.
3. Fee Settings
Purpose: Configures how WooCommerce fees are recorded in QuickBooks Online.
Options:
Set a default vendor (e.g., WooCommerce) for fees.
Assign a specific expense category and bank account for fee-related transactions.
4. Payout Settings
Purpose: Manages how WooCommerce payouts are recorded and reconciled in QuickBooks Online.
Options:
Enable "Process the Payout" and assign a Transfer To account for WooCommerce payouts.
Helps during reconciliation by categorizing payouts as transfers.
How to Save Your Settings
After selecting your preferred options in either Express or Detailed Settings, click Save to finalize your configuration.
You can revisit and adjust these settings anytime by navigating to Settings > Preferences in the PayTraQer dashboard.
Troubleshooting Tips
Settings Not Saving: Ensure you have admin access to both QuickBooks Online and WooCommerce.
Unmatched Products: Double-check that SKUs or names match exactly between WooCommerce and QuickBooks.
Payout Errors: Consult with your accountant if you're unsure about the best account to assign payouts to.
With your settings configured, PayTraQer is now ready to begin syncing your WooCommerce sales data with QuickBooks Online. In the next section, we’ll discuss how to sync transactions and review their statuses.
Step 4: Sync Transactions Between WooCommerce and QuickBooks Online
Now that your integration settings are in place, you can start syncing your WooCommerce transactions with QuickBooks Online. PayTraQer provides two primary syncing modes: Manual Sync and Automatic Sync. Here’s how to use each method effectively:
Option 1: Manual Sync
Manual Sync gives you full control over which transactions to sync.
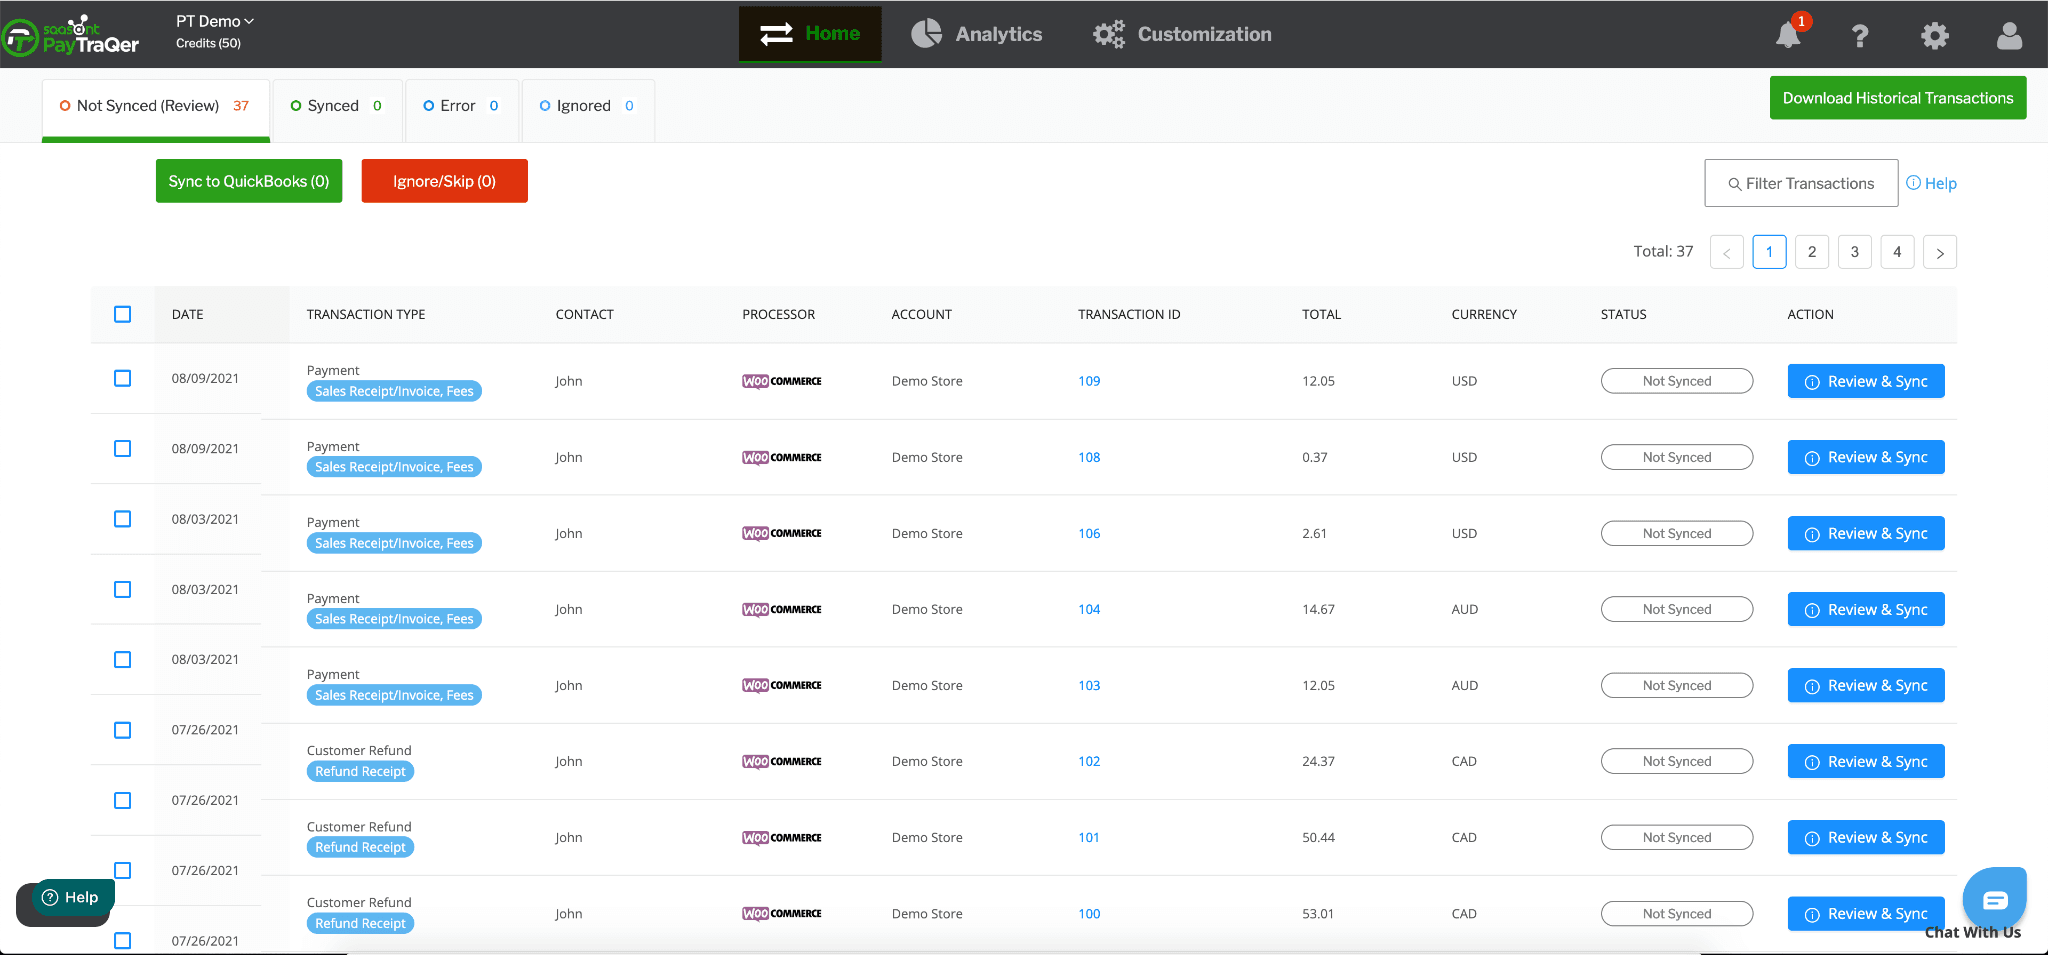
Access Unsynced Transactions
Log in to your PayTraQer dashboard.
Navigate to the Transactions tab, where you’ll find a grid view of all downloaded WooCommerce transactions.
Review Transactions
Inspect each transaction to ensure all details are accurate (e.g., amounts, customer names, and products).
Select the transactions you want to sync with QuickBooks Online.
Sync Selected Transactions
Click the Sync to QuickBooks Online button.
A progress indicator will display the syncing process, and you’ll receive a confirmation once it’s completed.
Ignore or Skip Transactions (Optional)
If there are transactions you don’t want to sync, select them and click Ignore/Skip. These will be moved to the Ignored tab for future reference.
Option 2: Automatic Sync
Automatic Sync allows real-time synchronization of WooCommerce transactions into QuickBooks Online without manual intervention.
Enable Automatic Sync
Go to Settings (gear icon) > Synchronization Options.
Toggle the Auto-Sync switch to On.
How It Works
Once enabled, PayTraQer will automatically sync all new WooCommerce transactions as they occur.
This feature is ideal for businesses with a high transaction volume or those seeking a hands-off approach.
Reviewing Synced Transactions
PayTraQer provides tools to monitor and manage synced transactions effectively:
Transaction Tabs:
Not Synced: Displays transactions pending synchronization.
Synced: Lists all successfully synced transactions.
Ignored: Contains transactions that were skipped during syncing.
Error: Displays transactions that failed to sync, along with error messages.
Resolve Errors:
Click on an error to view details and troubleshooting steps.
Common issues include mismatched SKUs or incorrect account mappings.
Tips for Efficient Syncing
Historical Transactions: Use the Download Historical Transactions option to retrieve and sync older transactions, as covered in a later section.
Real-Time Monitoring: Use the Home Dashboard to track the status of your syncs and identify any discrepancies quickly.
Clear Filters: When reviewing transactions, use filters to sort by date, amount, or customer for easier navigation.
What’s Next?
With your transactions syncing successfully, your QuickBooks Online data will now reflect the sales, refunds, and other transactions from your WooCommerce store. The next step is to ensure accurate reconciliation of these records within QuickBooks Online.
Step 5: Reconcile WooCommerce Transactions in QuickBooks Online
Reconciling transactions is the final step to ensure your books are balanced and your WooCommerce sales match your bank deposits in QuickBooks Online. PayTraQer simplifies this process by categorizing transactions and payouts.
1. Understand the Reconciliation Process
Reconciliation is the process of matching WooCommerce payouts with bank deposits in QuickBooks Online. With accurate records synced via PayTraQer, reconciliation becomes easier and less error-prone.
Key Accounts to Configure:
Clearing Account: Used to record WooCommerce sales and fees.
Bank Account: Actual bank account where payouts are deposited.
2. Match WooCommerce Transfers in QuickBooks Online
Navigate to Bank Feeds
In QuickBooks Online, go to Banking > Banking from the left-hand menu.
Select the bank account where your WooCommerce payouts are deposited.
Find WooCommerce Payouts
Locate WooCommerce payouts in the bank feed. These will appear as Transfers recorded by PayTraQer.
Match Transactions
Click on a transaction and select Match if it corresponds to a bank deposit.
Ensure that the transaction amount, date, and other details match the bank statement.
3. Complete the Reconciliation in QuickBooks Online
Start Reconciling
Navigate to Settings (gear icon) > Reconcile.
If reconciling for the first time, click Get Started.
Choose the Bank Account
Select the checking account tied to your WooCommerce payouts.
Verify that the Beginning Balance matches your bank statement.
Input Ending Details
Enter the Ending Balance and Ending Date from your bank statement.
Click Start Reconciling.
Match and Compare Transactions
Use filters like Payments or Deposits to narrow your view.
Check each transaction against your bank statement. Tick the checkbox for each matched transaction.
Resolve Differences
Ensure the Difference field reaches zero. Any unresolved differences could indicate missing or incorrect records.
Finish and Save
Once all transactions are reconciled, click Finish Now.
You can view and print the reconciliation report for your records.
Tips for Seamless Reconciliation
Use a Dedicated Clearing Account: Record WooCommerce sales and fees in a separate clearing account for better visibility during reconciliation.
Enable Payout Processing: In PayTraQer, turn on Payout Settings to group payouts as transfers, simplifying reconciliation.
Check for Errors: If there are discrepancies, revisit the Error Tab in PayTraQer to identify and fix syncing issues.
Pro Tip:
For large transaction volumes, schedule a regular reconciliation cadence (e.g., weekly or monthly) to keep your books updated and avoid backlogs.
What’s Next?
With reconciliation complete, your QuickBooks Online account now accurately reflects your WooCommerce sales. To further optimize your workflow, explore advanced features in PayTraQer, like custom reporting or multi-channel integrations.
Conclusion and Additional Resources
With the integration of WooCommerce and QuickBooks Online using PayTraQer complete, your e-commerce business is now equipped with an automated and efficient bookkeeping solution. Here's a summary of what we've covered and additional resources to help you make the most of PayTraQer.
Summary of Steps
Prerequisites: Setting up QuickBooks Online, WooCommerce, and PayTraQer with necessary admin credentials.
Connecting Accounts: Linking QuickBooks Online and WooCommerce to PayTraQer securely.
Customizing Settings: Configuring Express or Detailed Settings for transactions, products, fees, and payouts.
Syncing Transactions: Using manual or automatic syncing to transfer WooCommerce sales data into QuickBooks Online.
Reconciling Records: Matching WooCommerce payouts with bank deposits in QuickBooks Online for balanced books.
Why PayTraQer?
PayTraQer stands out with its:
Ease of Use: Intuitive interface and Express Settings for quick setup.
Advanced Features: Options for detailed settings, automatic syncing, and custom reporting.
Scalability: Supports large transaction volumes and historical data sync.
Customer Support: Email support and personalized demo sessions for resolving issues.
Additional Resources
To further optimize your experience, explore the following:
FAQs and Troubleshooting:
Visit our Help Center for answers to common issues and detailed guides.
Advanced Customizations:
Learn how to configure multi-channel integrations, tax settings, and complex workflows using our support articles.
Demo and Support:
Schedule a free demo session for personalized assistance.
Contact our support team at support@saasant.com for queries or troubleshooting.
Pro Tips for Long-Term Success
Review Sync Logs Regularly: Monitor PayTraQer’s transaction logs to ensure everything syncs accurately.
Use Filters for Reporting: Customize QuickBooks Online reports to gain insights into sales trends and expenses.
Schedule Routine Maintenance: Periodically check for updates in both WooCommerce and QuickBooks Online to maintain compatibility.
By following this guide and utilizing the provided resources, you can achieve seamless accounting automation for your WooCommerce store, saving time and reducing errors.
Frequently Asked Questions (FAQs)
Can QuickBooks integrate with WooCommerce?
Yes, QuickBooks Online integrates seamlessly with WooCommerce using tools like PayTraQer. PayTraQer automates the synchronization of transactions, refunds, payouts, and more, ensuring your accounting records are always up-to-date.
How do I integrate QuickBooks with WordPress?
QuickBooks does not directly integrate with WordPress. However, if your WordPress site uses WooCommerce, you can connect WooCommerce to QuickBooks Online through PayTraQer or similar integration tools.
Can QuickBooks integrate with my website?
If your website uses a compatible e-commerce platform like WooCommerce, you can integrate it with QuickBooks Online. Tools like PayTraQer handle this integration, syncing sales, refunds, and other financial data automatically.
Is QuickBooks good for an e-commerce business?
Yes, QuickBooks Online is highly beneficial for e-commerce businesses. It automates bookkeeping tasks, provides accurate financial reports, and simplifies tax preparation, making it easier to manage growing e-commerce operations.
Can I sync historical WooCommerce transactions with QuickBooks?
Yes, PayTraQer allows you to download and sync historical WooCommerce transactions, including older sales data, ensuring comprehensive financial records.
What if I encounter errors during syncing?
PayTraQer provides detailed error logs and troubleshooting guides to help you resolve syncing issues. You can also reach out to their support team for assistance.