How to Setup QuickBooks Desktop Detailed Guide
We get it; finding solid guides for QuickBooks Desktop setup can be a challenge, especially when there are so many more resources for the online version. Whether you’re switching from QuickBooks Online or just starting fresh with QuickBooks Desktop, we’re here to help you every step of the way. In this blog, we’ll walk you through the complete QuickBooks Desktop setup process, from downloading and installing the software to setting up your company profile and importing your data.
It’s not just about getting it installed; we’ll also share tips on backup measures to ensure you have a smooth accounting experience. Plus, we’ll introduce you to SaasAnt Transactions Desktop, a fantastic QuickBooks Desktop add-on that makes importing transactions a breeze. Let’s dive in to see how to get started with QuickBooks Desktop.
How to Download QuickBooks Desktop
First step in QuickBooks Desktop Set up is to install Quickbooks Desktop.
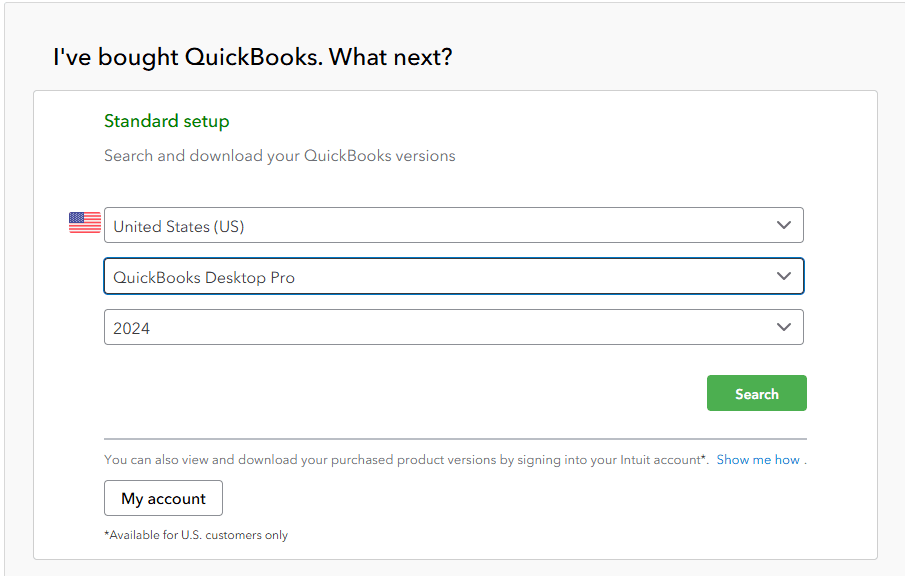
Step 1: Visit the QuickBooks download page. Select your region, product, and version, then click search and download the software.
Step 2: If the installation doesn’t start automatically, find the install file named quickbooks.exe on your desktop or in your downloads folder and double-click it to begin.
Step 3: Read the license agreement and click ‘accept and continue’ to proceed.
Step 4: Enter your license and product numbers. If you don’t have them, click ‘locate your license/product number’ to retrieve it using your business phone number or by logging into your Intuit account.
Step 5: After entering the numbers, click next. Choose the “express” option for a standalone installation or “custom” for a server setup. For more details, select ‘Explain these choices in detail.’
Step 6: Click Next to start the installation. Once QuickBooks Desktop is installed, open the program. If prompted, reboot your computer.
Step 7: Select begin activation, and you’re all set! You can now create a new company or restore an existing file.
QuickBooks Desktop Setup in 7 Steps
This guide covers how to use Quickbooks Desktop as a beginner starting from setting up the company to setting up sales tax.
1. How to Create a New Company in QuickBooks Desktop
Open QuickBooks Desktop.
Click on “My company” and select "Create a new company."
You will have two setup options:
Select Express Start for a quick setup. You only need to provide your business name, industry, and type, and you can add more details later.
Choose Detailed Start if you want to set everything up thoroughly from the start.
Follow the instructions to complete the setup. Remember, if you already have a company file in QuickBooks, make sure to give your new one a different name to avoid overwriting any existing data.
2. How to Set up Existing Company in QuickBooks Desktop
Access the File menu and select "Open or Restore Company."
Click on "Open a company file," then press Next.
Locate the folder where your company file is saved.
Select the company file (which should have a .qbw extension) from the list and click Open.
If asked, enter your username and password.
3. Setup Customers, Items and Services
Once you are done adding your company file, the next natural step in QuickBooks Desktop setup is to set up customers, items and services.
Step 1: Set Up Customers
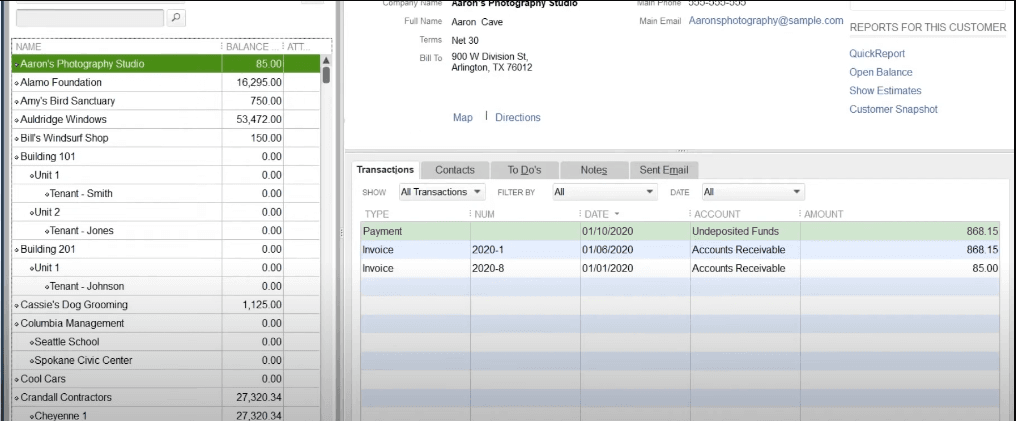
Start by selecting "Customers" from the menu. A list of customers will appear. Clicking on a customer’s name will display their contact details and past transactions. Indented names indicate jobs assigned to the customer above.
Step 2: Create a New Customer or Job
To add a new customer or job, click on "New Customer and Job" at the top. Fill in the customer name and job information. QuickBooks will remember this information for future transactions and reports.
Step 3: Set Payment Terms
If you offer customers a specific number of days to pay their invoices, select "Payment Settings" and assign the appropriate payment terms.
Step 4: Edit Existing Customers or Jobs
To modify an existing customer or job, double-click their name in the list.
Step 5: Set Up Items and Services
Next, create your items and services list. Click on "Item" at the bottom of the screen, then select "New." Fill in the details for what you charge. Most items will be services or non-inventory items. If you want QuickBooks to track your inventory, set it up as an inventory item. Don’t forget to enter the price and the account that tracks revenue from sales.
Step 6: Choose Your Sales Recording Workflow
There are two main workflows for recording sales in QuickBooks, depending on when you collect payments. If you provide services or goods before receiving payment, start by recording an invoice. Most service businesses use invoices to track who owes them money, and this process may begin with an estimate if requested by the customer.
Step 7: Use Sales Receipts for Immediate Payments
If you collect payment right away, use a sales receipt. This method is common for retail businesses and restaurants that don’t have a point-of-sale app integrated with QuickBooks.
Step 8: Record Sales Details
Once you determine the best workflow for your business, open the appropriate form. Record the customer’s name, the date of the sale, the item or service provided, and any other relevant details.
Note: You can easily skip tedious manual entry by bulk importing your customers, items, and services. Simply integrate SaasAnt Transactions for a seamless and efficient import process.
4. QuickBooks Desktop Employees
Before you can pay your employees in QuickBooks Desktop, you’ll need to create profiles for them. Note: the following steps are the same for all versions of QuickBooks Desktop Payroll.
This section covers QuickBooks Desktop direct deposit setup and QuickBooks Desktop payroll setup.
Step 1: Obtain a W-4 form from your employee, which contains personal information and any deductions. In QuickBooks, go to Employees > Employee Center, then select New Employee.
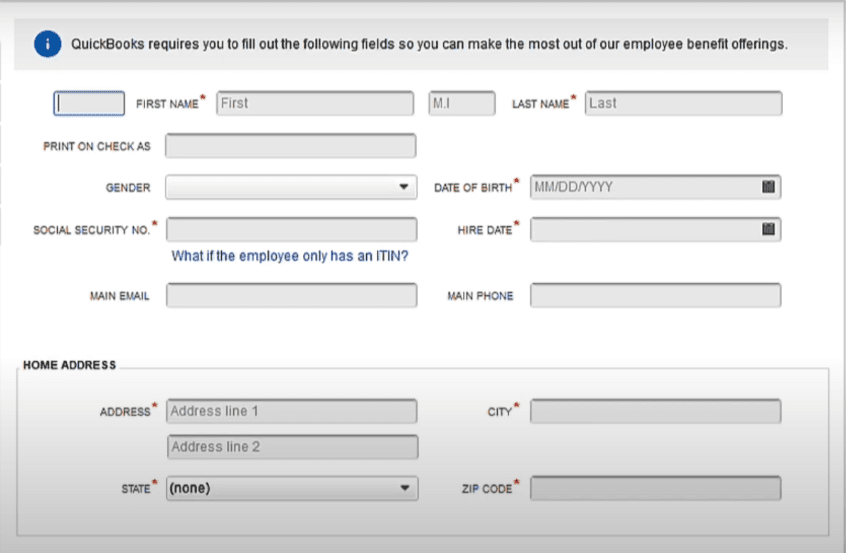
Step 2: Fill in the required fields, including the employee’s name, Social Security number, date of birth, hire date, and address. Check the personal info tab for additional useful fields.
Step 3: In the additional info tab, you can add contacts or create custom fields for your business.
Step 4: Go to the payroll info tab, select the pay schedule, and enter the payroll frequency. Choose the payroll item in the earnings field and enter the pay rate, along with any deductions like health insurance or 401(k) contributions.
Step 5: For direct deposit, select the deposit button and enter the employee’s bank account and routing number. Request a voided check to ensure accuracy.
Step 6: Click on Taxes to add tax information based on the W-4 year. Complete the necessary fields, including state withholding.
Step 7: Use the sick and vacation buttons to track accruals if needed.
Step 8: Finally, select the worker’s comp code for your employee. Note that QuickBooks doesn’t automatically pay worker’s compensation; you must handle that separately. Once finished, select save and close.
Note: You can also bulk import your employee list without having to go through the tedious manual entry using SaasAnt Transactions.
5. Integrate SaasAnt Transactions
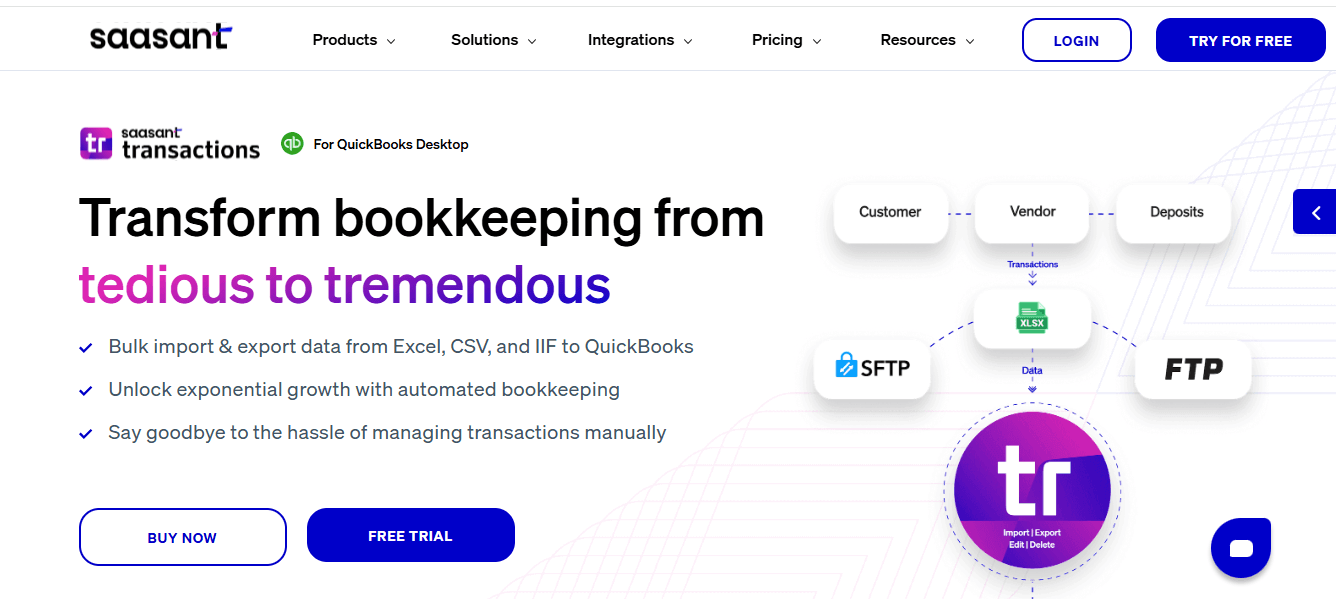
By now you would have noticed that a lot of the QuickBooks Desktop setup is about entering data. If you're a new QuickBooks user, you know how overwhelming the setup process can be. That’s where SaasAnt Transactions becomes an essential, affordable add-on for your QuickBooks Desktop setup. It simplifies importing your existing financial data, allowing you to focus on what truly matters—growing your business.
With SaasAnt Transactions, you can easily import all your QuickBooks entities, from invoices and expenses to customer and vendor lists, eliminating tedious data entry. Plus, if you need to export your financial data for safekeeping or sharing, it’s a breeze to create a local copy on your flash drive.
Managing financial data can be daunting, especially when you need to make bulk changes or deletions. SaasAnt Transactions allows you to do just that, giving you the flexibility to manage your data effectively. You can also create secure backups via Email or FTP/SFTP folders, ensuring your information is safe.
And for added convenience, SaasAnt Transactions supports automated data imports through email, or FTP/SFTP. Best of all, you can try it risk-free with a 30-day free trial. Let SaasAnt Transactions be your trusted partner in achieving a smooth QuickBooks Desktop setup!
Quick Instructions for Bulk Import Using SaasAnt Transactions
Download the app from SaasAnt Transactions Desktop Page and click the Import button on the home screen.
Select the QuickBooks transaction type (Bill, Invoice, Expense, Journal Entry, etc.) and choose your file.
Click Next to access the mapping screen.
Map QuickBooks fields to the uploaded file headers.
Ensure your file has headers for proper mapping.
After mapping, click Next for a final review.
Edit any grid entries as needed to verify data.
Once confirmed, select Send to QuickBooks for a successful import. Use the QB symbol to open the transaction directly in QuickBooks.
6. Opening Balance in QuickBooks Desktop Setup
Gather Information: Obtain your bank statements or log into your bank's website.
Access Chart of Accounts: In QuickBooks, go to the Company menu and select Chart of Accounts.
Create a New Account: Right-click in the Chart of Accounts and choose New. Select Bank or Credit Card as the account type, then click Continue.
Name Your Account: Give your account a unique name, especially if you have multiple accounts at the same bank. Fill in the remaining fields.
Enter Opening Balance: Click Enter Opening Balance. If you need to edit it later, use the Change Opening Balance button.
For Summarized Transactions: If you won’t enter older transactions, enter the ending balance and date from your latest bank statement, then select OK. This summarizes past transactions, allowing you to track new ones going forward.
For Detailed Transactions: If you want to track past transactions, choose a date older than the oldest transaction you want to include. Enter this date in the Ending date field and the corresponding balance in the Ending balance field, then select OK.
Save Your Changes: Once finished, click Save & Close to record the opening balance.
For other account types like Fixed Assets or Liabilities, follow similar steps, ensuring you enter accurate opening balances. If you have questions, consult your accountant for guidance.
7. Setting up Sales Tax
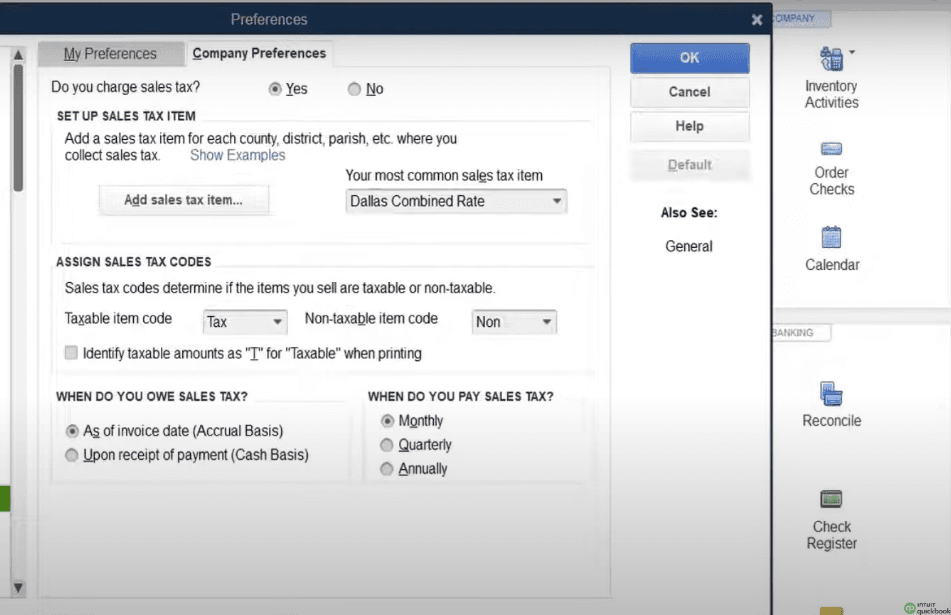
Step 1: To set up sales tax in QuickBooks, first enable the sales tax preference by selecting Edit > Preferences > Sales Tax. Next, add individual sales tax items for each rate you charge customers, as rates vary by location.
Step 2: To set the state rate, name the sales tax item after your state, enter the applicable rate, and choose the tax agency you pay. If the agency isn’t listed, select Add New.
Step 3: For city rates, repeat the process by naming the item after your city and entering the corresponding rate and agency. Continue adding rates until all individual rates are set up.
Step 4: To combine these rates, select Add Sales Tax Item and then Sales Tax Group. Name the group and select all applicable rates, then click OK.
Step 5: Once your sales tax rates are established, choose the one you typically charge customers, usually the combined group rate. When setting up new customers or items, use these codes to mark them as taxable or nontaxable. If your state requires reporting for nontaxable sales, create a new code for that purpose.
Step 6: Finally, select your sales tax payment method: accrual basis for invoice dates or cash basis for paid invoices. Choose how often you pay sales tax and click OK.
Make QuickBooks Desktop Setup Efficient with SaasAnt Transactions
Hope you got the hang of how to set up QuickBooks Desktop now. Once you set up QuickBooks Desktop, your next step will be to import your financial data into QuickBooks. That’s when you need SaasAnt Transactions. You could have your financial statements in XLS, XLSX, CSV, IIF or PDF, and you still can bulk upload in QuickBooks. If you are migrating from another accounting software to QuickBooks, you can always contact SaasAnt’s support team for assistance. You can also get started with a 30-day free trial immediately.
FAQ
How do I set up QuickBooks Desktop?
Start by downloading and installing QuickBooks Desktop and then set up your company file. The next step is to import your existing financial data using SaasAnt Transactions. Finally, set up sales tax.
Can I still use my QuickBooks desktop after May 2024?
No, you will not be able to use older versions of QuickBooks Desktop after May 31, 2024, unless you upgrade to a newer version. Intuit will gradually discontinue support for older versions of QuickBooks Desktop.
How to install QuickBooks Desktop on a new computer?
To install QuickBooks, visit the download page, select your region, product, and version, then download the software. If installation doesn’t start, find quickbooks.exe on your desktop or in downloads and double-click it. Accept the license agreement, enter your license and product numbers, choose your installation type, and follow the prompts to complete the setup.
How to setup QuickBooks for the first time?
Go to the QuickBooks download page and install. Set up your company file first. Then integrate SaasAnt Transactions to import all your existing financial data into QuickBooks Desktop. Then finally set up payroll and sales tax.