Shopify QuickBooks Integration - A Complete Guide
Shopify QuickBooks integration is just what you need to keep your Shopify sales data centralized and easy tracking of your financial performance. You could be a Shopify merchant or an accountant for a Shopify merchant trying to simplify the complexities of Shopify fees, taxes, refunds, and reconciliation. But the trouble with Shopify QuickBooks integration is an error often seen by QuickBooks users - “uh oh, there’s a connection problem.” or “bringing in data,” but it never brings in any data.
You need a solution like PayTraQer that connects Shopify with QuickBooks effortlessly and automates the transfer of sales, expenses, and inventory information, saving you time and effort. The best part is that it comes with a 15-day free trial and has a 4.7 rating from around 700 users in the QuickBooks App Store.
Let’s dive into this step-by-step Shopify and QuickBooks Online integration guide to simplify your Shopify bookkeeping.
Contents
How do Shopify and QuickBooks connect?
What Kind of Account Is Shopify Categorized as in QuickBooks?
Quick Instructions: How do I integrate Shopify with QuickBooks?
Shopify Quickbooks Integration using PayTraQer: Step-by-Step Instructions
The Shopify Reconciliation Report using PayTraQer
Advanced Features of Shopify QuickBooks Integration using PayTraQer
Get Shopify QuickBooks Integration Today
FAQ
How do Shopify and QuickBooks connect?
You might wonder, does Shopify integrate with QuickBooks? Yes, Shopify and QuickBooks connect through PayTraQer, making it one of the best Shopify QuickBooks integrations available. This tool simplifies the process by automating the transfer of Shopify data, such as sales, expenses, and inventory information, between the two platforms.
With this Shopify integration with QuickBooks, you can ensure that your financial records are accurate and up-to-date without the hassle of manual entry. This connection saves you time and helps you maintain a clear overview of your business’s financial health, allowing you to focus on what really matters—growing your business.
What Kind of Account Is Shopify Categorized as in QuickBooks?
In QuickBooks, a Shopify account is typically categorized as a bank account. When you integrate Shopify with QuickBooks, transactions from your Shopify store—such as sales, refunds, and fees—are recorded similarly to transactions in a traditional bank account. This setup allows you to accurately track your income and expenses, reconcile your accounts, and generate effective financial reports.
Depending on your accounting needs, you may also categorize specific Shopify transactions under different income or expense accounts. This flexibility helps you maintain a clear view of your financial health and make informed business decisions.
Quick Instructions: How do I integrate Shopify with QuickBooks?
Install PayTraQer: Find and install PayTraQer from the Intuit App Store.
Grant access: Allow PayTraQer to access your QuickBooks Online account.
Connect Shopify: Go to Settings > ‘E-commerce Accounts’ and select ‘Shopify.’
Authorize PayTraQer: Sign in to your Shopify account and authorize PayTraQer.
Shopify Quickbooks Integration using PayTraQer: Step-by-Step Instructions
This section details the step-by-step process of importing transactions from Shopify into QuickBooks Online. QuickBooks and Shopify integration with PayTraQer seamlessly allows you to connect Shopify to QuickBooks Online and sync your financial data, eliminating manual entry and ensuring accuracy.
Step 1: Access QuickBooks Online
Log in to your QuickBooks Online account using your credentials.
Step 2: Install PayTraQer
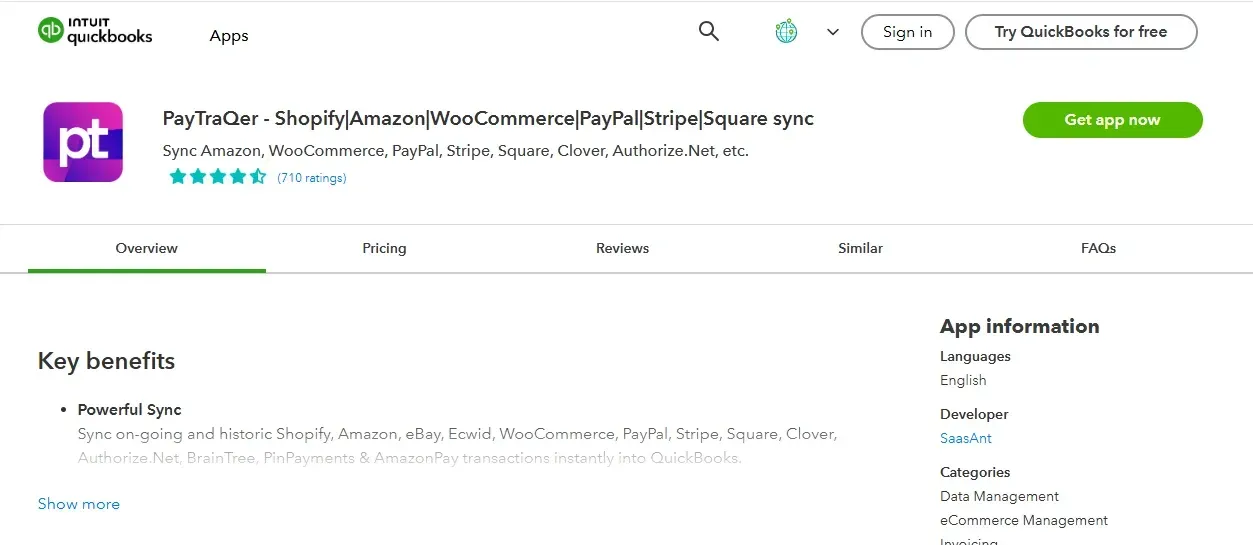
Search for "PayTraQer" in the Intuit App Store and install the app.
Step 3: Connect QuickBooks Online
Sign up for PayTraQer using your QuickBooks Online credentials. Grant PayTraQer access to your QuickBooks Online account by clicking the "Connect" button.
Step 4: Connect to Shopify
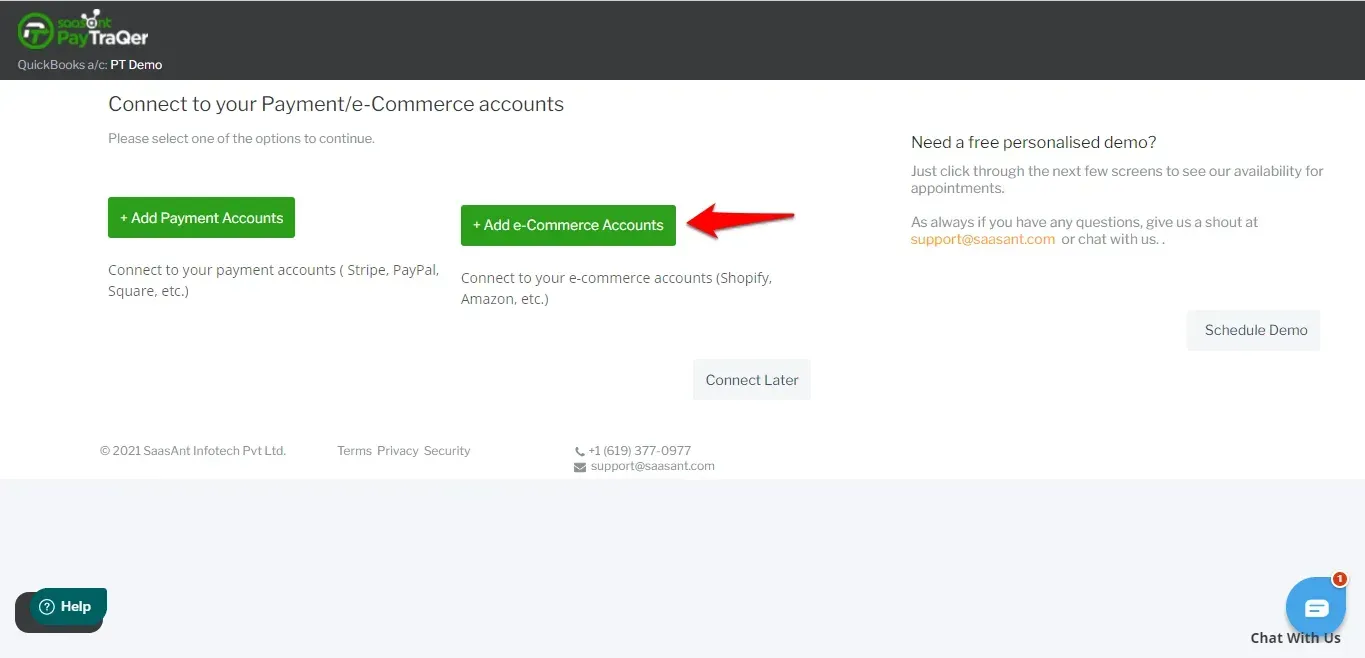
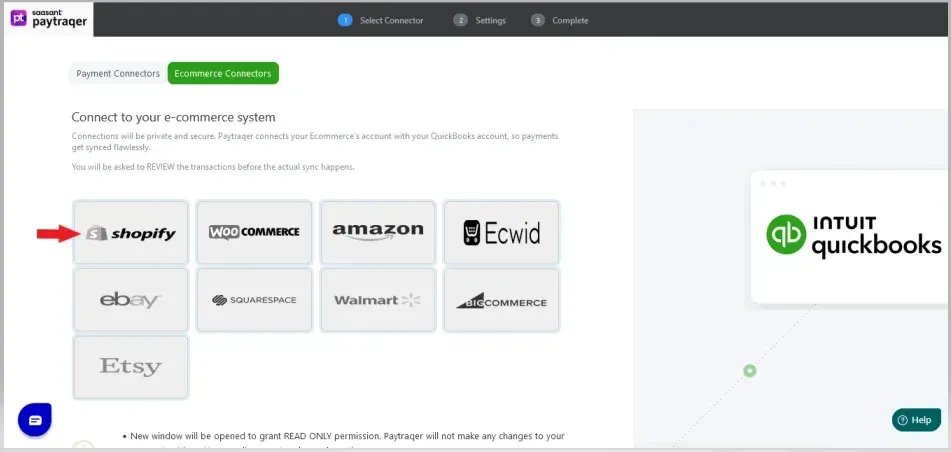
Navigate to the "Settings" icon and select "E-commerce Accounts." Choose the "Shopify" tile.
Step 5: Log in to Shopify
Enter your Shopify credentials to connect your Shopify account to PayTraQer.
Step 6: Confirm Connection
Once the connection is established, you will receive a success message indicating that Shopify has been successfully connected to PayTraQer.
Step 7: Configure Quickstart Settings
After connecting your Shopify website to PayTraQer, choose between Express Settings for a quick setup or Detailed Settings to customize your preferences, including managing Sales, Products, Fees, and Payouts. These settings will assist in generating your Shopify Reconciliation Report. You'll be directed to the dashboard afterward.
The Shopify Reconciliation Report using PayTraQer
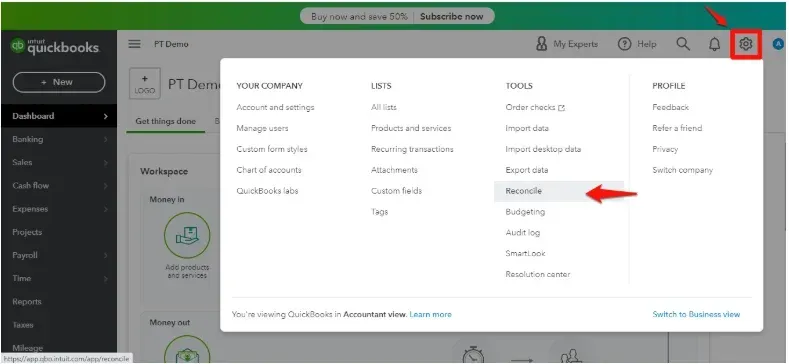
Step 1: In QuickBooks Online, select the Settings icon and select Reconcile.
If this is your first reconciliation, click Get Started.
Step 2: From the Accounts dropdown menu, select the Checking account you wish to reconcile. Your beginning balance will be displayed under the selected account. Ensure that this beginning balance matches the one on your bank statement.
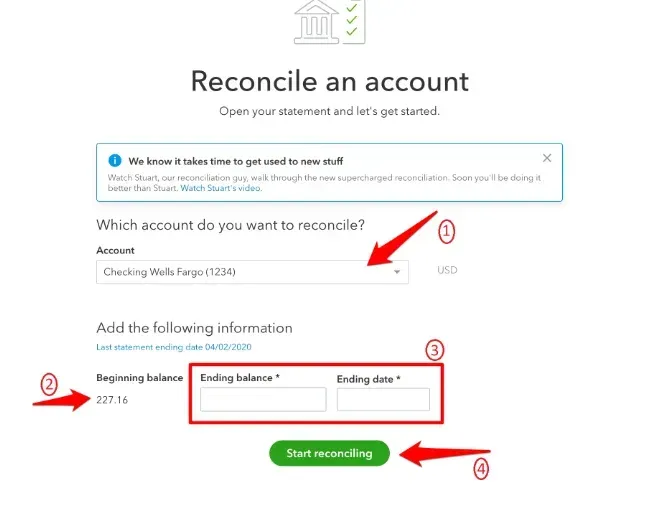
Step 3: Enter the Ending Balance and Ending Date. Click the Start Reconciling button to proceed to the reconciliation page.
Compare & Match the Statements
All your transactions recorded in QuickBooks Online will be shown on the screen. Review each transaction and compare them individually with your bank statement. There is a checkbox next to each transaction; mark it when you find a match in the bank statement.
Leave unchecked any transactions not found in the bank statement. Transactions that were previously matched and categorized will be automatically checked.
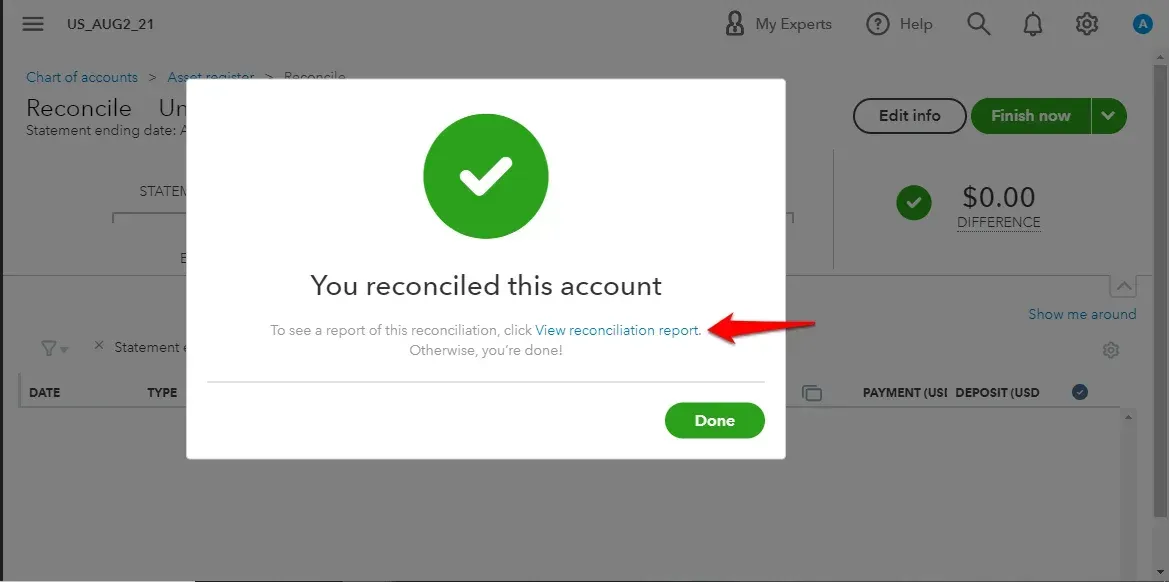
Once completed, click the Finish Now button. You will see a success message. To view and print your reconciliation report, click on the View reconciliation report button.
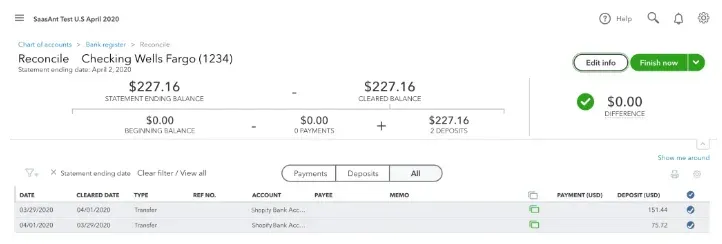
With PayTraQer, you will not overlook any transactions or encounter duplicate issues. With accurate records, you can maintain perfectly balanced books without complications.
Additional Tips
For easier categorization, you can select Payments or Deposits.
You can also search for transactions using the filter option.
Continue this process until the difference is reduced to zero.
Once you have checked all transactions from your bank statement, you should achieve a zero difference in your accounts.
Advanced Features of Shopify QuickBooks Integration using PayTraQer
Here’s a quick overview of the advanced features of PayTraQer for Shopify business owners.
Secure API Integration: Connects directly to your Shopify account and QuickBooks/Xero.
Automatic Data Import: Imports Shopify orders, refunds, and fees with detailed breakdowns.
Transaction Matching: Matches Shopify transactions with bank transactions.
Categorization: Automatically categorizes transactions for easy reconciliation.
Customization: Allows customization of import settings, transaction types, and tax mapping.
Transaction Review: Enables review and editing of transactions before import.
Analytics and Insights: Provides reports on sales, expenses, cash flow, and profitability.
Multi-Platform Integration: Works seamlessly with other e-commerce platforms and payment gateways.
Get Shopify QuickBooks Integration Today
There you have it. We have seen Shopify QuickBooks Integration and how to set it up. This integration simplifies managing cash flow, tracking expenses, and staying organized, eliminating the hassle of manual data entry and reducing errors. With the best Shopify QuickBooks integration like PayTraQer, you can easily sync your data and gain valuable insights into your business. Get started with a 15-day free trial and experience how much easier your online accounting can be, allowing you to focus on growing your business while ensuring your financial management is efficient and accurate.
FAQ
Does Shopify integrate with QuickBooks?
Yes, Shopify integrates with QuickBooks through PayTraQer. This integration allows you to automatically sync your Shopify sales, refunds, and fees into QuickBooks, simplifying your Shopify bookkeeping and ensuring accurate financial records without the need for manual data entry.
How do I reconcile Shopify in QuickBooks?
To reconcile in QuickBooks Online, go to Settings > Reconcile. Select your Checking account and ensure the beginning balance matches your bank statement. Enter the Ending Balance and Date, then click Start Reconciling. Compare transactions with your bank statement, checking off matches. Click Finish when done to view your reconciliation report.
How to transfer data from Shopify to QuickBooks?
Integrate PayTraQer with QuickBooks and your Shopify account to transfer your Shopify data into QuickBooks. This integration allows you to automatically sync your Shopify sales, tax refunds, and fees into QuickBooks and takes care of reconciliation too.
How do I get started with the Shopify and QuickBooks integration?
To start, install PayTraQer from the Intuit App Store, grant it access to your QuickBooks account, and connect your Shopify account. Follow the step-by-step instructions to sync your financial data effortlessly.