How to Create a Simple Inventory Management System?
Inventory management can be a daunting task for both big and small retailers. And it’s also hard to choose the right software among the plethora of options available. Affordability is again a bigh factor in the final choice.
With all these hurdles, it’s only natural that some of us would want to create our own inventory management application.
So, if you’re a tech savvy retailer who does not want to rely on a third party software, you can create a simple inventory management system that assists you in your supply chain operations.
That’s exactly what we’re going to do in this article.
We have listed down a step-by-step process on how to create a simple inventory management system. Here’s the complete video series of the same.
Note: You need to be pretty good with excel and microsoft office suite to pull this off.
Now let’s get started:
Contents
Step 1: Database Creation
Step 2: Create Database Relationships
Step 3: Setting Up User Interface (UI)
Step 4: Setting Up Menus & Dashboard
Step 5: Creating User Activity Log
Step 6: Creating Product Catalog and Variants
Step 7: Creating & Managing Suppliers
Step 8: Purchase Order Management
Step 9: Ensuring Everything is Working Smoothly
Use SaasAnt to Improve Your Inventory Accounting Processes
Step 1: Database Creation
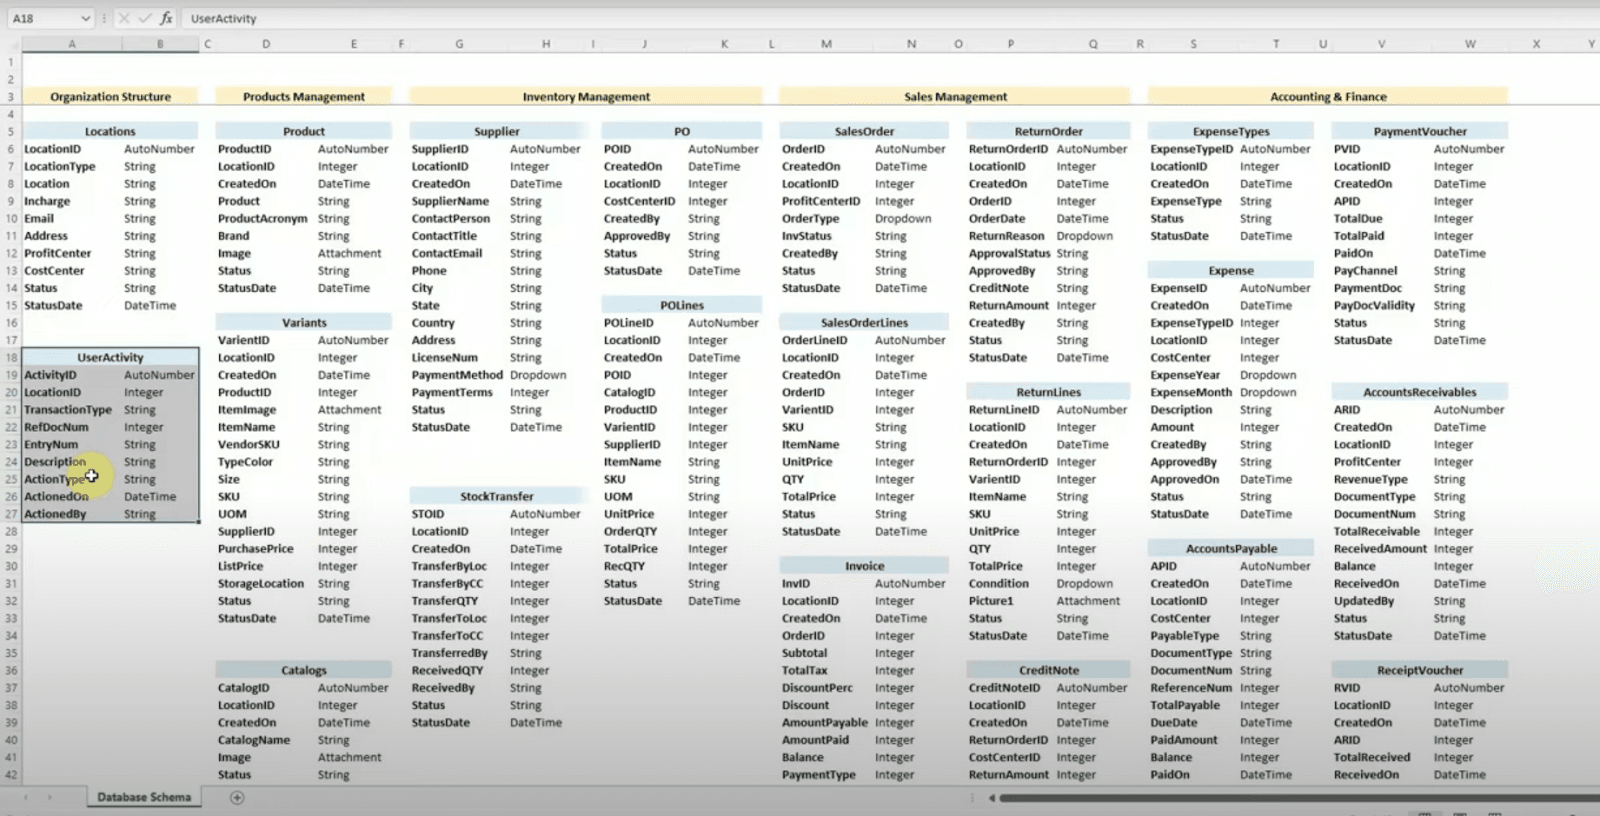
To build this system you need to have access to Microsoft Excel and Access.
The first step in this process, you will need to have basic database for the following items:
Organization Structure
Locations
User Activity
Product Management
Products
Variants
Catalogs
Inventory Management
Suppliers
Stock Transfers
Purchase Orders
Sales Management
Sales Orders
Invoices
Return Orders
Credit Notes
Accounting & Finance
Expense Types
Accounts Payable
Accounts Receivable
Payment & Receipt Vouchers
As you can see in the screenshot above, you need different types of datatypes or a database schema such as strings & integers for each item.
And that’s the beginning.
Step 2: Create Database Relationships
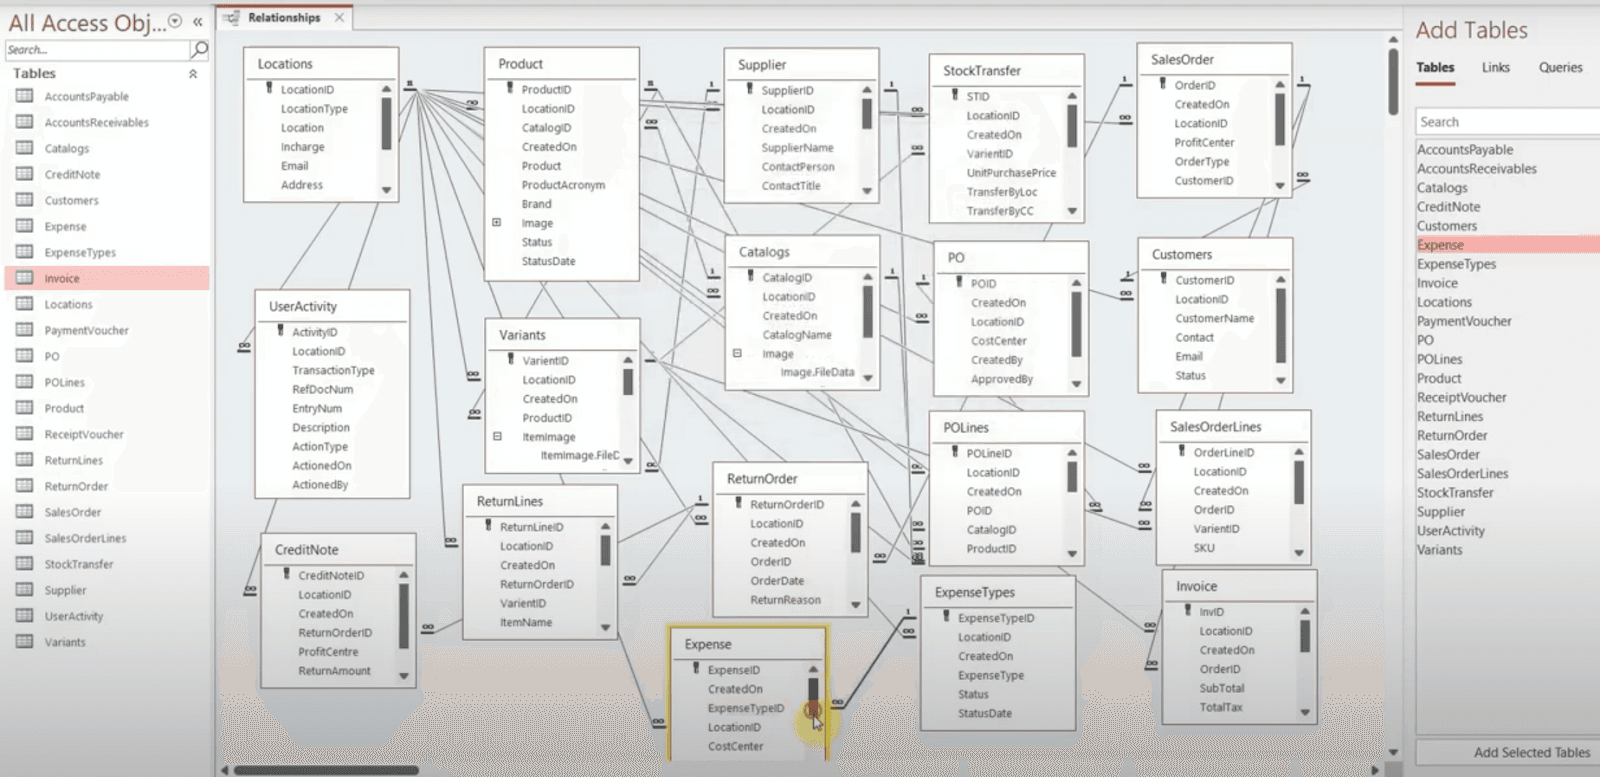
The next step is creating relationships between the various items within your database.
Any application requires proper planning and understanding of the real-world process. As discussed above, there are about 7 steps within the inventory management process.
From procuring the product to fulfilling an order, there are multiple activities & moving parts happening at the same time. There are customers and employees who play an integral part in the entire process. You need to create relationships between each database item considering all these various aspects.
These relationships help capture the information of each activity automatically.
There are multiple web applications that can also help you build the database schema and the relationships.
Step 3: Setting Up User Interface (UI)
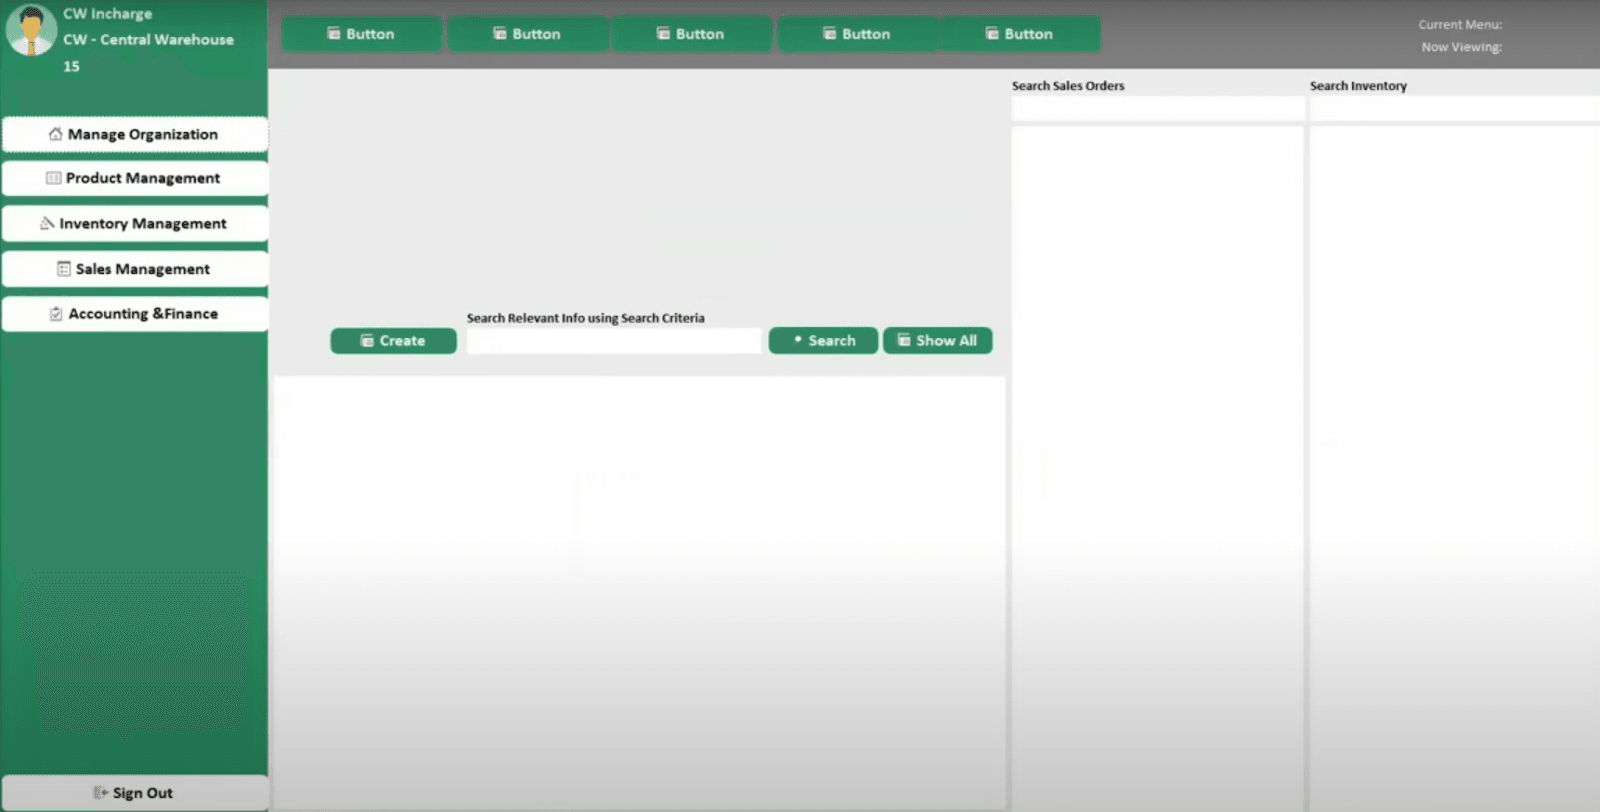
The next step is to set up a user interface based on all the relationships previously created.
Your user interface needs to be simple. The aim of this UI is to help navigate the core functionalities and to have multiple users setup and login from various locations.
Do not try to complicate the UI as it will most likely affect user experience, leading to a lot of complaints.
Step 4: Setting Up Menus & Dashboard
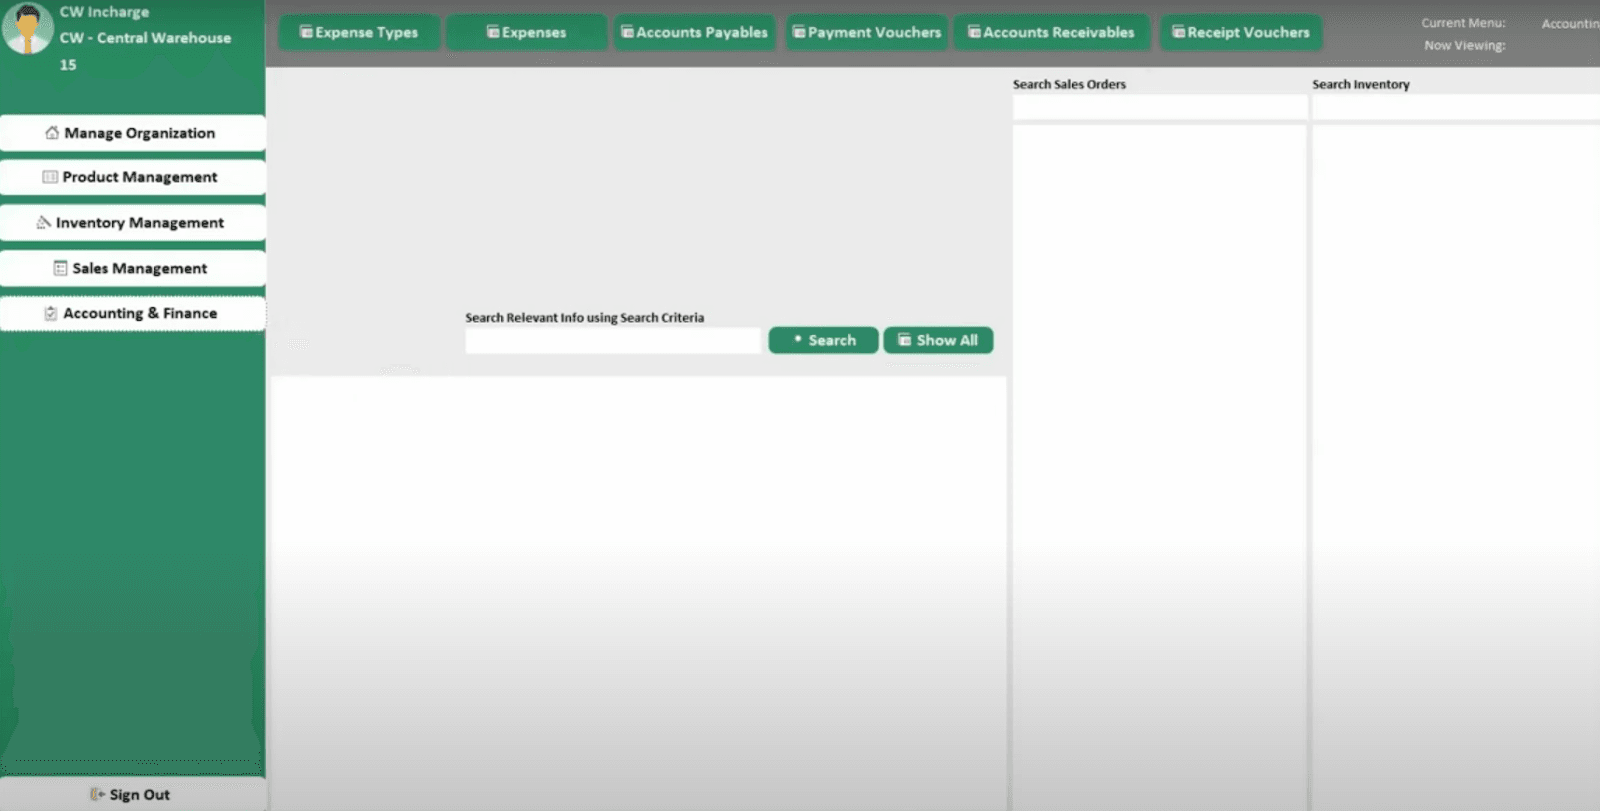
Dashboard is very important when creating these applications.
It’s like a cockpit of an aircraft, which will help you operate the aircraft efficiently. Likewise, this dashboard can help you navigate the various areas of your inventory management system.
You need to build different menus and submenus to access each item, along with a search menu which can help you easily find different options.
Step 5: Creating User Activity Log
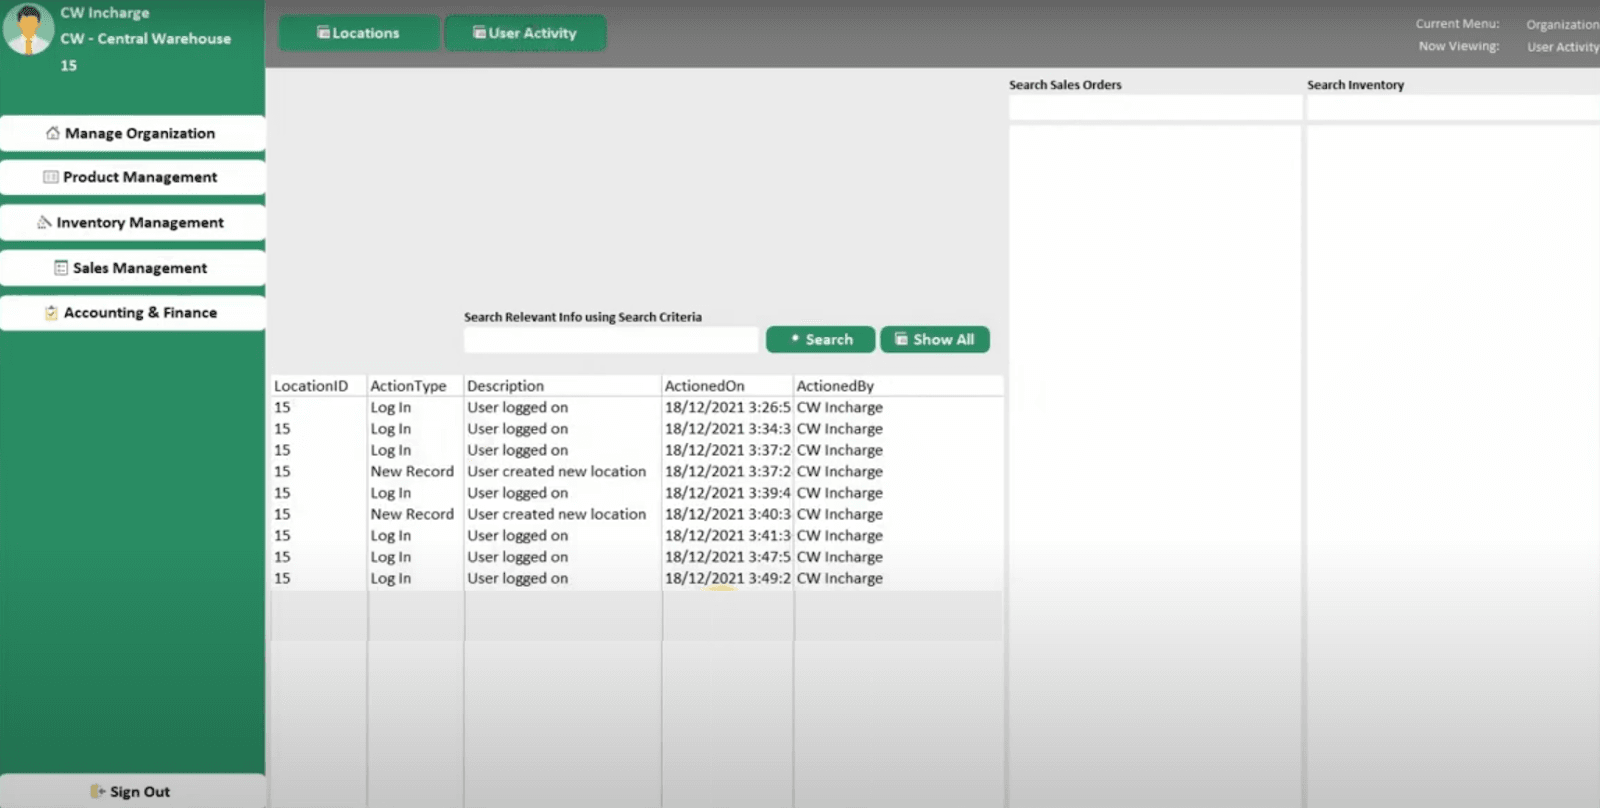
The next important step is to create user activity capture. Now this step applies to you if multiple users will be accessing this system.
You can skip this step if you’re going to be the only user that will access the application.
This part of the application helps you track activities such as when users are logging in and logging out, which users are being created, and when a user creates or deletes any data within the application.
Step 6: Creating Product Catalog and Variants
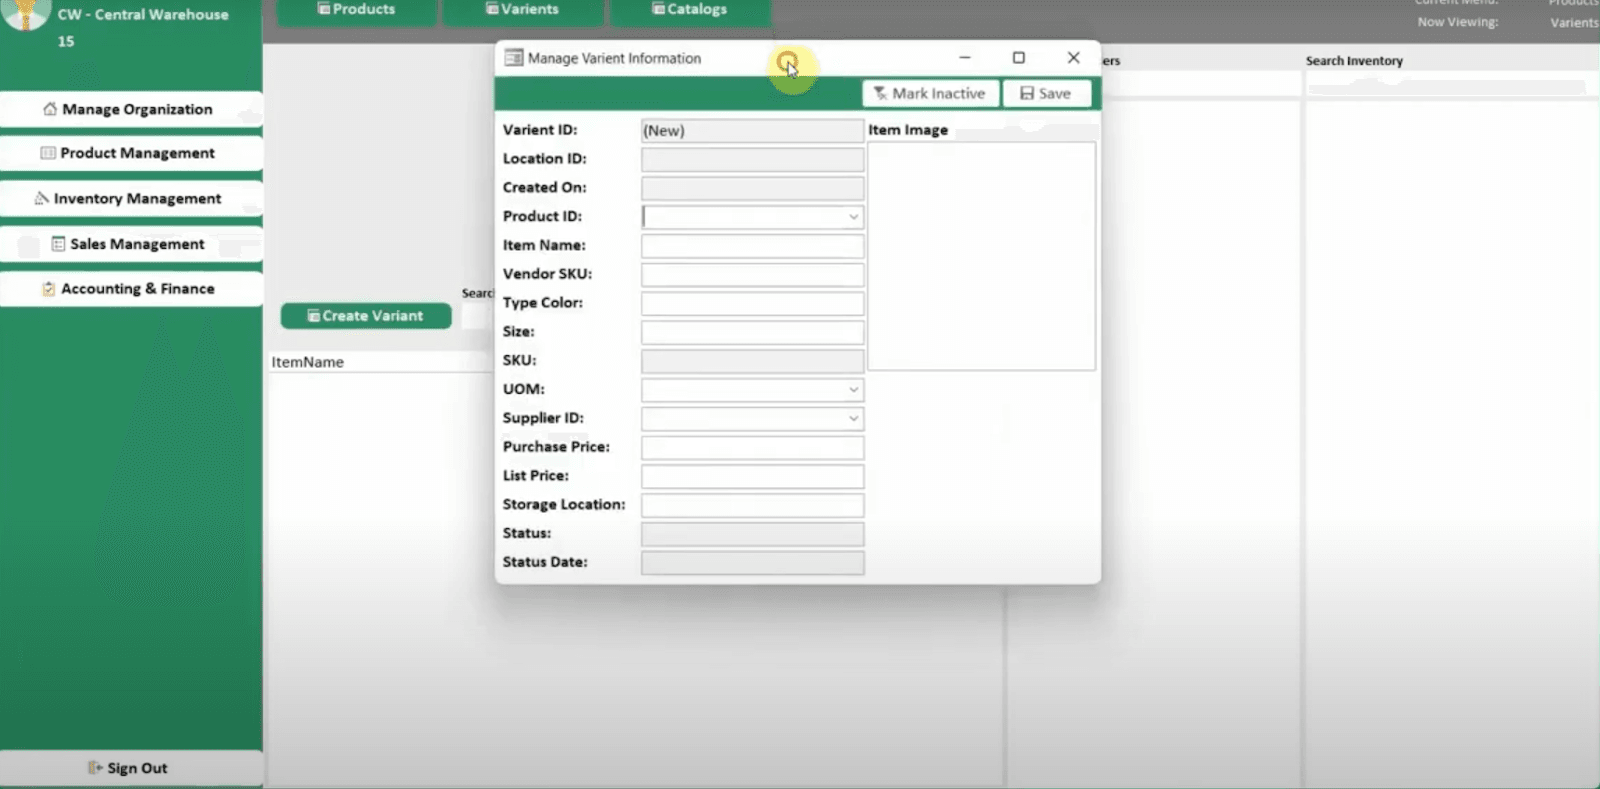
Now you need to create a product catalog in the product management section, where you can add your various product details along with its multiple variants and SKUs.
Whenever there is an activity such as a new purchase order and the stock replenishes, you product & inventory count will get updated.
You can distinguish each product based on the product ID, brand, catalog ID.
You can also create a product variant section where you can enter the details of multiple variants and SKUs.
Once you have set up your product aspects, you can then move on the next step which is creating the module for your suppliers.
Step 7: Creating & Managing Suppliers
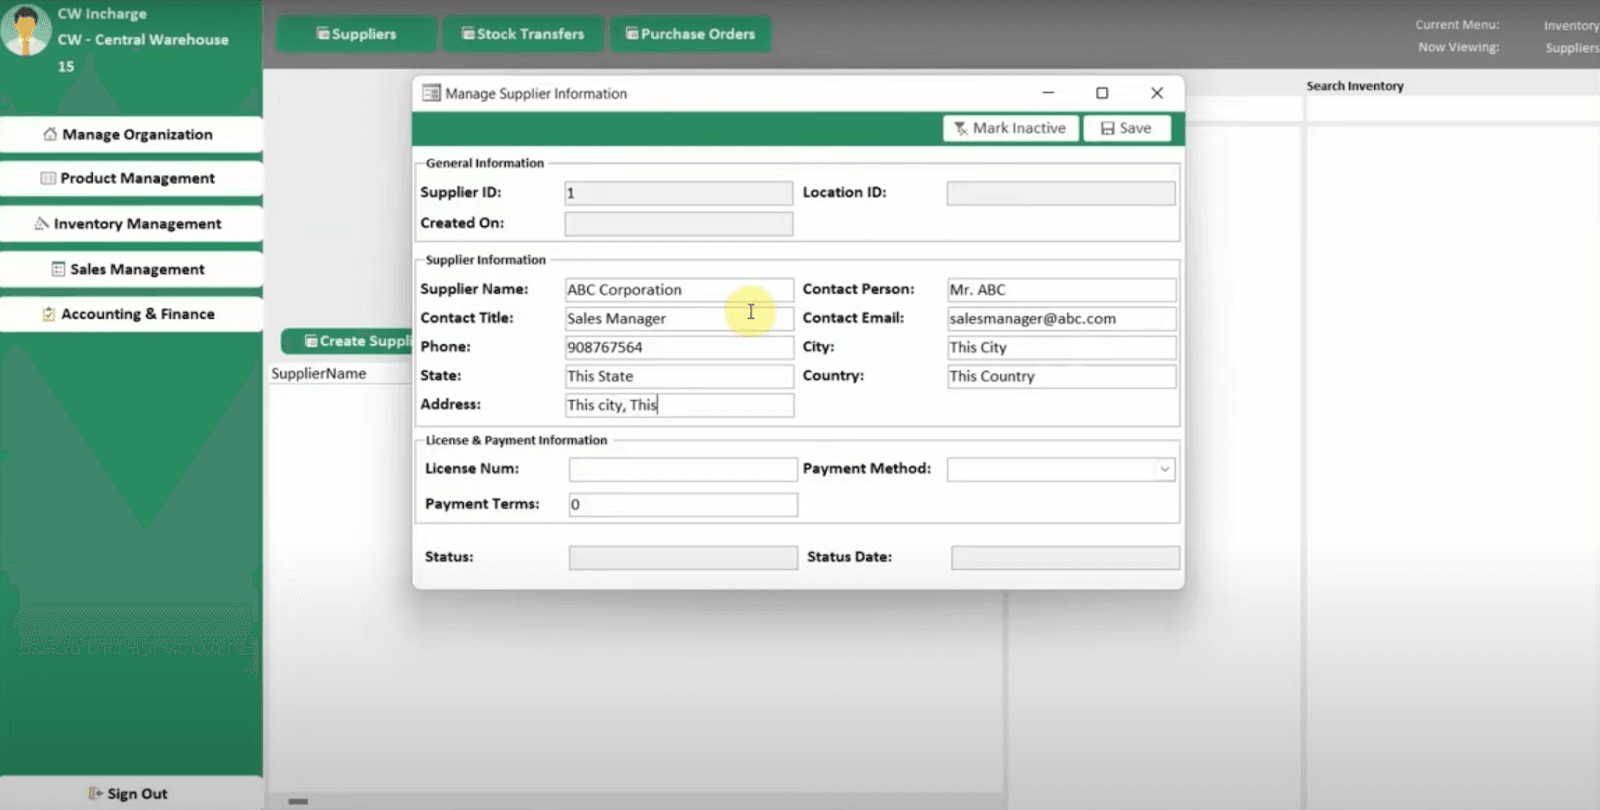
Creating your supplier database is critical to the entire inventory management cycle.
You need to carefully enter details such as
Supplier name
Address
Contact Info
License Info
Status
Now you'll be able to access your supplier database and the next step is to create purchase order management.
Step 8: Purchase Order Management
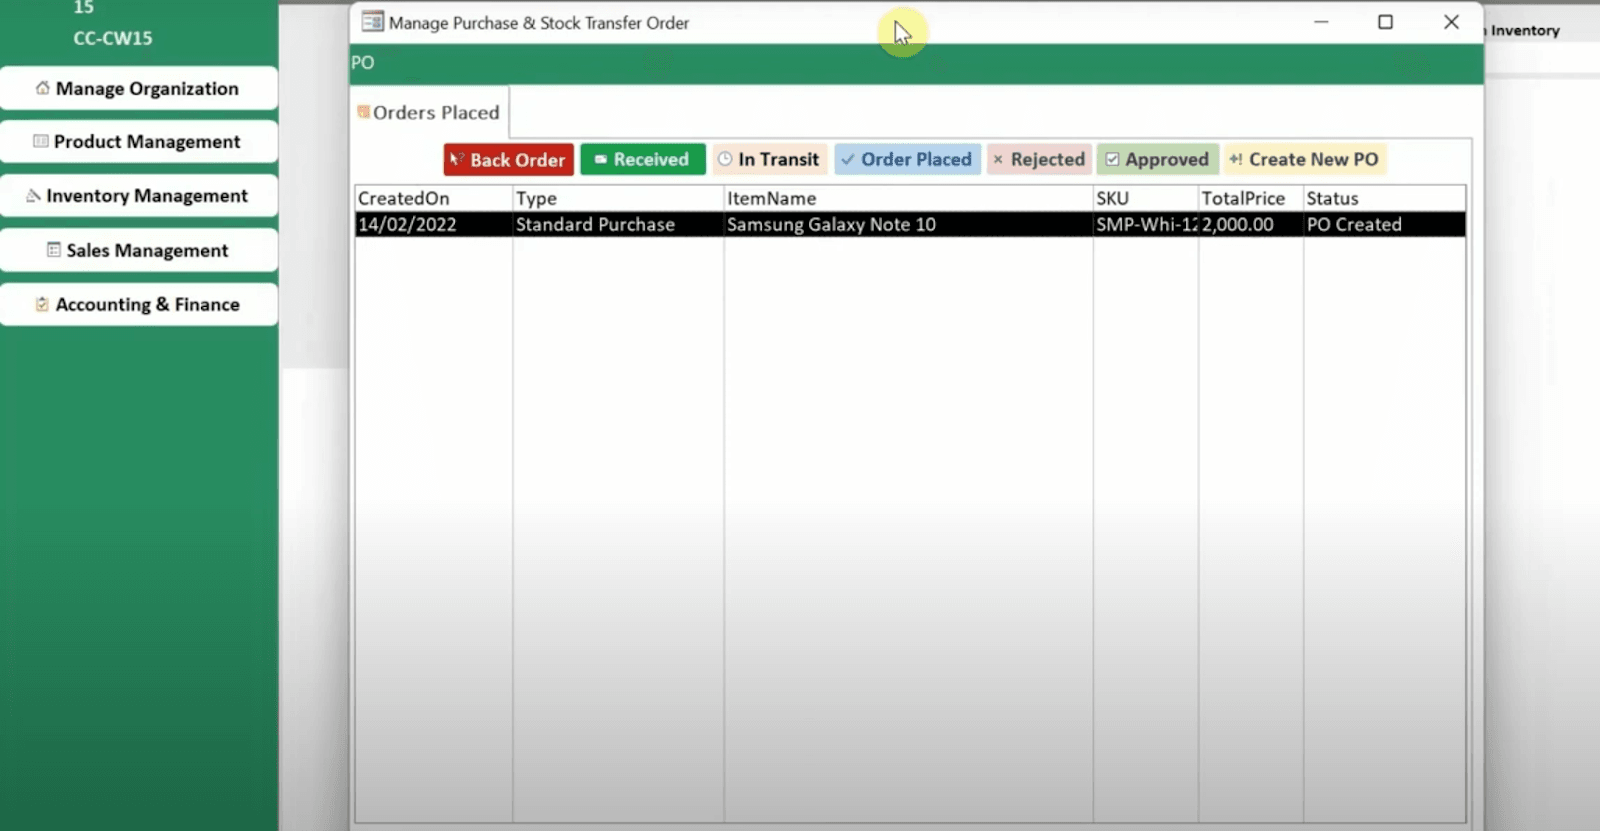
Purchase order management requires creating the following options & statuses:
Placing Order
In Transit Status
Received Status
Back Order
Approval & Rejection
Once you’ve set up these options, you can start placing orders with your suppliers.
Step 9: Ensuring Everything is Working Smoothly
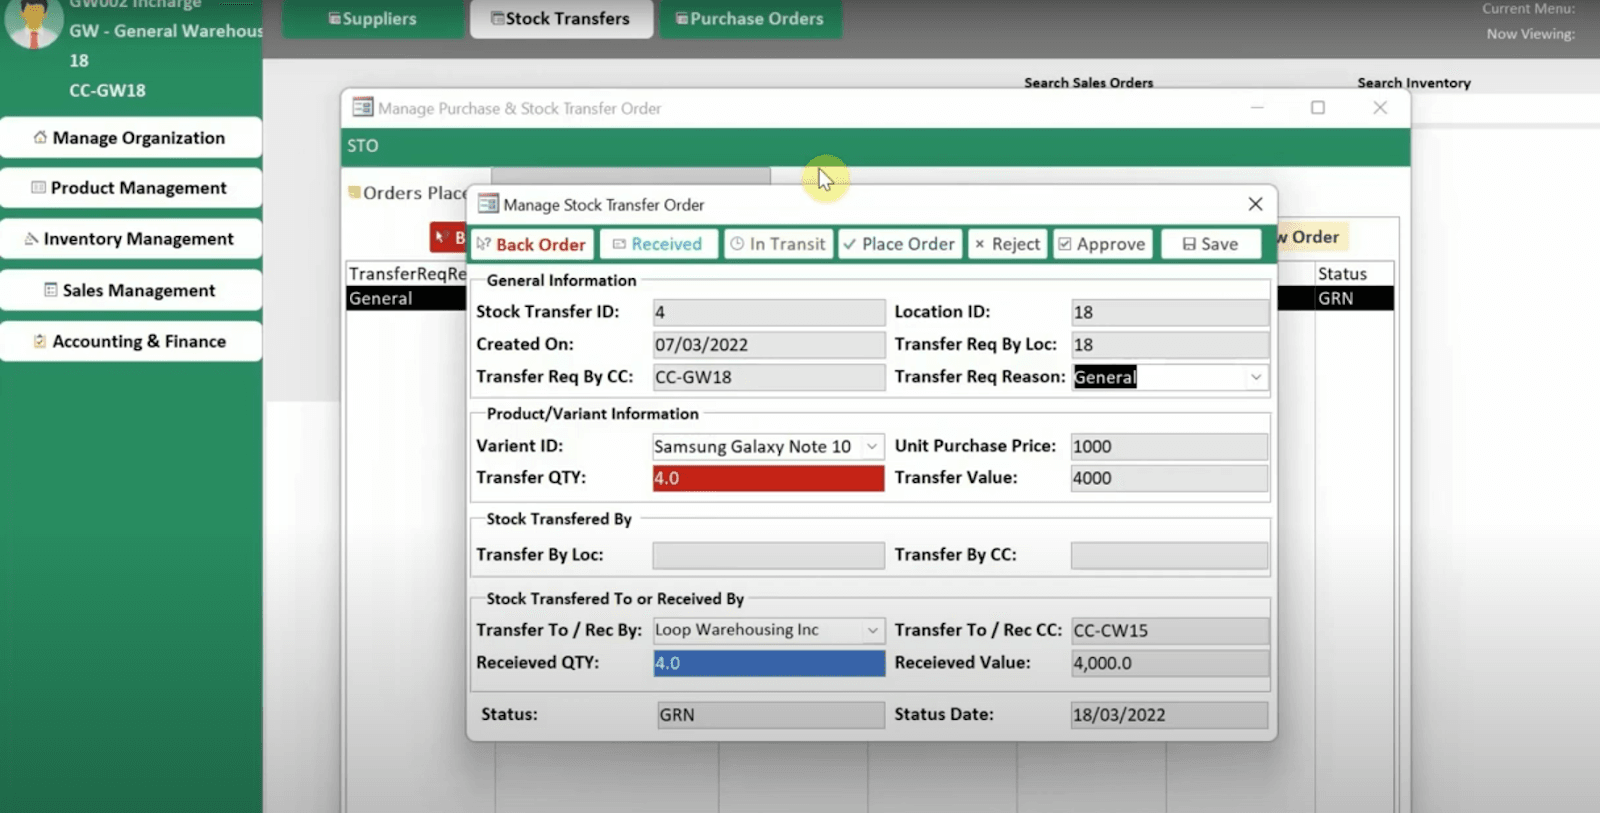
And now for the final step is to check and ensure that your new system is working perfectly.
Software quality check is generally a laborious process but all you need is to check that your system is functioning in the test environment and also the live environment.
You can start using this app by placing smaller orders initially. That will ensure you don’t get into a lot of trouble when you face dreadful technical issues.
This type of software is ideal for any small business owner or ecommerce merchant who does not want to spend any money on external or third party software.
However, you need to be very patient through this process as it requires multiple iterations.
If you do not have the time to go through this often exhausting process, you can check out some of the inventory management software for small businesses and ecommerce stores.
To learn more about How to Add Inventory in QuickBooks refer this guide
Use SaasAnt to Improve Your Inventory Accounting Processes
Having control over your inventory is key to a successful business. But managing it can be overwhelming and time consuming, especially when you have to manually update reports in your accounting software. SaasAnt can help you with this process by providing automated updates of reports into your accounting software.
SaasAnt Transactions and PayTraQer give you powerful automation to sync up sales, inventory and online payments into QuickBooks Online & Xero. It offers asynchronous processing to update your inventory transactions quickly and accurately. This allows for real-time insights into your stock levels, preventing issues such as overstock or out of stock situations from occurring.
Additionally, SaasAnt also helps with listing entities for an easier way to keep track of all the products in your warehouse. It supports thousands of formats for importing listing data making it easier for businesses to handle the millions of products that are often part of their warehouse operations.
With accurate data on hand, you’ll have better management on things like order fulfillment which leads to improved customer service, faster order turnaround times and higher customer satisfaction ratings overall.
Some of benefits include:
Improved stock tracking – WithSaasant’s detailed reporting capabilities, it’s easy to keep an eye on stock levels so you know exactly what items you have in store and what needs re-ordering ahead of time. This helps reduce wastage while keeping customers happy with quick delivery times!
Reduced human error – Automated processes minimize mistakes that can arise from manual data entry allowing businesses to avoid costly errors in their financials and inventory tracking systems.
Accurate forecasting – Having detailed insights into sales trends lets businesses plan better for future orders so they always stay well stocked without over ordering or running out too quickly!
SaasAnt is an invaluable tool for streamlining inventory management processes and improving business performance. It offers robust automation that helps businesses save time and money by ensuring accurate data entry every time! So if you’re looking to optimize your inventory management processes make sure to check out SaasAnt today!