Import Checks into QuickBooks Online: Step-by-Step Guide
Checks are often created manually or issued through handwritten transactions, which must be recorded in QuickBooks for accurate bookkeeping. If you have offline data for these checks, SaasAnt Transactions allows you to import them into QuickBooks Online, even in bulk, quickly.
By importing checks, you can keep your accounts up-to-date and generate precise reports effortlessly. Before following the steps to import, ensure you have connected SaasAnt Transactions with your QuickBooks account.
SaasAnt Transactions allows small businesses, entrepreneurs, and bookkeepers to efficiently manage data transfers to and from QuickBooks Online. Its powerful import, export, and delete features ensure seamless data management. Get a demo today!
Contents
Import Checks into QuickBooks Online: Quick Instructions
Import Checks into QuickBooks Online: Step-by-Step Guide
Import Checks Without Check Numbers in QuickBooks
Conclusion
FAQ’s
Import Checks into QuickBooks Online: Quick Instructions
For a quick start, follow the given steps to import your checks into QuickBooks Online:
Connect SaasAnt Transactions with your QuickBooks Online account.
Upload your checks file (supports various formats, including Excel, CSV, PDF, images, and IIF).
Click on import to start importing your transactions into QuickBooks
Click on rollback/ undo if needed.
Getting Started With Check Imports
A business receives a stack of checks from customers. Instead of manually entering each check, they can import them into QuickBooks Online using an Excel/ CSV file. SaasAnt Transactions plays an essential role in helping you with the automation. It speeds up the data entry process, reduces errors, and keeps their financial records up-to-date. Instead of manually entering each check into QuickBooks, companies can use SaasAnt Transactions to import checks in bulk in just a few simple clicks.
Further, this article will guide you through the steps to import checks into QuickBooks Online using SaasAnt Transactions.
Import Checks into QuickBooks Online: Step-by-Step Guide
Step 1: Open SaasAnt Transactions from your computer
Open QuickBooks and connect SaasAnt Transactions from the QuickBooks App Store.SaasAnt Transactions is a safe, certified app to handle your data, ensuring your information is secure and accurately managed. Click ‘New Import’ from the menu and select ‘Import’. This way, you could easily import your checks into QuickBooks Online.
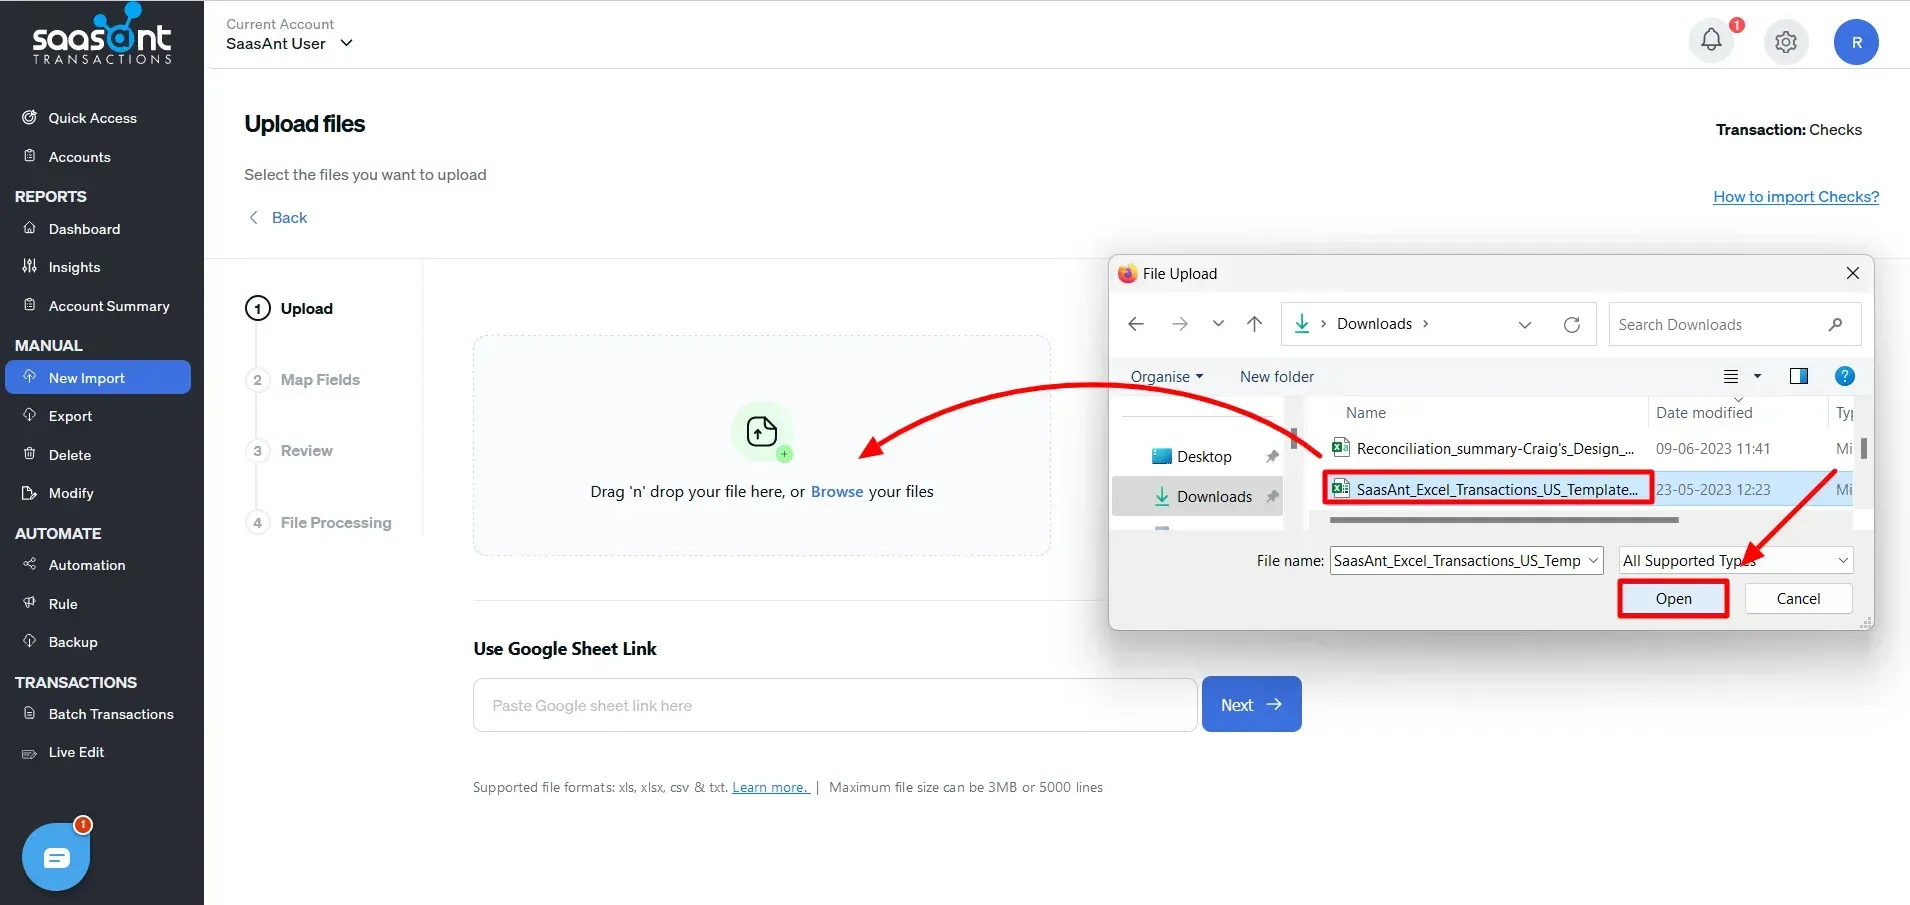
Step 2: Upload your File
Here are easy steps to upload your checks into QuickBooks Online:
Selecting the Transaction Type: Choose ‘Checks’ as the transaction type to proceed with the import.
Uploading the File: Use the ‘Browse’ option to upload the specific file you want to import. Remember, it should be in a supported format (Excel, CSV, PDF, images, or IIF) to ensure a smooth process. If you have a file in PDF format, SaasAnt Transactions offers tools to effortlessly convert your PDF and prepare your data into a compatible format for import.
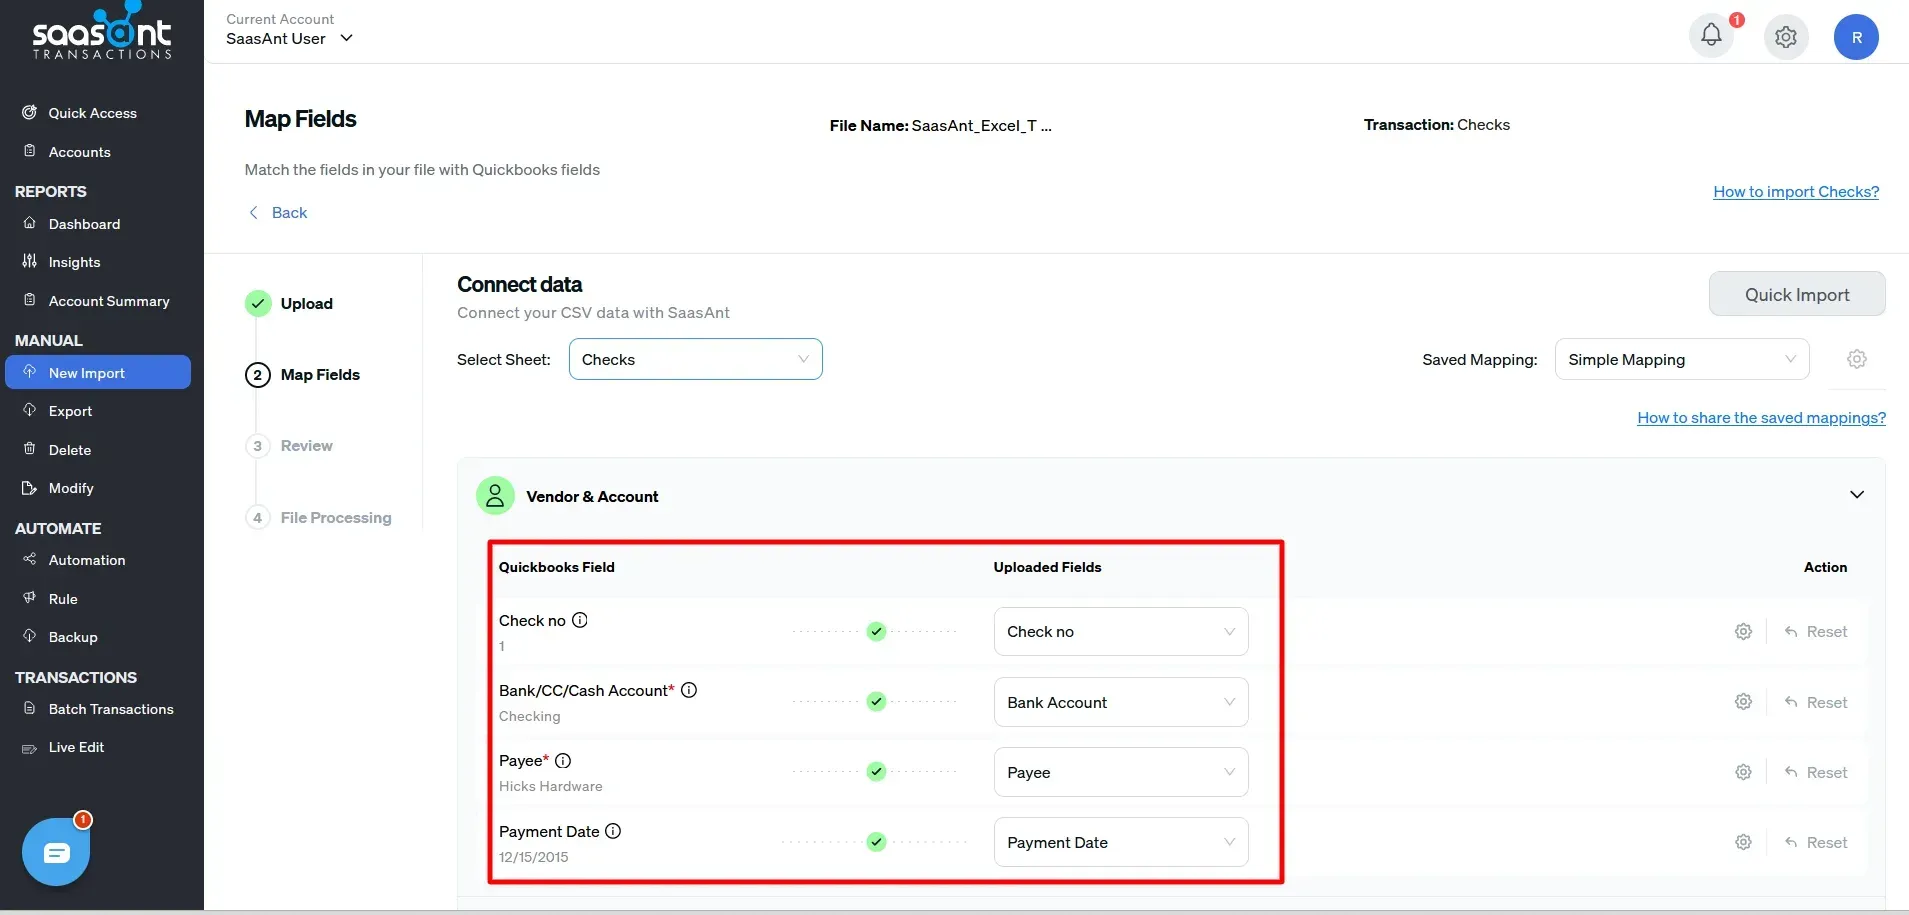
Step 3: Mapping Data Fields
Mapping your data fields is a crucial phase in the importing process. This action entails aligning the details, like check numbers and customer details, to the respective areas within QuickBooks Online.
Now, you'll be mapping the fields from your file to the corresponding fields in QuickBooks Online. SaasAnt Transactions offers a user-friendly interface, including a 'Preview Mapping' option to prevent errors during import.
For more help, consult the SaasAnt support portal, which provides comprehensive tutorials to help you with data mapping.
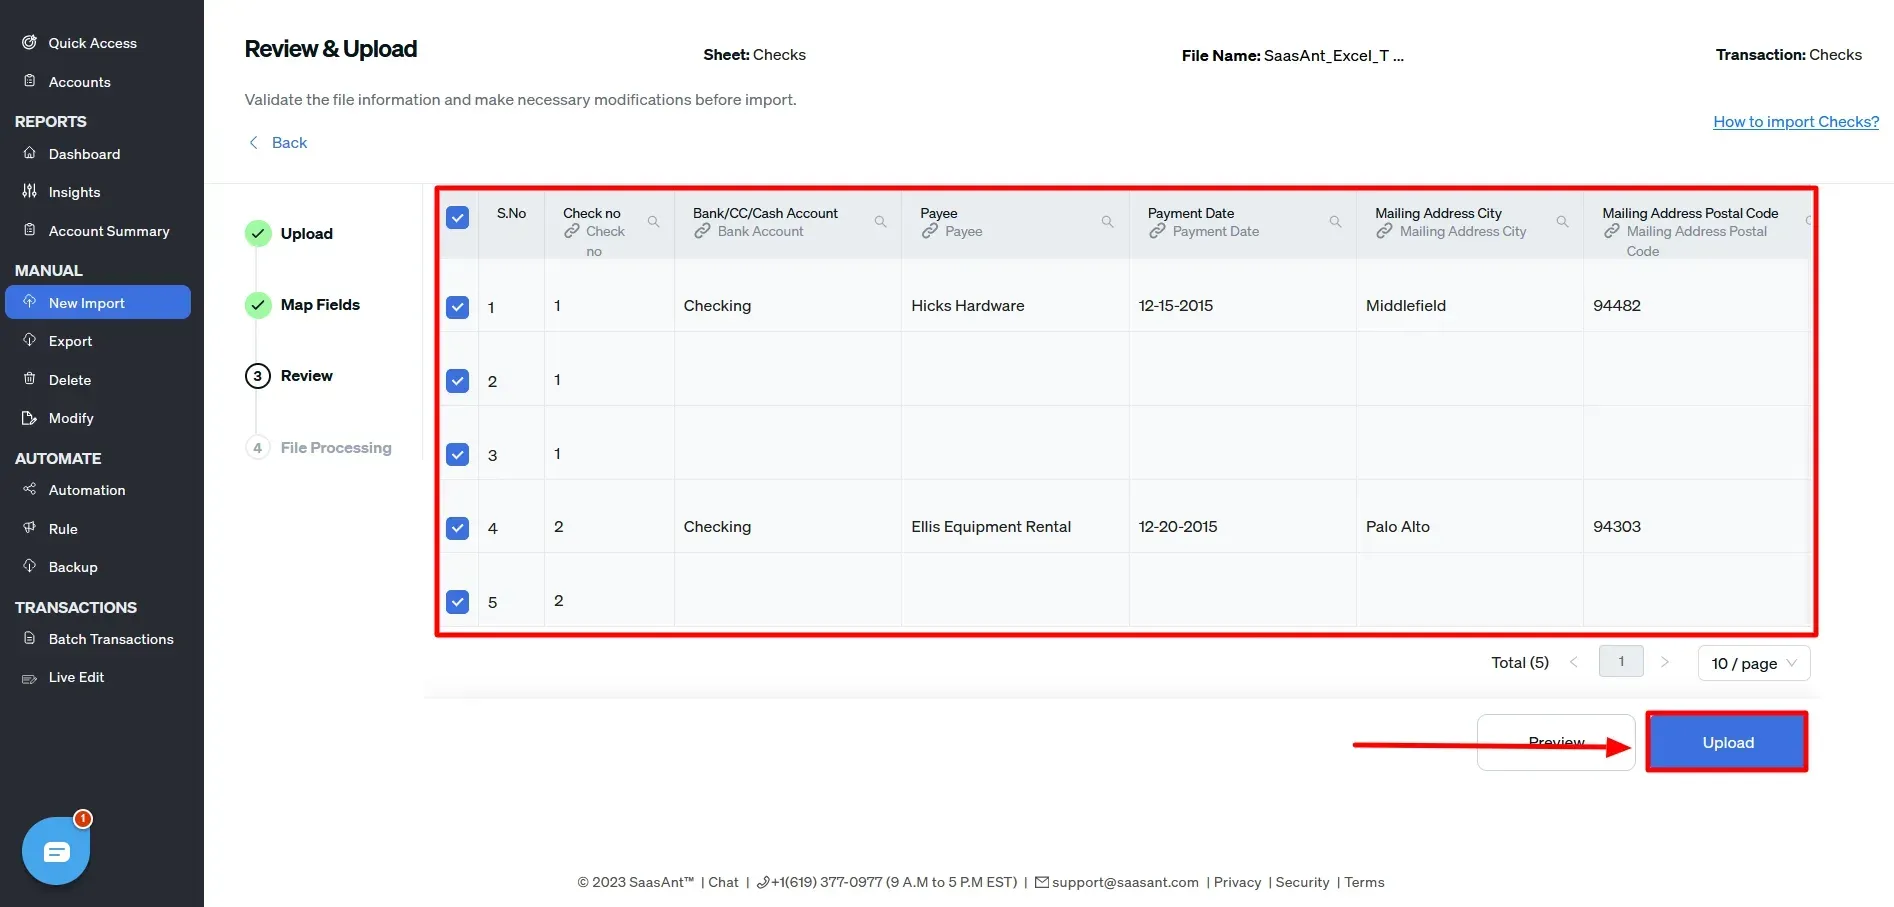
Step 4: Reviewing Your Data Before Final Import
Reviewing the data before import is essential to avoid mistakes and ensure accurate alignment of all details. SaasAnt Transactions aids in this process by streamlining data review and corrections, helping you identify and resolve errors efficiently.
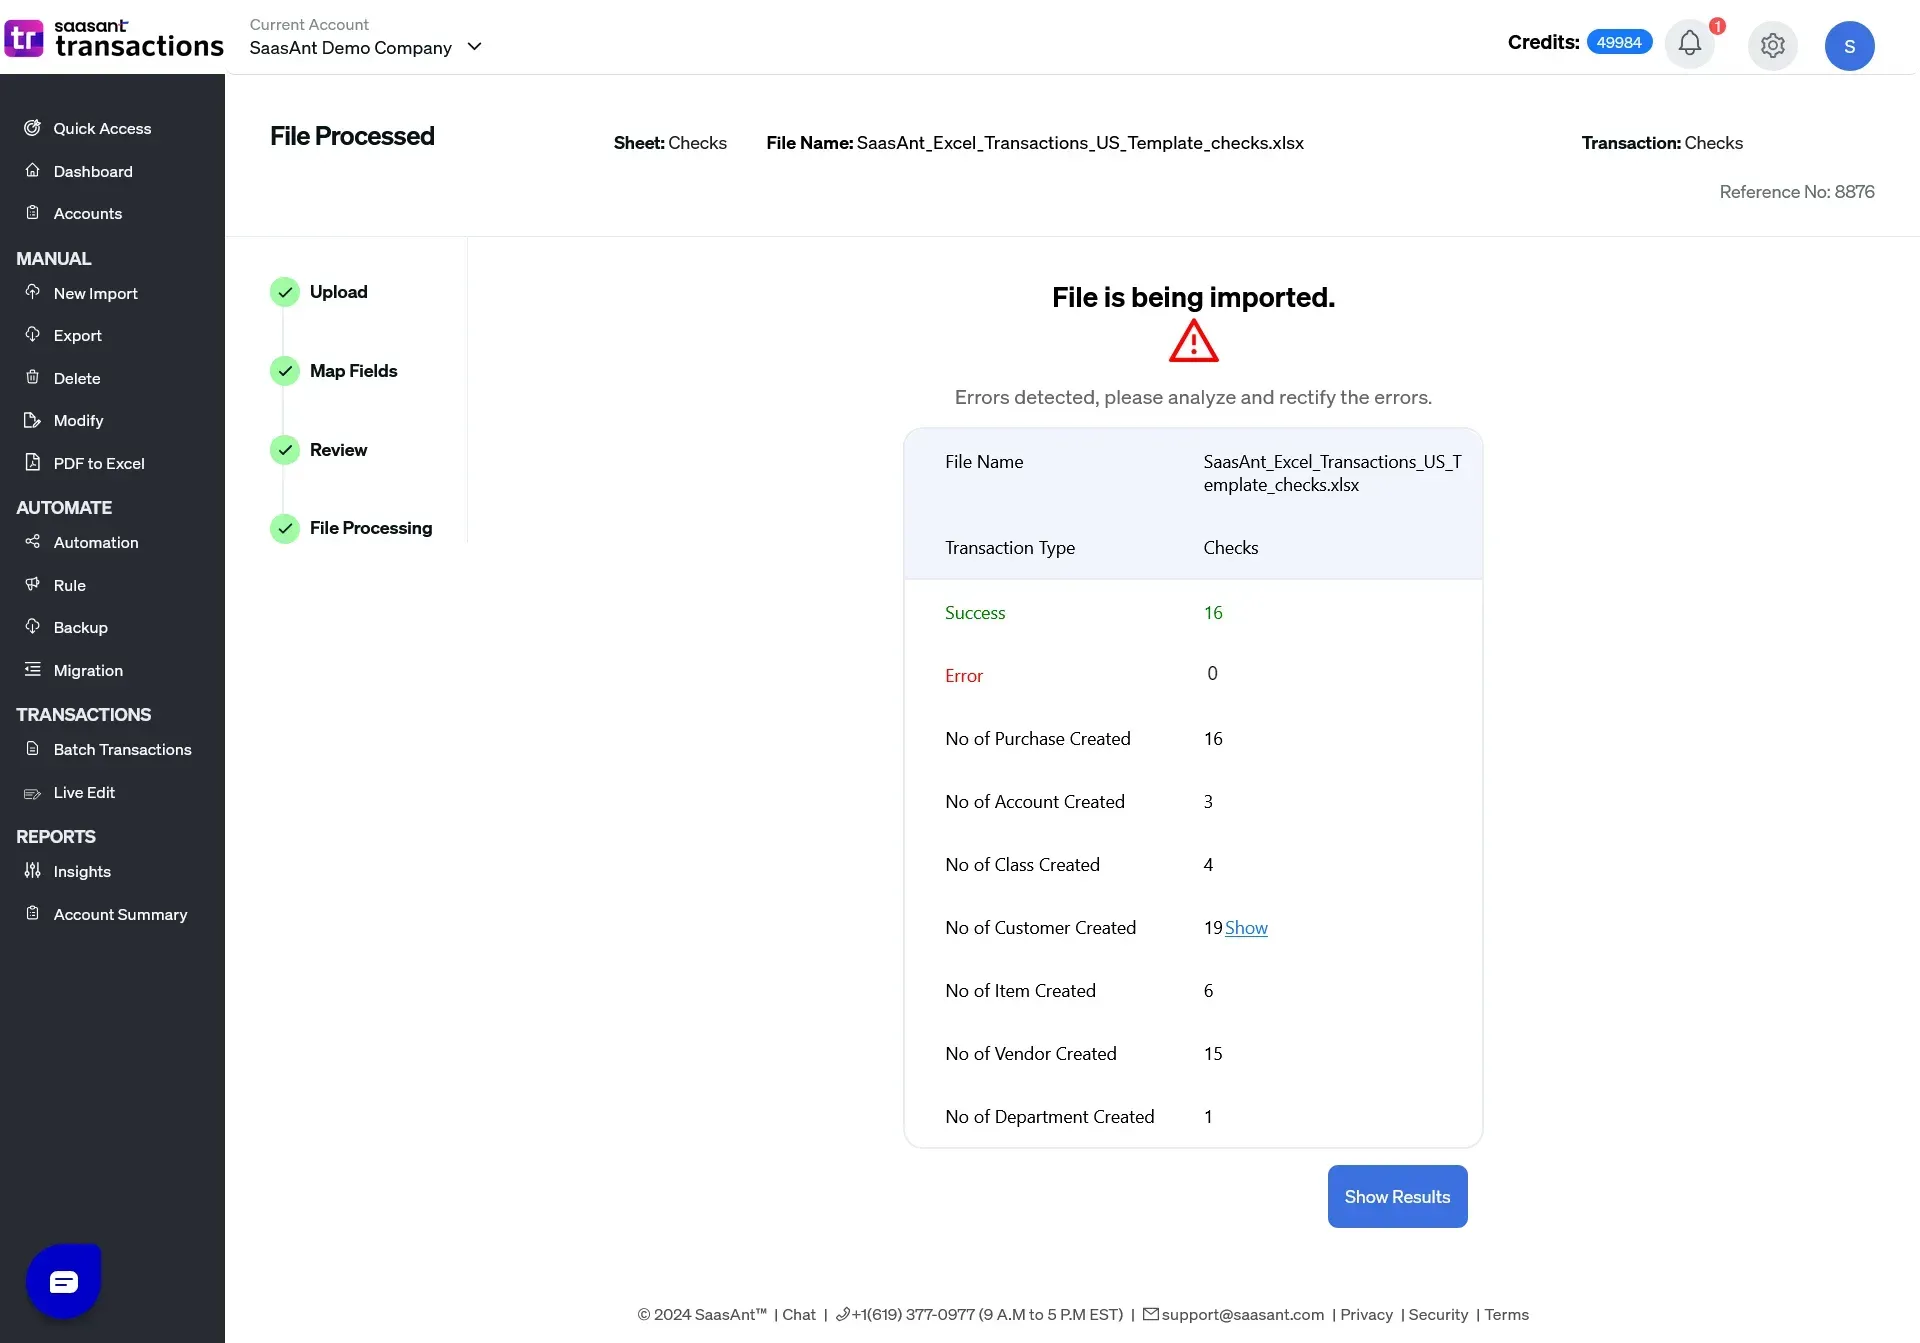
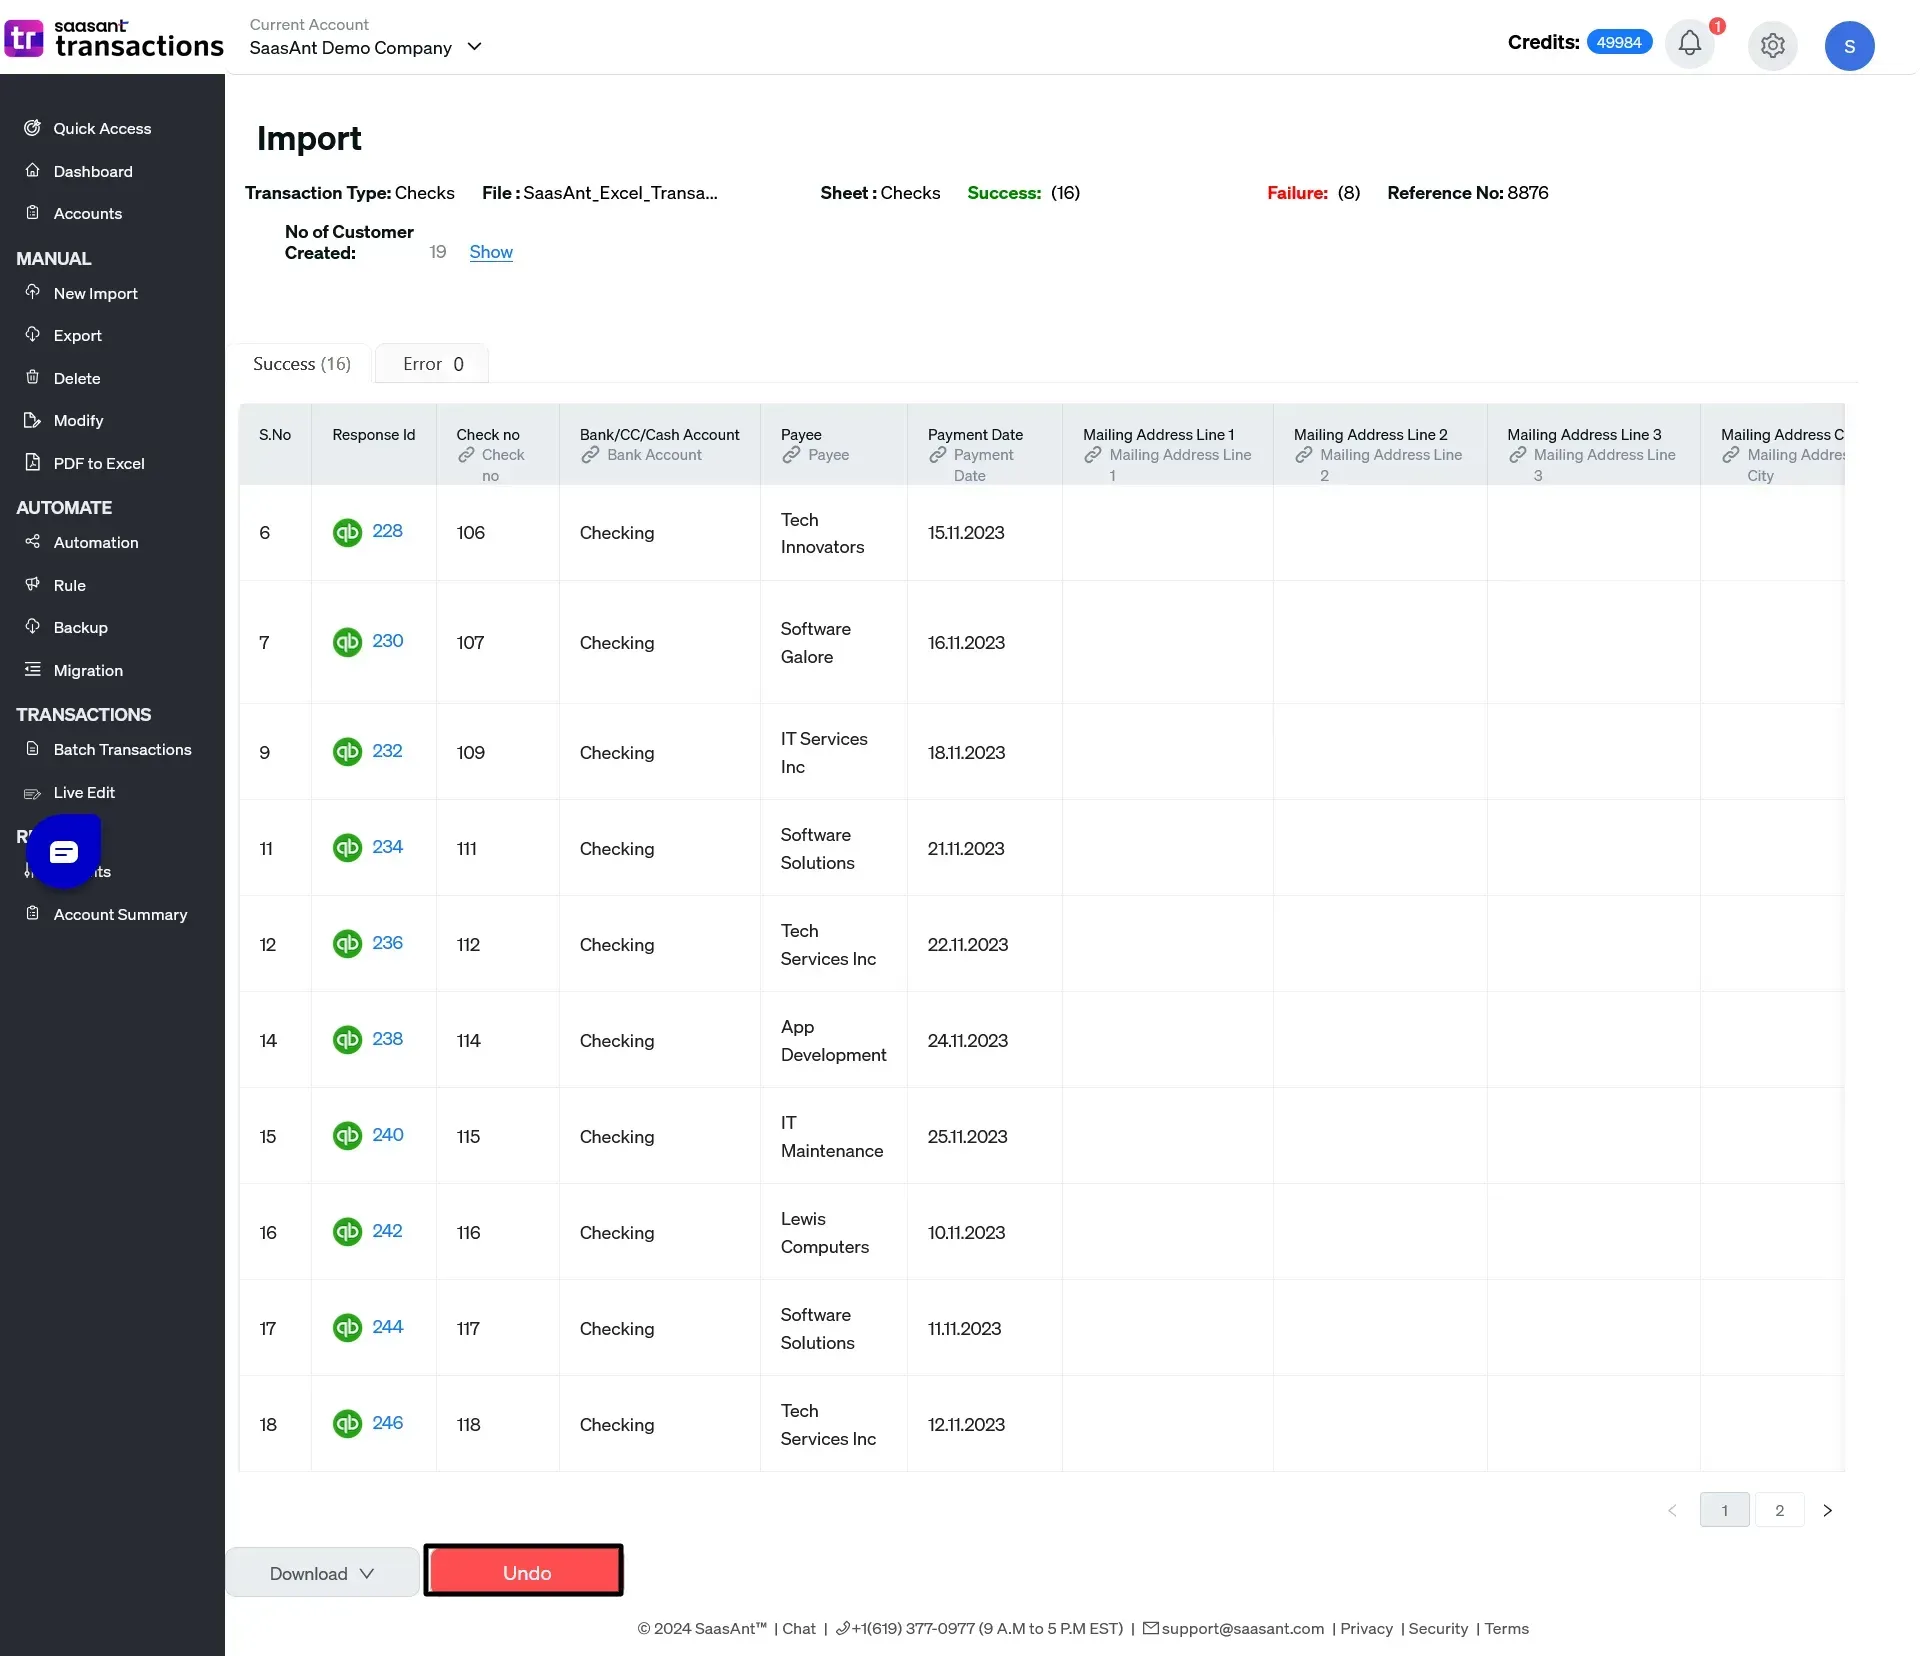
Step 5: Verifying the Imported Checks
Now, click the ‘Import’ button in the SaasAnt Transactions application and import all your checks to QuickBooks and check the imported checks data, to ensure accuracy.
If there is a data mismatch in your file, SaasAnt Transactions will detect and help resolve these issues, ensuring your data is accurately imported into QuickBooks according to your preferences. This guarantees a smooth and precise transaction import process.
Step 6: RollBack in Case of Errors (Optional)
If you run into errors during the import, there's no need to worry; you can quickly undo the import and restore the data with the rollback feature.
Fix "The ExpenseAmount is Not Valid" Error in QuickBooks
This error usually appears when QuickBooks detects an invalid format for the expense amount. Here's how to resolve it:
Use only numerical values in the amount field (no commas or symbols).
Ensure the currency format matches QuickBooks' requirements.
Check that data columns are correctly mapped during import.
Update QuickBooks to the latest version if needed.
Import Checks Without Check Numbers in QuickBooks
To import checks without assigning check numbers for pre-numbered check printing:
Leave the "Check Number" field empty in your source file.
Map all required fields during import, excluding the check number.
SaasAnt Transactions will keep the check number field blank in QuickBooks.
Advantages of SaasAnt Transactions
Using SaasAnt Transactions to import checks into QuickBooks provides numerous benefits for businesses:
Automating the import process significantly reduces time spent on manual entry, enabling business owners and accountants to concentrate on more strategic activities.
Automated imports reduce human errors, ensuring data accuracy and integrity, which is vital for precise financial reporting.
SaasAnt Transactions efficiently manages large volumes of data, making it perfect for businesses with extensive transactions to handle.
SaasAnt allows customization of import templates to match specific QuickBooks Online configurations, accommodating diverse business needs and ensuring seamless integration.
Importing checks directly from Excel keeps all data up-to-date and correctly categorized, streamlining reconciliation processes and enhancing efficiency during audits.
Get a 30-day free trial, and no credit card required, allowing businesses to experience its benefits risk-free.
These features make SaasAnt Transactions an invaluable tool for businesses looking to optimize their check management process in QuickBooks.
Conclusion
Importing checks into QuickBooks Online streamlines financial management and ensures accurate record-keeping. Following the outlined steps in the article, you can efficiently import checks to QuickBooks Online using SaasAnt Transactions. This application saves you time but also ensures the accuracy and reliability of financial data.
FAQ’s
How to Create Checks in QuickBooks Online?
To create checks in QuickBooks Online:
Log In: Access your QuickBooks Online account.
Go to New Transaction: Click “+ New” and select “Check.”
Enter Details: Fill in Payee, Bank Account, Date, and Amount.
Save: Click “Save and Close” to finalize the check.
How to Import Checks into QuickBooks Online?
To import checks into QuickBooks Online using SaasAnt Transactions:
Log In: Access SaasAnt Transactions with your QuickBooks credentials.
Go to Import Section: Select “Import” > “Checks.”
Prepare File: Ensure your file is in CSV or Excel format with all check details. (All formats supported: PDF, Images, IIF, CSV, Excel)
Map Fields: Match your file columns to QuickBooks fields.
Validate and Import: Review for errors, fix any issues and complete the import.
How to Export Checks from QuickBooks Online?
Follow these steps to export checks into QBO using SaasAnt Transactions:
Sign In: Log in to SaasAnt Transactions.
Start Export: Go to “Export” > “Checks.”
Apply Filters: Set filters by date or other criteria.
Choose Format: Select CSV or Excel and customize the fields.
Download File: Begin the export and save the file to your system.
How to Delete Checks in QuickBooks Online?
To delete checks in QuickBooks Online using SaasAnt Transactions:
Log In: Connect SaasAnt Transactions to QuickBooks.
Navigate to Delete Section: Select “Delete” > “Initiate Clean Up.”
Select Checks: Search by date or use filters to choose specific checks.
Confirm Deletion: Click “OK” to permanently delete the selected checks.
How to Edit Checks in QuickBooks Online?
Here's how to edit checks in QuickBooks Online:
Log In: Access your QuickBooks account.
Locate Checks: Navigate to “Checks” and select the one you want to edit.
Update Information: Modify details like the amount, date, or payee.
Save Changes: Confirm and save your updates.
Read also: