How to Import Vendors into QuickBooks Desktop
Welcome to our guide on importing vendor lists into QuickBooks Desktop. If you're a bookkeeper, accountant, or administrative professional, you know how time-consuming manual data entry can be—and how duplicate records and data mapping errors can disrupt your workflow.
This guide addresses those pain points head-on, providing a clear, step-by-step process to import your vendor data accurately and efficiently. Learn how to avoid common pitfalls and discover how SaasAnt Transactions can automate bulk imports, manage duplicates, and ensure your vendor information aligns perfectly with QuickBooks requirements. Streamline your operations, reduce errors, and get back to focusing on what matters most: running your business.
Import Vendors into QuickBooks Desktop: Quick Instructions
Download, install, and log in with Intuit credentials. Connect your company.
Click 'Import,' choose 'Vendors,' and upload your file or use the sample template.
Match file columns to QuickBooks fields or let SaasAnt do it automatically.
Check for errors and click 'Send to QuickBooks' to complete the import.
How to Import Vendors into QuickBooks Desktop: Step-by-Step Guide
Using SaasAnt Transactions, importing vendors into QuickBooks Desktop is simple and efficient. Just follow these easy steps:
Step 1: Install SaasAnt Transactions
To install and activate the free trial of SaasAnt Transactions Desktop, first download the latest version by clicking on the free trial. Run the "SaasAntTransactions-Setup.exe" file with administrative privileges, accept the license agreement, choose your installation path, and complete the setup.
After installation, launch the application, navigate to Subscription > Register, and enter the license key provided in your confirmation email to activate the software. Ensure your computer has an active internet connection during this process.
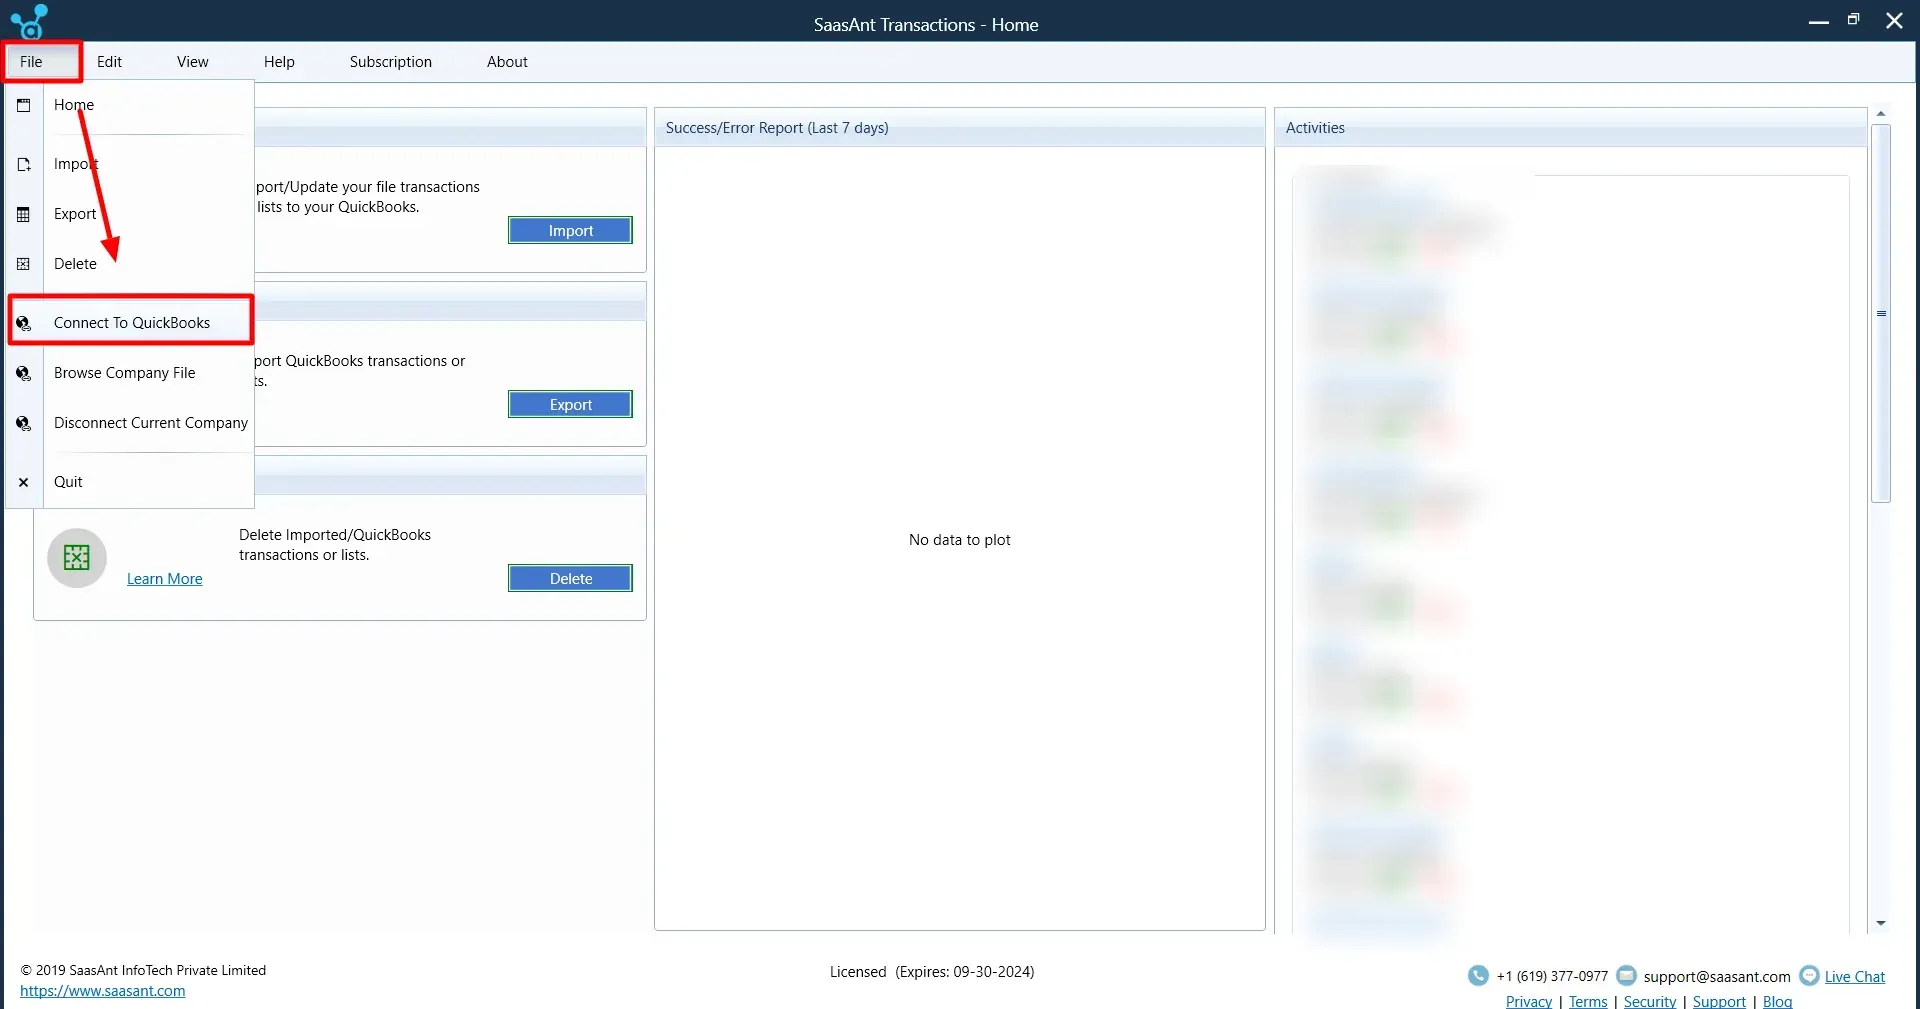
After installing, open SaasAnt Transactions, click on ‘File’ and then click on ‘Connect to QuickBooks.’
Step 2: Select Your File
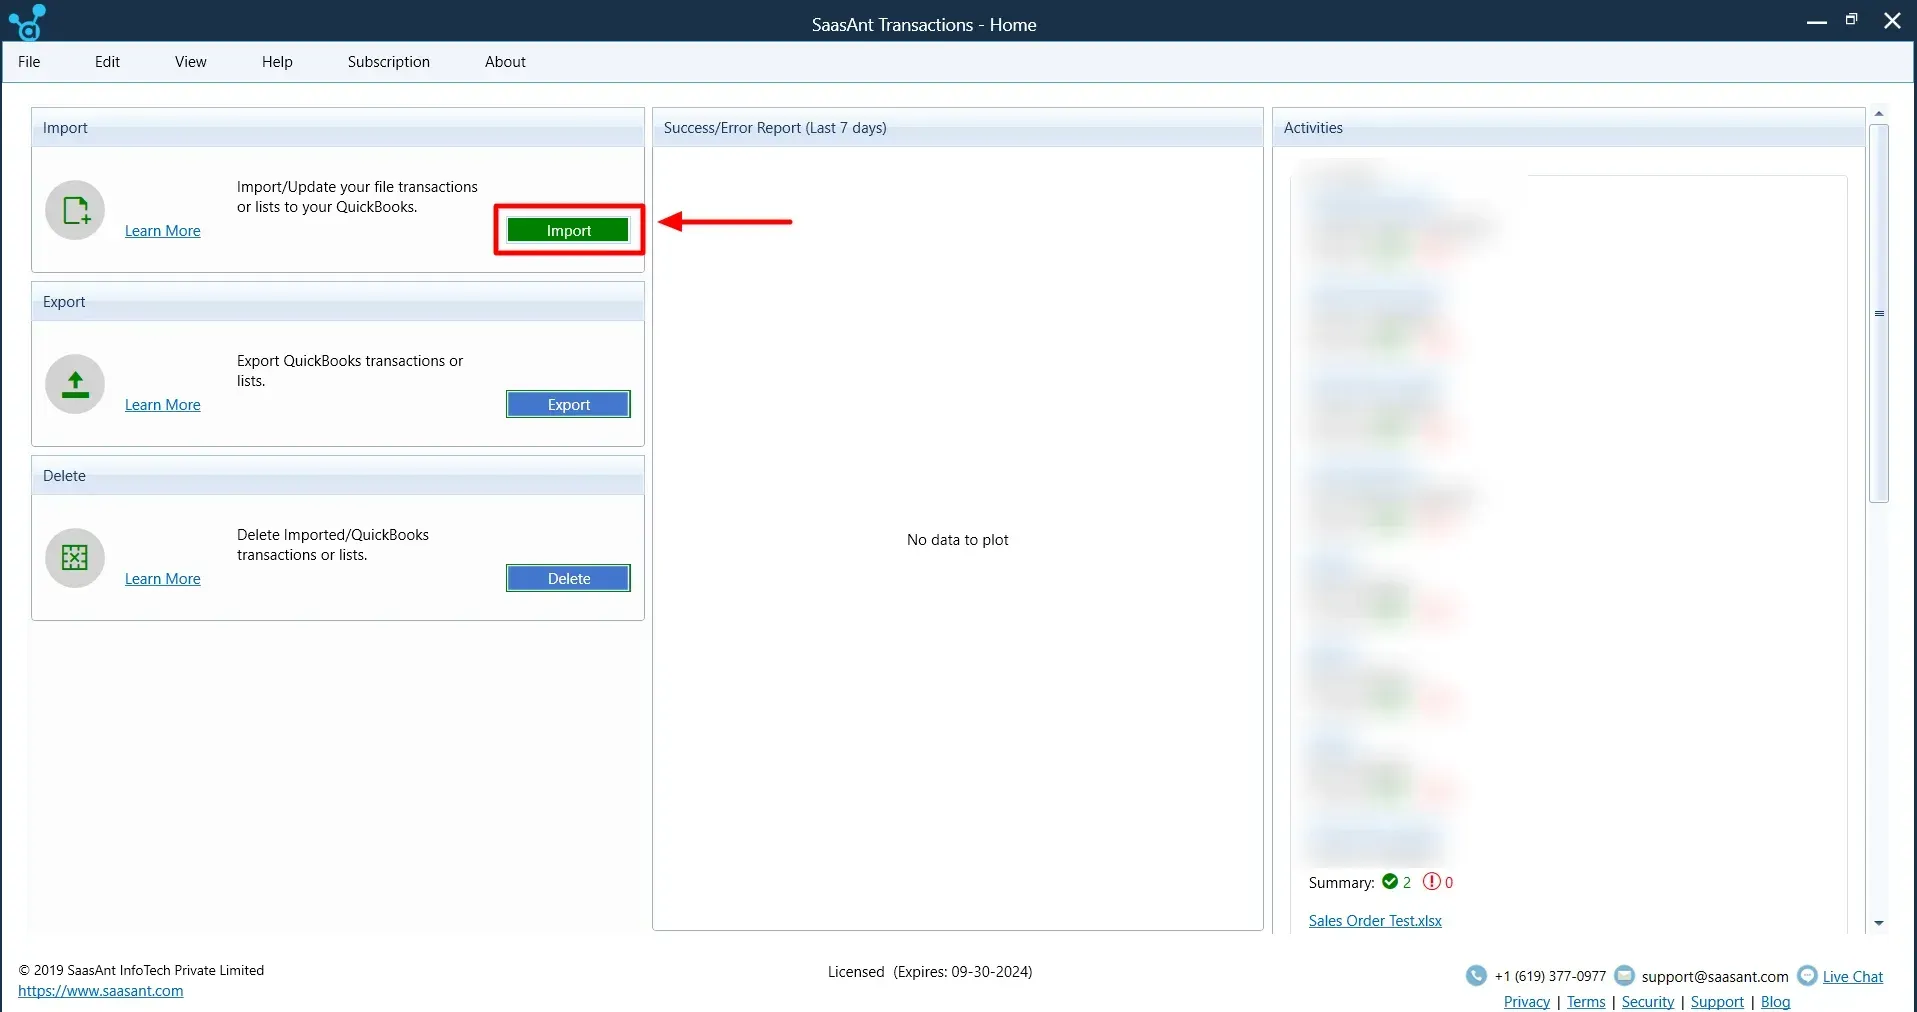
Start by clicking the 'Import' button on the Dashboard. Navigate to the 'File' menu and choose 'Import.'
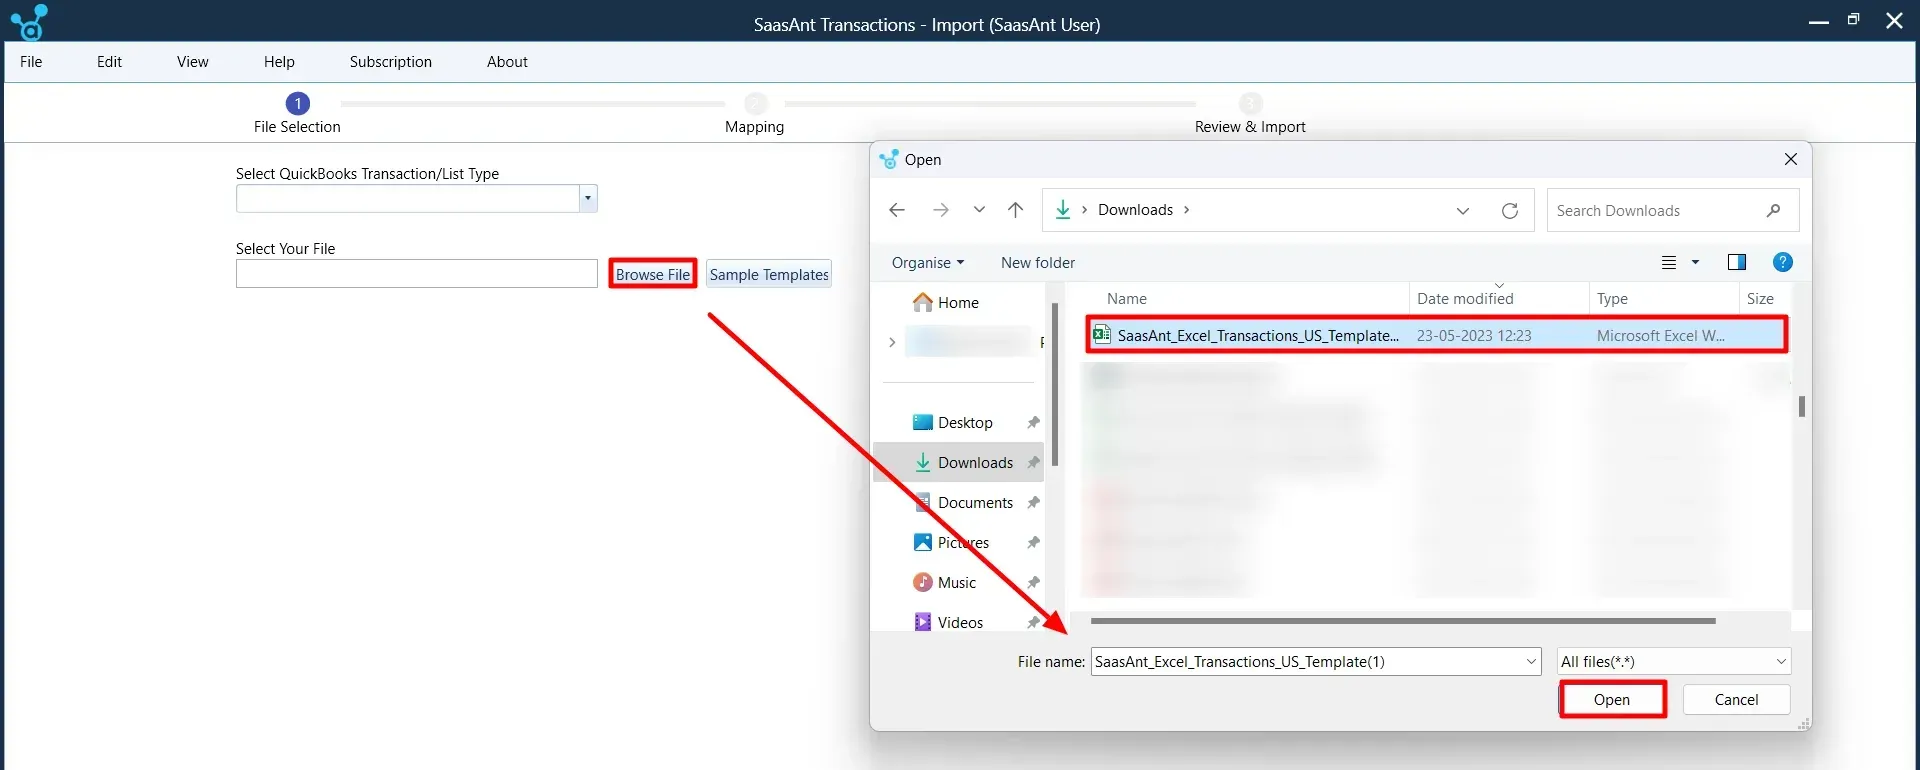
Next, select "Vendors" as the data type for QuickBooks.
Click ‘Browse File’ to upload your vendor file from your computer, or use the 'Sample Templates' option to access a ready-made template for reference.
Step 3: Map Your Data
Match the columns from your file to the appropriate QuickBooks Desktop fields.
If you're using a SaasAnt template, the mapping will be done automatically, saving time.
You can also download the template to ensure your data is correctly formatted.
Step 4: Review and Import
Carefully review your mapped data on the Review Grid to check for accuracy.
Click 'Send to QuickBooks' to complete the import of your vendor details into QuickBooks Desktop.
Why Should You Import Vendors into QuickBooks Desktop?
Managing your vendor list is crucial for keeping your business operations smooth. QuickBooks Desktop makes vendor management more manageable by allowing bulk data import. Whether you’ve migrated from a spreadsheet or need to consolidate multiple vendor lists, importing saves you from entering everything manually.
By importing vendor data, you ensure that QuickBooks Desktop is always up-to-date with the most accurate information. This helps you stay organized and ensures that payments are processed quickly and correctly.
Tips for Successful Vendor Imports
To make sure everything goes smoothly, here are some tips for a successful import:
Back up your data: Always create a company file backup before importing. That way, you can restore your data if anything goes wrong.
Test imports with small files: Try importing a sample file to ensure everything works as expected before importing large datasets.
Check field mappings: Ensure that the fields in your file match the fields in QuickBooks Desktop. This step helps avoid errors in data import.
Optimizing Import Settings in SaasAnt Transactions for Efficient Vendor Management
When importing vendor lists into QuickBooks Desktop using SaasAnt Transactions, configuring the import settings appropriately can significantly enhance efficiency and accuracy. Here's how specific settings can address common challenges:
1. Auto Create List Entities
Purpose: Automatically create new vendors in QuickBooks if they are not already present.
Real-World Application: When importing a vendor list that includes new suppliers, this setting eliminates the need to manually add each vendor, streamlining the import process.
2. Date Format in File
Purpose: Ensures that dates in your import file are correctly interpreted by QuickBooks.
Real-World Application: If your vendor data uses a date format like DD/MM/YYYY, specifying this format prevents errors during import, ensuring transactions are recorded on the correct dates.
3. Find Matching Transactions in QuickBooks by Reference Number
Purpose: Identifies existing transactions in QuickBooks based on reference numbers to prevent duplicates.
Real-World Application: When importing vendor bills, this setting ensures that only new transactions are added, maintaining data integrity by avoiding duplicate entries.
4. Truncate Text Exceeding QuickBooks Limits
Purpose: Automatically shortens text fields that exceed QuickBooks' character limits.
Real-World Application: If vendor descriptions or notes are too lengthy, this setting truncates them to fit within allowed limits, preventing import errors and ensuring a smooth import process.
By customizing these settings in SaasAnt Transactions, you can effectively manage and import vendor lists into QuickBooks Desktop, reducing manual data entry and minimizing errors.
Conclusion
Importing vendors into QuickBooks Desktop is a simple, effective way to streamline your accounting processes. Whether using the built-in tools or SaasAnt Transactions Desktop for automation, managing your vendor list has never been easier.
So why spend hours entering data manually when you can import it quickly and efficiently? Try SaasAnt Transactions Desktop today and take your vendor management to the next level!
FAQ’s
What file formats are supported for vendor imports in QuickBooks Desktop?
QuickBooks Desktop supports IIF, CSV, and Excel file formats for vendor imports. Choose the format that best suits your data.
How do I handle duplicate vendor entries during the import process?
QuickBooks will flag duplicate vendors during the import process. You can skip or merge them to keep your vendor list clean.
Can SaasAnt Transactions Desktop automate the vendor import process?
Yes! SaasAnt Transactions Desktop automates bulk vendor imports, saving time and ensuring data accuracy. It’s a great way to simplify your accounting workflow.