Everything About Xero Expenses: Setting Up Expense and Mileage Claims

Discover the power of Xero Expenses, an innovative solution that streamlines the process of reimbursing personal expenses incurred by your staff while tracking company spending. With user roles like Submitter, Approver, and Admin, you can efficiently manage expense claims and empower your team to handle expenses within Xero. Available on both the web version and the Xero Me mobile app, Xero Expenses offers flexibility and accessibility for seamless expense management. Subscription to Xero Expenses is essential for its use, ensuring your organisation benefits from its comprehensive features. You can transition from classic expense claims to Xero Expenses to unlock enhanced functionality and integration with Xero Me for a more streamlined expense management experience.
Contents
How do you Set Up Expense Claims in Xero?
How do you Create an Expense Claim in Xero?
How do you Create and Submit a Mileage Claim?
How do you Import Expense Claims into Xero Easily?
Xero Expenses: A Solution for Effortless Expense Management
Conclusion
FAQs
How do you Set Up Expense Claims in Xero?
To begin, include Xero Expenses in your subscription. This will enable you and your team to initiate expense and mileage claims for your organisation. Admin privileges are required to configure Xero Expenses.
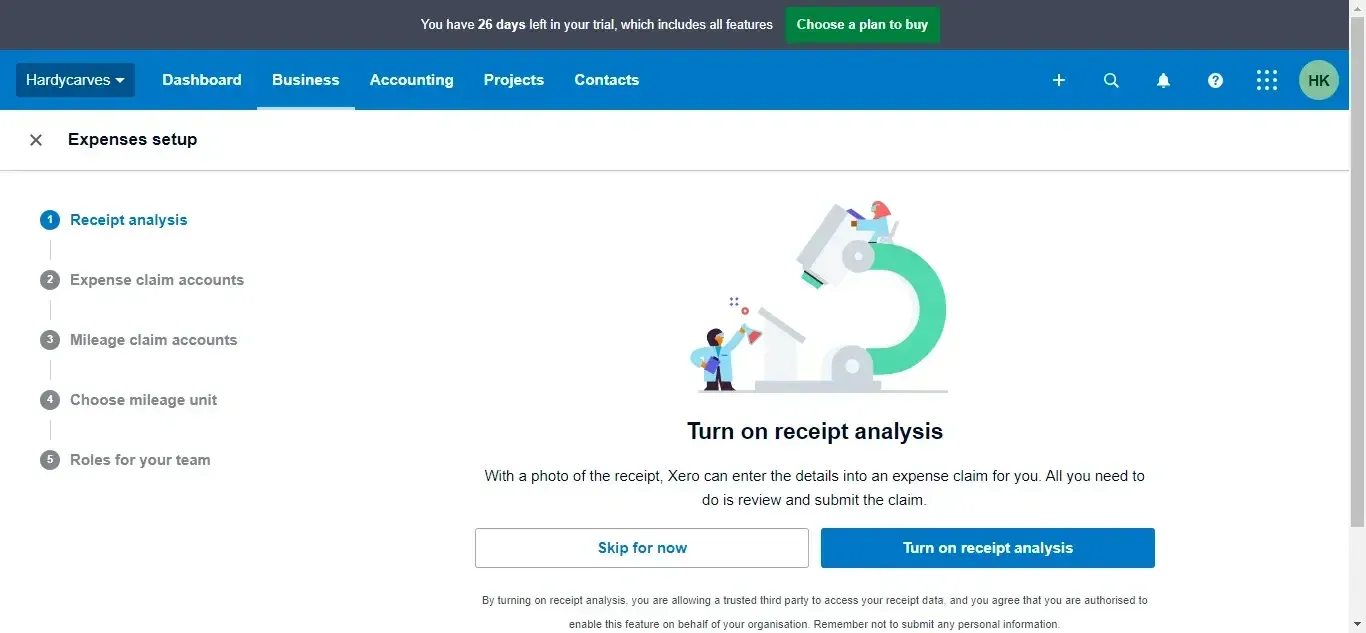
With receipt analysis activated, your employees can snap photos of their receipts on their mobile devices. This automatically populates the expense details, saving them from the tedious manual entry task. The app scans and extracts information like expenditure location, claim amount, vendor details, and other necessary fields, freeing up their time for more critical tasks.
What are the Steps to Set Up Xero Expenses?
Navigate to the “Business menu” and choose “Expense claims” found at the bottom.
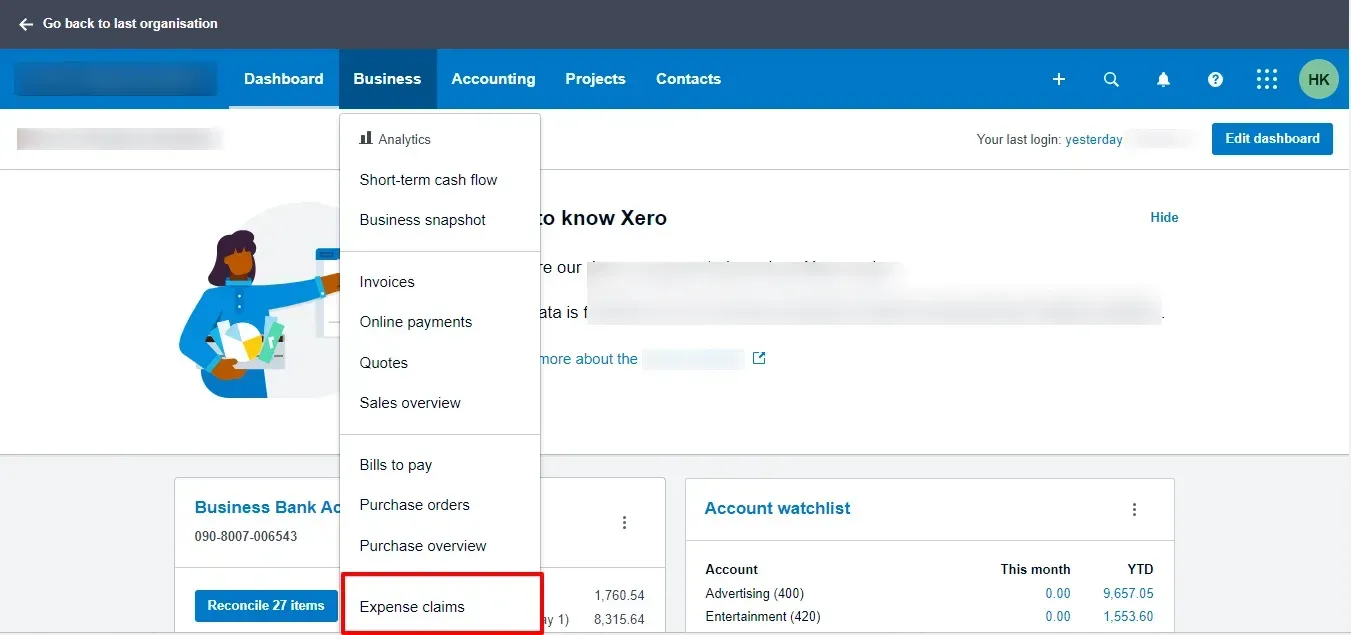
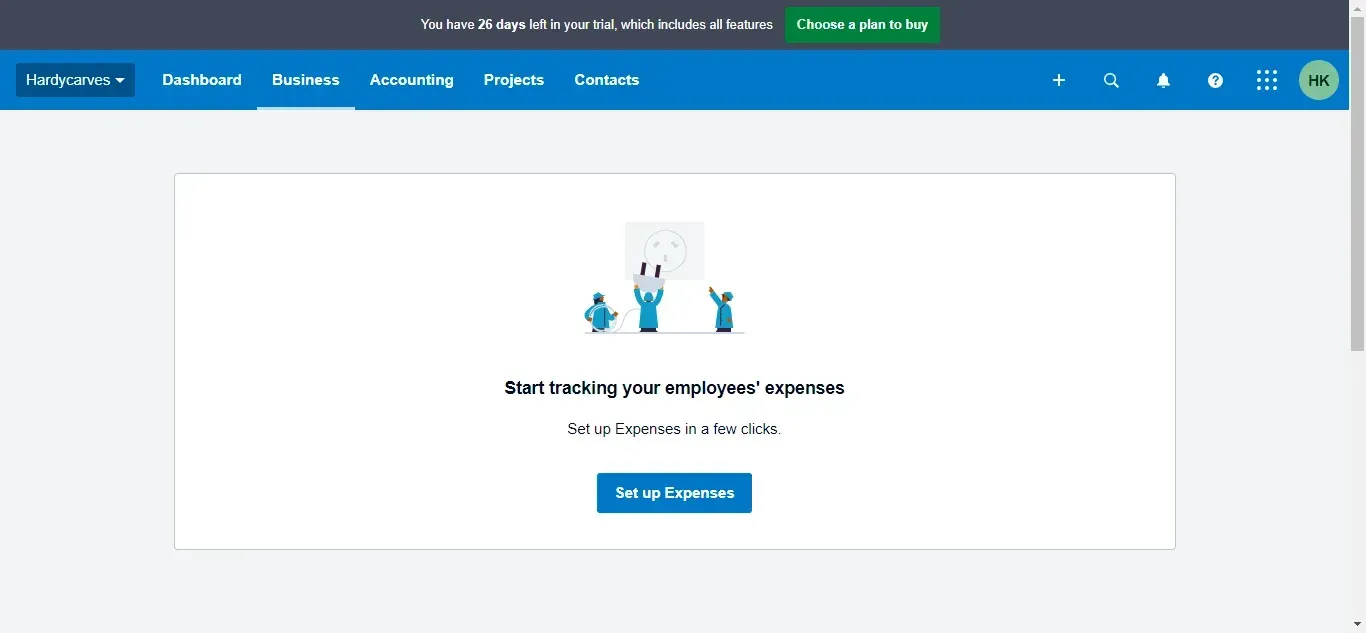
Click “Set up Expenses.”
Click Turn on receipt analysis to allow Xero to upload the receipt data. If you'd prefer to enter the information manually, click Skip For Now.
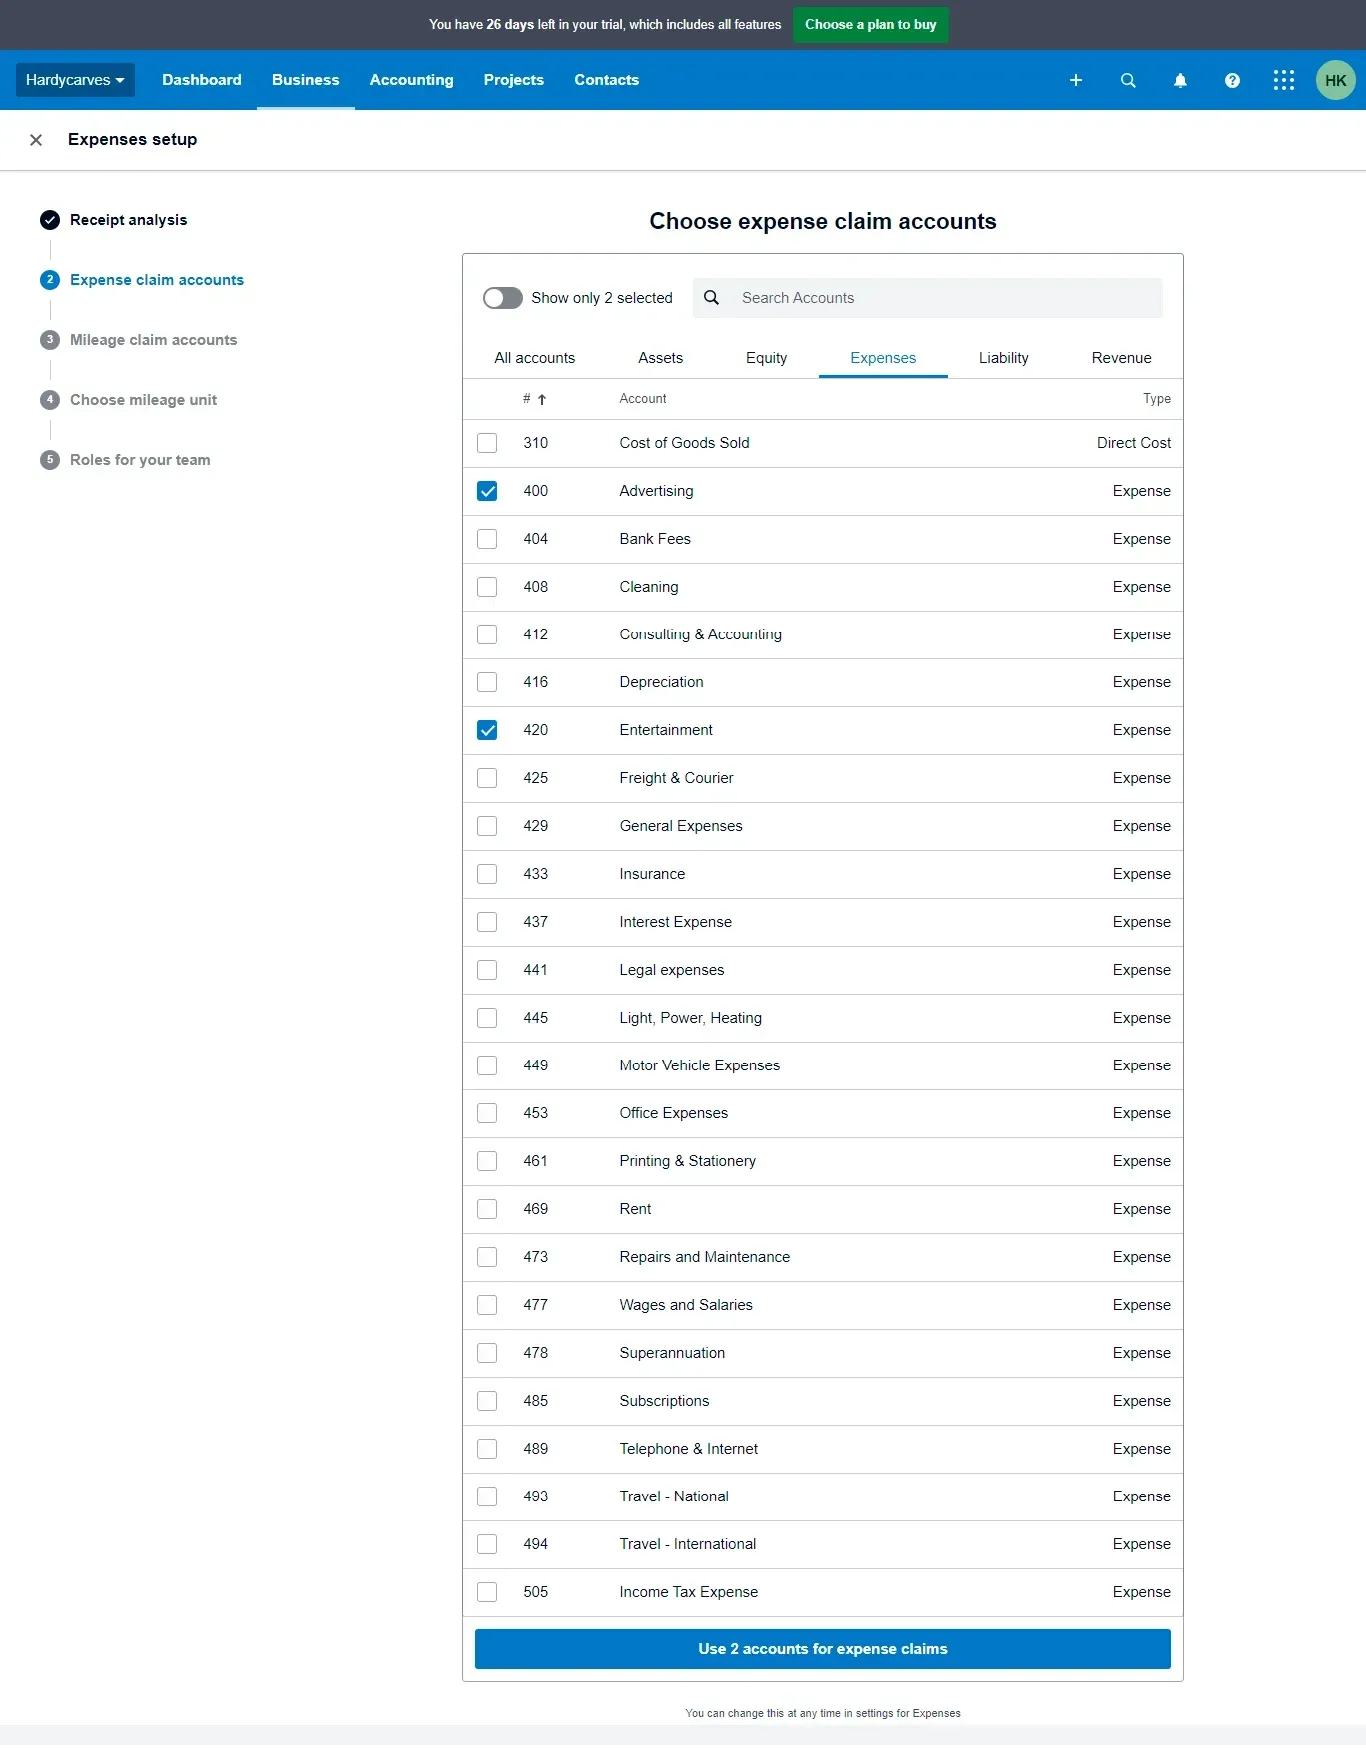
Select the accounts you want your team to use when creating expense claims, then click Use [number] account for expense claims. In this case, we have chosen two accounts.
Select the accounts you want your team to use when creating expense claims, then click Use [number] account for mileage claims. We have chosen two accounts for mileage reimbursement or claim in this case.
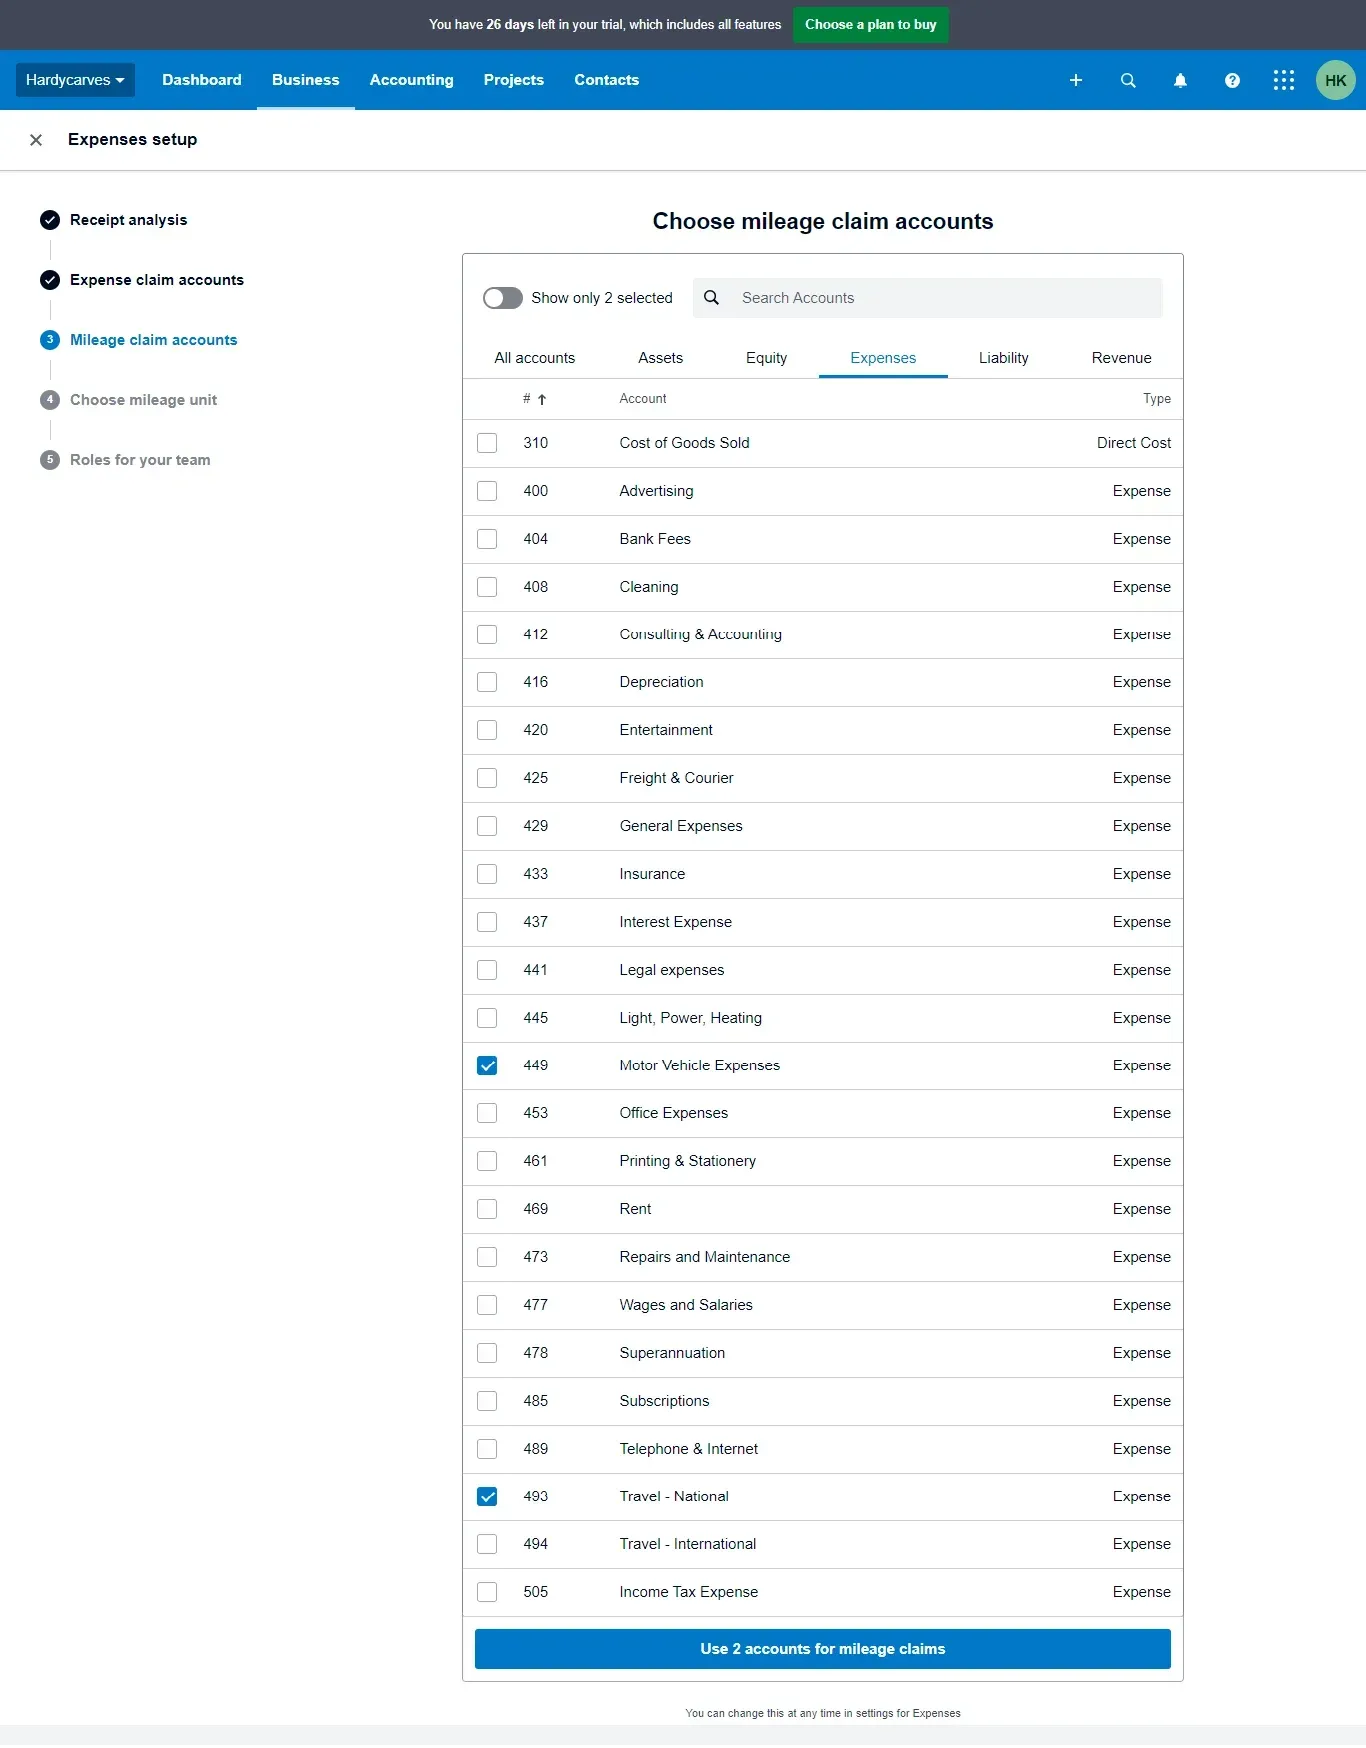
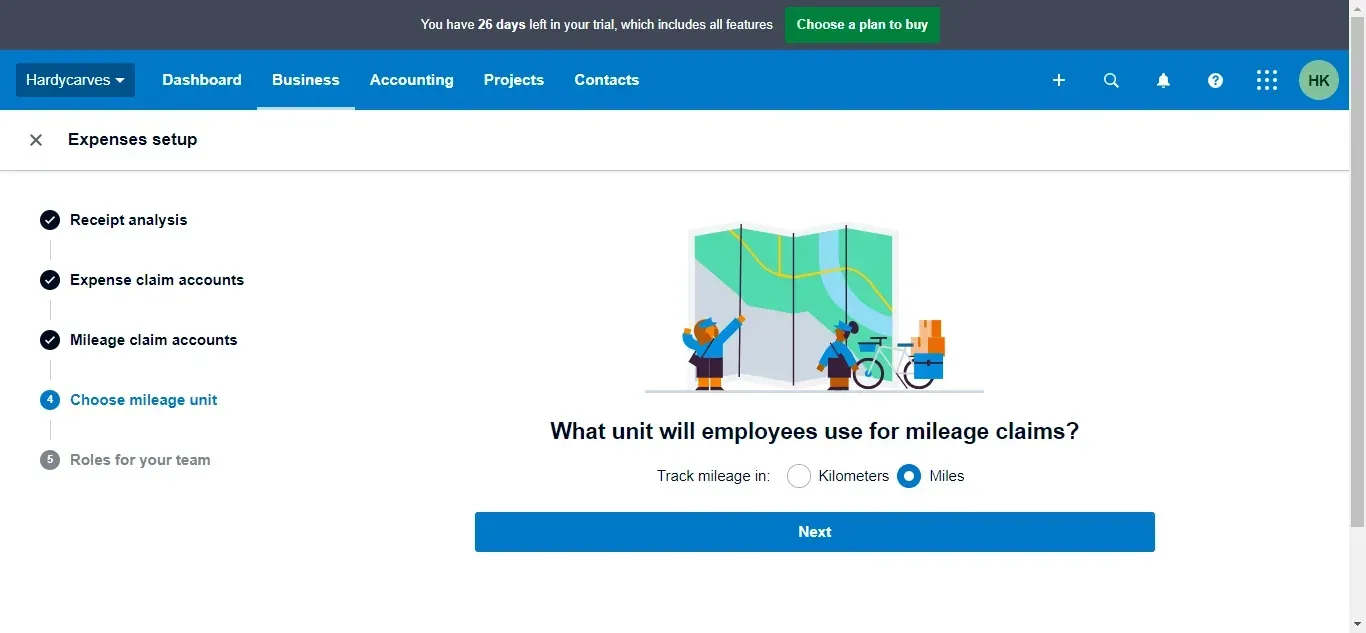
Choosing the mileage unit is essential to align with the unit in your country. The unit for Australia, the UK, and the USA is usually “Miles.”
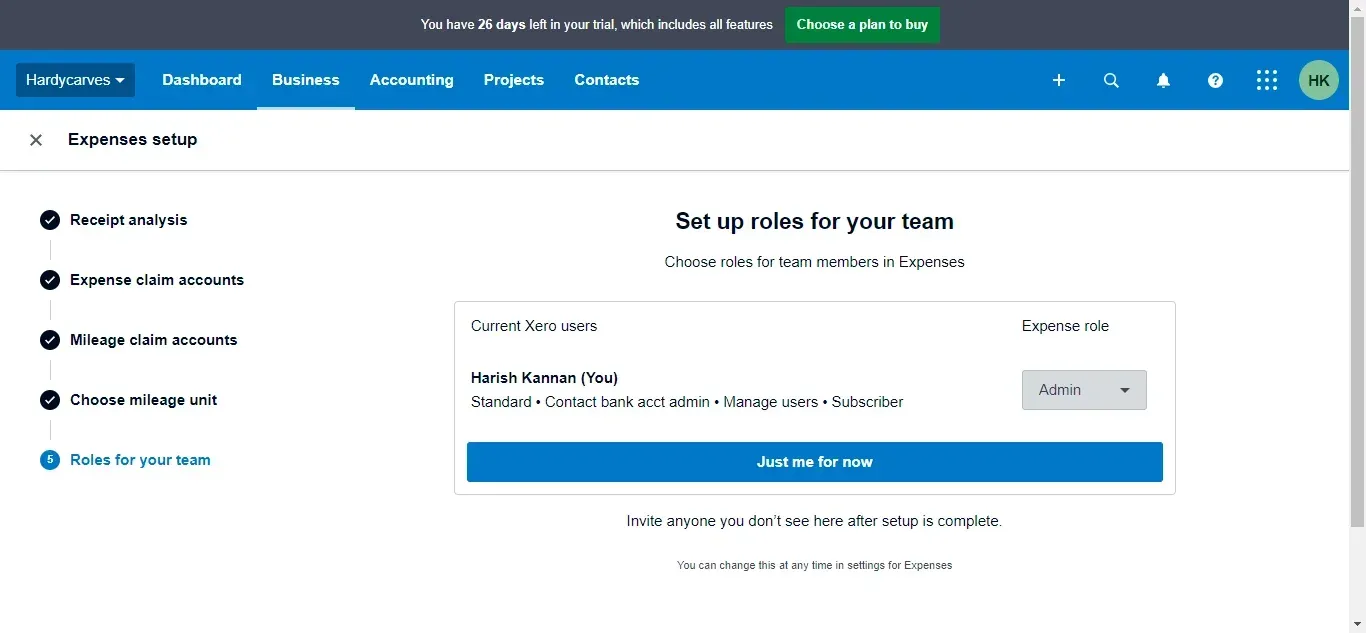
For each user in your organisation, select if you’d like them to have access to Xero Expenses and the user role you’d like them to have, then click Update roles for [number] members. If you're the only user, click Just Me for now to continue.
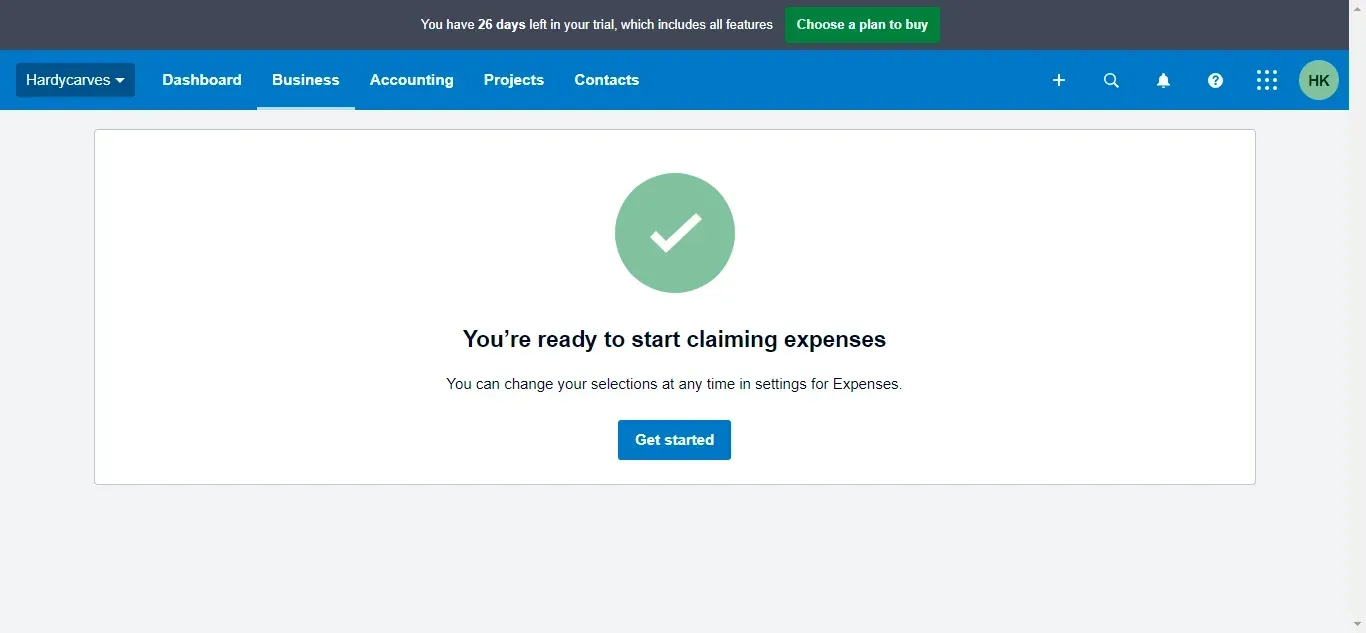
Click Get Started.
How do you Create an Expense Claim in Xero?
Submit an expense claim to receive reimbursement for either your expenditures or your daily allowance.
Initiate and submit expense claims for reimbursement of personal expenses or daily allowances. Administrators or approvers with appropriate permissions can also create claims for employees. To make a claim, access the expense claim section, choose the employee, and utilise the auto-populate feature on the Xero Me mobile app after an expense admin enables receipt analysis.
Using Xero Expense
Navigate to the Business menu and select "Expense claims."
Choose "New expense" and then "Expense claim."
You can upload your expense receipt by clicking "Upload" or drag and drop an image into the designated field.
In the "Purchase Amount" section, specify the currency and total amount paid, including tax. If the currency differs from your organisation's base currency, the applicable exchange rate is displayed at the bottom.
Fill in the required fields with relevant details.
The "Optional" section allows you to add tracking categories, associate the expense with a project or customer, or apply a label.
Select one of the following actions:
"Save draft" to finalise and submit later.
"Submit" to send the expense claim to your approver.
"Approve" if you are the approver and wish to process the claim.
You can also use the menu icon (three vertical dots) to choose additional options such as "Save draft + add another claim," "Submit + add another claim," or "Approve + add another claim."
Using Classic Expenses
To add a receipt:
Navigate to the Business menu and choose "Expense claims."
Access the classic expense claims by selecting "Go to classic expense claims."
Click "Add Receipt" and fill in the receipt details.
Optionally, use the file icon to upload a copy of your receipt from your file library or computer.
Click "Save" or "Save & Add Another Receipt" to include additional receipts if needed.
To submit an expense claim for approval:
Select "Expense claims" in the Business menu and go to classic expense claims.
Within the Current Claim tab, select the receipts you wish to include in this claim.
Click "Submit for Approval" and confirm by selecting "OK."
Your claim is now accessible in the Previous Claims tab or, while pending, in the Awaiting Authorisation tab.
Using Xero Me Application: For Expenses on the Go!
iOS
Open the Xero Me app and access the dashboard.
Tap on "+ New claim."
Select "Expense claim."
Attach a file to the claim by tapping "Add receipt." You can:
Take a photo of the receipt and continue.
Choose a photo, file, PDF, or document from your device.
Select a photo from your photo library.
If you don't have a receipt, tap "No receipt."
Fill in the required expense details.
Optionally, add tracking categories, assign to a project or customer, or assign a label in the Optional fields.
Tap "Submit" to send the claim for approval or "Save draft" to keep it as a draft.
Android
Open the Xero Me app and go to the dashboard.
Tap on "+ New claim," then select "Expense claim."
You can use your camera to take a photo of the receipt or select an image, file, PDF, or document from your device.
If you don't have a receipt to upload, you can skip this step and enter the details manually.
After uploading the receipt:
Tap "Add details now" to manually fill out the expense claim fields.
Or, tap "Analyse for Xero" to let Xero extract receipt details and enter them into the claim. You'll receive a notification when the claim is ready.
Review the claim details and fill in any missing information like amount, description, and date.
Optionally, add tracking categories, assign to a project or customer, or assign a label in the Optional section.
Tap the send icon to save the claim as a draft, submit it for approval, or approve it if you're the approver.
How do you Create and Submit a Mileage Claim?
Initiate and submit a mileage claim for reimbursement. Please note that this feature is not available in Classic expense claims.
If you have admin or approver permissions, you can create a mileage claim on behalf of an employee. Access the mileage claim section, choose the employee, and note that the employee details cannot be edited once made.
The distance measurement defaults to your country's standard. Xero automatically calculates the total amount in your organisation's base currency.
Using Xero Expenses
Navigate to the Business menu and choose "Expense claims."
Select "New expense," then choose "Mileage claim."
Optionally, upload an image for the mileage claim.
Enter the mileage to claim, the standard rate per mile or kilometre, a trip description, and the travel date.
In the Optional section, add tracking categories, assign to a customer or project, or label the expense.
Review your claim, then click:
"Save draft" to finalise and submit later.
"Submit" to send the expense claim for approval.
"Approve" if you're the approver and wish to process the claim.
Use the menu icon (three vertical dots) to choose additional options such as "Save draft + add another claim," "Submit + add another claim," or "Approve + add another claim."
Using Xero Me (iOS)
Open the Xero Me app and go to the dashboard.
Tap on "+ New claim."
Select "Mileage claim."
Add a document by tapping "Add document" for the mileage claim.
Enter the distance travelled or use the "Calculate distance" option to specify start and end locations. Once Xero shows the route on the map, tap "Use this distance."
Enter the standard rate per mile or kilometre, a trip description, and the travel date.
Assign an expense account by tapping "Account."
Optionally, use the "Optional fields" section to add tracking categories, assign to a project or customer, or apply a label to this expense.
Tap "Submit" to send the claim for approval or "Save draft" to keep it as a draft.
Using Xero Me (Android)
Open the Xero Me app.
On the dashboard, tap +, then tap Mileage Claim.
(Optional) Add a document to add a file or photo for the mileage claim.
Enter the distance travelled, or tap Calculate distance to enter a start and end location. Once Xero displays the route on the map, tap Use this distance.
Enter the standard rate per mi or km, a trip description, and travel date.
Tap Account to assign an expense account.
Under Optional, add tracking categories, assign to a customer or project, or label the expense.
Review your claim, tap the send icon, then tap:
Approve if you’re the approver and want to process the claim
Submit the expense claim to an approver
Save the draft to finalise and submit it later
How do you Import Expense Claims into Xero Easily?
Using SaasAnt Transactions (Online) software, you can import Expense Claims from text files or Excel spreadsheets directly into Xero.
Connect your Xero account to the SaasAnt Transactions (Online) App from the Xero App Marketplace by clicking the "Get this app" button and get the 15-day free trial. Alternatively, you can log in with your Xero account directly through this link - https://apps.saasant.com/eti-importer-login/index.html
Steps to Import Expense Claim into Xero
To import Expense Claims into Xero using the SaasAnt Transactions (Online) application, follow the steps below.
Step 1: To upload your file, click on the "New Import" Menu.
Step 2: Select your file and spreadsheet with the Expense Claim you want to import.
Step 3: Select Expense Claim as the Xero entity.
Step 4: Set up the mapping of the columns in your Expense Claim import file to the corresponding fields in Xero.
Step 5: Click Import, and your Expense Claim will be directly added to your Xero account.
Xero Expenses: A Solution for Effortless Expense Management
Ditch the paper and manual entry hassles! Xero Expenses streamlines expense management by letting you capture receipts with your phone camera directly within the Xero Me app. Say goodbye to tedious data entry - Xero Expenses uses clever technology to automatically extract details from your receipts, saving you valuable time and minimising errors.
Simplify Expense Claims
Effortless Receipt Capture: Ditch the paper! Use your phone camera within the Xero Me app to capture receipts.
Automatic Data Extraction: No more manual entry. Xero Expenses uses OCR to automatically extract details from receipts, saving you time and minimising errors.
One-Click Claim Submission: Submitting claims is easy. Review the extracted details and submit with a single click.
Streamline Mileage Tracking
Convenient Map Tracking: The Xero Me app leverages maps to make tracking and claiming mileage painless.
Gain Real-Time Visibility
Instant Reimbursement Updates: Stay informed about employee reimbursements and their due dates, allowing you to understand your cash flow in real-time.
Boost Efficiency and Control
Robust Reporting and Analytics: Gain valuable insights into spending patterns across your organisation, empowering you to make informed financial decisions and optimise budgeting.
Customisable Expense Categories: Tailor expense categories to your business needs, ensuring clear and organised expense tracking.
Approval Workflows: Define approval workflows for different expense types, providing greater control over spending within your organisation.
Conclusion
Xero Expenses presents a robust and streamlined solution for organisations to manage expense claims efficiently. With features like receipt analysis, user roles, and seamless integration with the Xero Me app, it offers a user-friendly experience for administrators and employees. Automating receipt capture, tracking mileage claims, and customising expense categories enhances overall efficiency and control. Real-time visibility into spending patterns and robust reporting tools empower businesses to make informed financial decisions.
To further streamline your financial processes, consider using Saasant Transactions to efficiently import your expense data directly into Xero. This integration simplifies the expense management process, reduces manual tasks, and ensures compliance with expense policies, making Xero Expenses a valuable asset for modern businesses. Use Saasant Transactions to enhance expense management and provide seamless data flow into Xero.
FAQs
What are the steps to set up mileage claims in Xero?
Here are the steps to set up mileage claims or reimbursement in Xero
Navigate to the Business menu and select Expense Claims.
Click the settings icon, then select the Mileage claims tab.
Click the Set up mileage claims.
Select the accounts you want your team to use when creating mileage claims, then click Use [number] accounts for mileage claims.
How do you submit an expense claim in Xero?
Go to the Business menu and choose Expense Claims.
Select the 'Add Expense Claim' button.
Fill out the expense details, including the date, amount, and description.
Attach any relevant receipts or documents, then click Submit for Approval.
How do you approve an expense claim in Xero?
Navigate to the Business menu and click on Expense Claims.
Choose the claim you wish to review from the list of submitted claims.
Review the details and attached receipts, then click Approve or Decline.
How do you reconcile expense claims in Xero?
Access the Accounting menu and select Bank Accounts.
Choose the account used for the expense payment.
Find the payment transaction, then click on it to open the reconciliation window.
Select the appropriate expense claim from the list to match it with the bank transaction.
How can you delete an expense claim in Xero?
Go to the Business menu and select Expense Claims.
Find the claim you wish to delete and open it.
Click the Options button, then select Delete Claim.
Confirm the deletion when prompted.
How do you edit an expense claim in Xero?
Navigate to the Business menu and choose Expense Claims.
Click on the claim you need to edit.
Update the necessary information, such as the amount, description, or attached files.
Save the changes by clicking Update.
How do you set up default expense accounts for new claims in Xero?
From the Settings menu, select General Settings.
Click on Expense Claim Settings.
Choose the default expense accounts for new claims.
Save the settings by clicking Update.
How do you view all processed expense claims in Xero?
Access the Reports menu and select Expense Claims.
Choose the Processed Claims Report to view all approved and paid claims.
Apply any filters or specify a date range to refine the results.
How do you assign expense claims to a specific project in Xero?
While creating or editing an expense claim, select the relevant project using the Project field.
Complete the claim details and ensure the project is correctly assigned before submission.
How do you set reminders for overdue expense approvals in Xero?
Go to the Settings menu and select Reminder Settings.
Enable reminders for Expense Claims.
Set the conditions and frequency for the reminders.
Save the settings to activate reminders for overdue approvals.