Xero Invoicing Essentials: A Beginner's Guide
 Invoicing is a cornerstone of any successful business. It formalizes the payment request, provides a vital sales record, establishes professionalism, aids in financial tracking, and offers legal protection. With proper invoicing, businesses can avoid delayed payments, poor cash flow management, and difficulties during tax season or in the event of disputes.
Contents
Setting Up Your Xero Invoicing System
Creating an Invoice Template
Generating Invoices in Xero
How to Add Bank Details in Xero
How to Convert Quotes to Invoices in Xero
Sending Invoices via Xero
Advanced Invoicing Features
How to Set Up a Recurring Invoice
Creating proforma invoices
Xero Advanced Invoice Templates
How to Use Advanced Invoice Templates
Enabling Multi-Currency in Xero
Receiving Payments and Managing Invoices
Conclusion
Xero offers a robust suite of invoicing tools designed to make getting paid more effortless and efficient for your business. If you're new to Xero, here's a quick overview of the key features that simplify the invoicing process:
User-Friendly Design: Xero's invoicing is built with simplicity in mind. Creating professional-looking invoices is straightforward, and the clean interface keeps everything organized.
Customizable Templates: Personalize invoices with your logo and branding. You can also add or remove fields to match your business requirements.
Automation Saves Time: Set up recurring invoices for subscriptions or regular clients. Xero can even send automatic payment reminders, taking this task off your hands.
Get Paid Faster: Integrate with popular payment gateways to allow clients to pay directly from the invoice with credit cards or online transfers.
Track Invoice Status: Know immediately when a client opens your invoice, helping you gauge follow-up timing effectively.
Xero's invoicing features provide a well-rounded solution for streamlining your billing processes. As you become more familiar with Xero, you'll discover more profound reporting tools and customization options that give you even greater control over your business finances.
Setting Up Your Xero Invoicing System
This section will walk you through setting up your invoicing system in Xero, ensuring you can efficiently create and send professional invoices to your clients. We'll cover creating invoice templates, customizing their appearance, and generating invoices from scratch or copying existing ones.
Understanding Xero's Invoicing Versions
Xero offers two versions of invoicing: Classic and New Invoicing. Let's briefly understand the difference:
Classic Invoicing: Requires manual entry of all invoice details and saving drafts.
New Invoicing: This feature automatically saves drafts, pre-fills many details, and offers features like adding items from previous invoices and showing/hiding specific fields.
Look at the bottom of the sales invoice screen to check which version you're using. The link will either say "Switch to new invoicing" (indicating you're on classic) or "Switch to classic invoicing" (indicating you're on the new version).
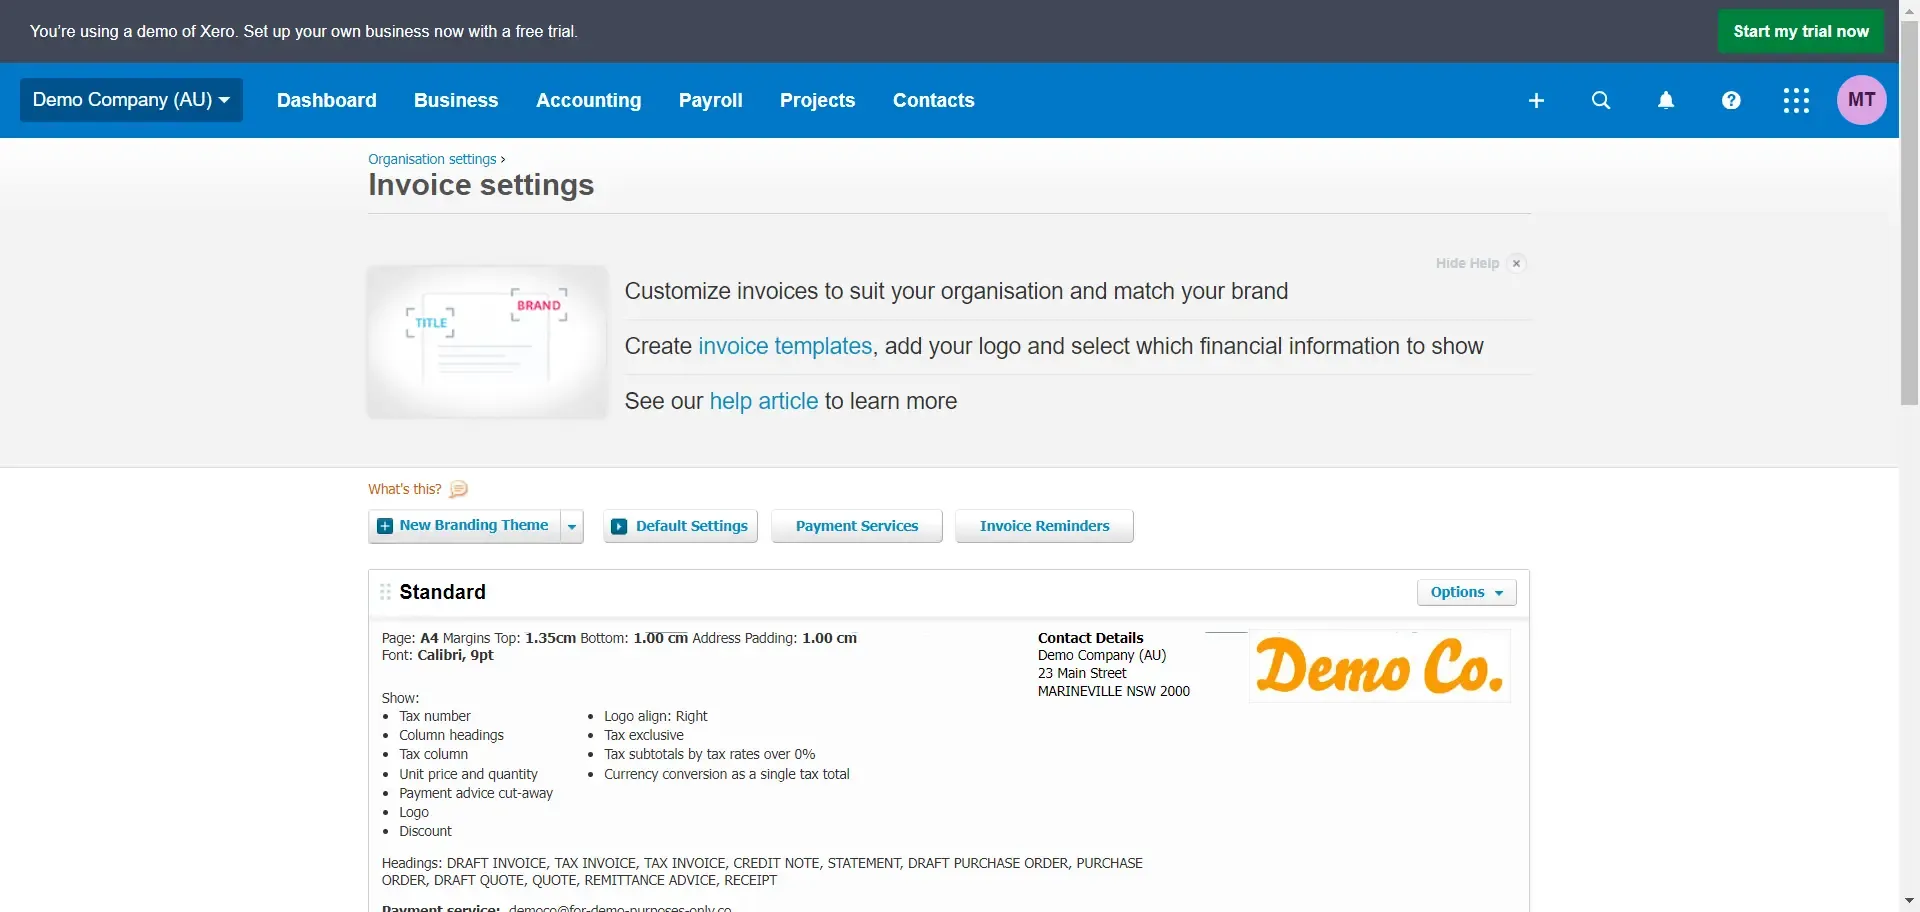
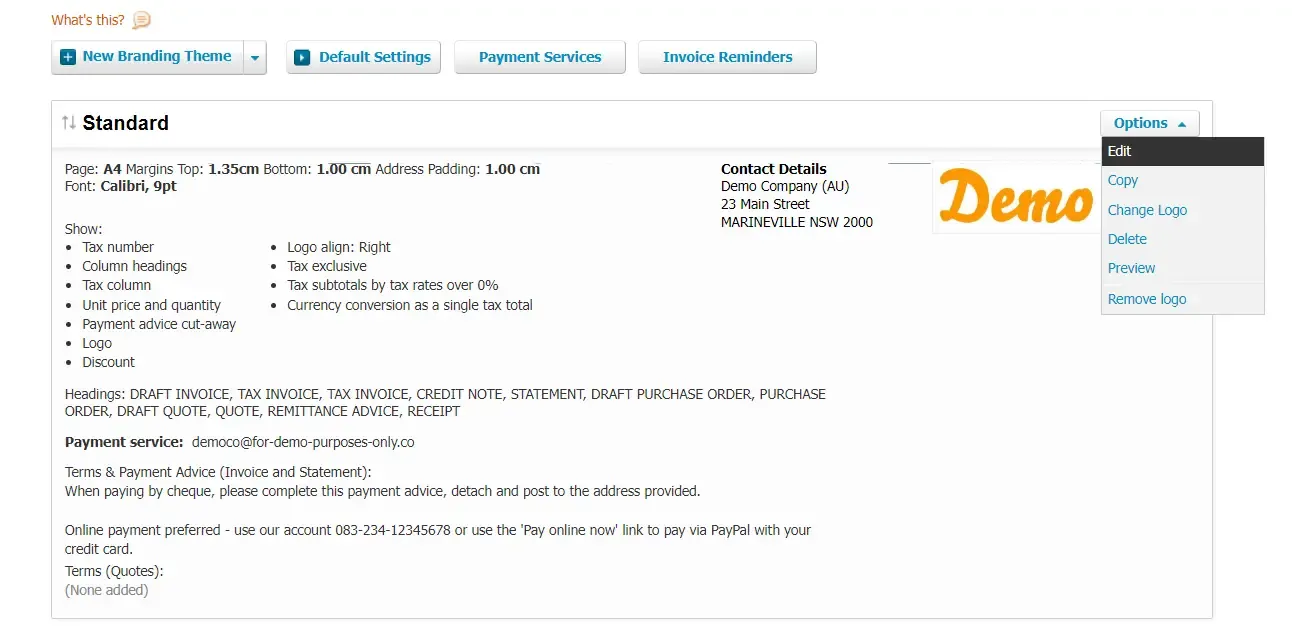
Creating an Invoice Template
Creating invoice templates allows you to customize the appearance and information displayed on your invoices, quotes, credit notes, statements, and purchase orders. You can have multiple templates for different scenarios, such as varying payment terms or logos.
Steps to Create a New Invoice Template:
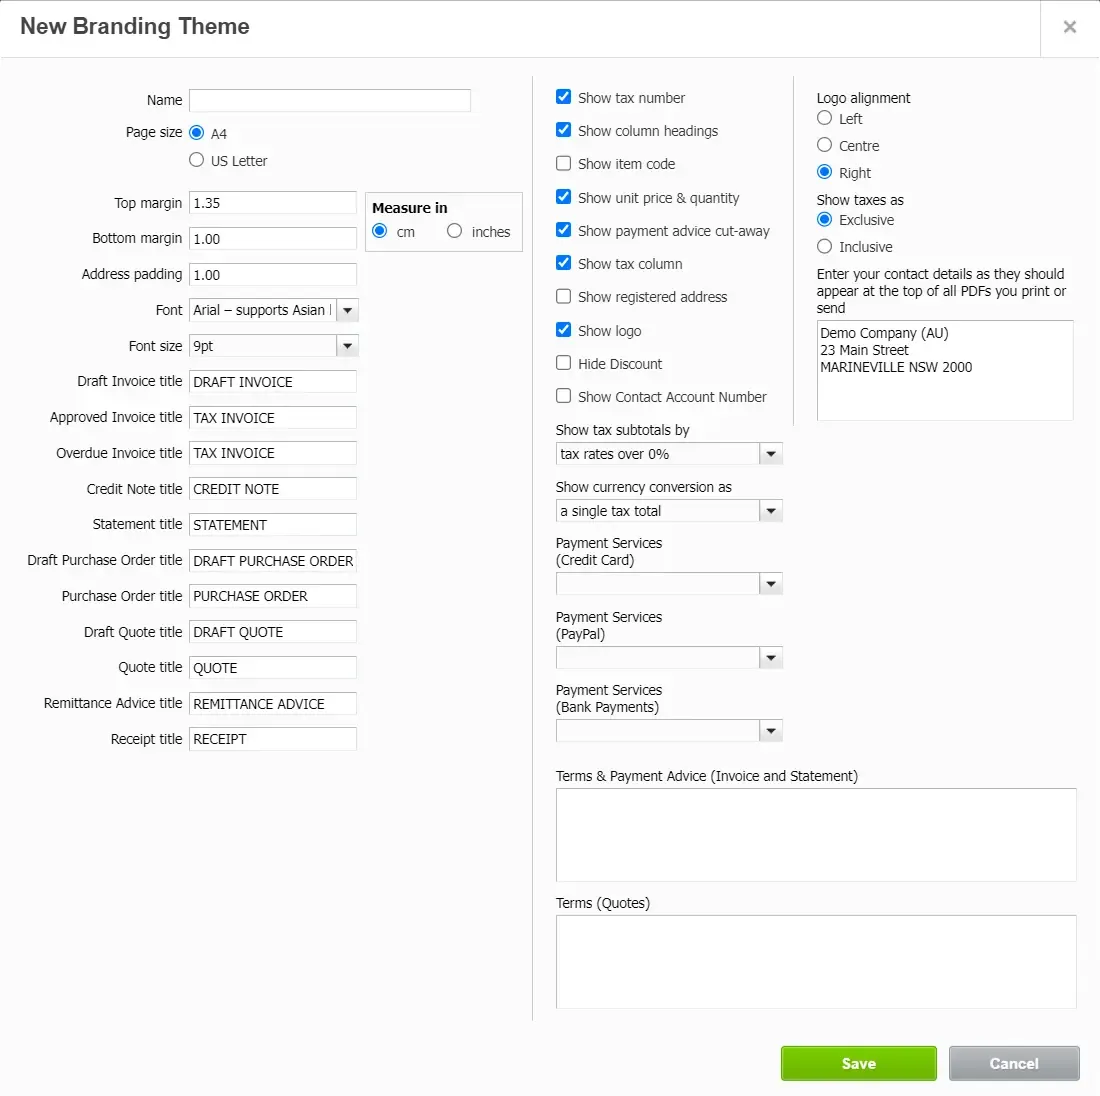
Click on your organization name and select Settings.
Go to Invoice settings.
Click on New Branding Theme.
Enter a descriptive name for your template.
Customize the appearance by adjusting the logo, font, and color scheme.
Choose which fields to display on the invoice, such as tax number, contact details, and terms.
Click Save to finalize your new template.
Copying and Editing Existing Templates:

To copy a template: In Invoice settings, find the template, click Options, and select Copy. Name the new template and click Save.
To edit a template, go to Invoice settings, find the template, click Options, and select Edit. Make the necessary changes and click Save.
Previewing Your Template:
Go to Invoice settings and select Options > Preview for the desired template.
To see the template with actual data, create a new invoice, fill in the details, choose the template under the Branding theme, and click Preview.
Generating Invoices in Xero
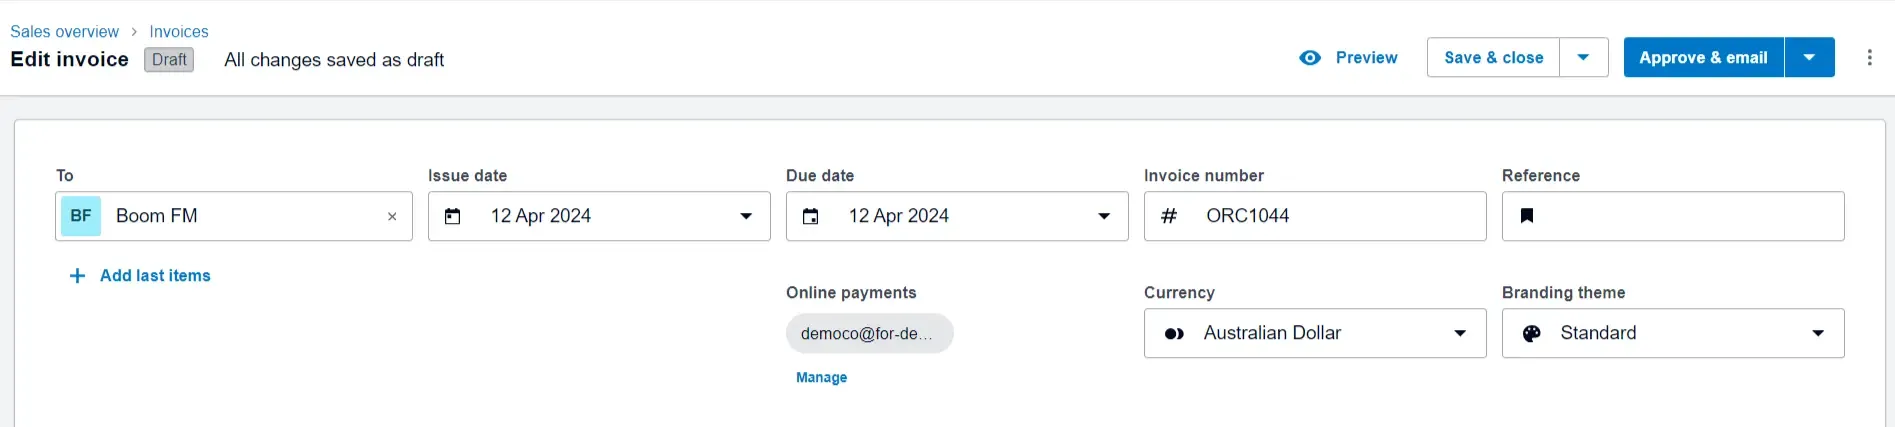
Xero allows you to create invoices from scratch or by copying existing ones. We'll explore both methods for New Invoicing:
Creating a New Invoice:
Click the + icon in the header and select Invoice.
In the To field, start typing to select an existing contact or add a new one.
(Optional) Click Add last items to include items from the previous invoice sent to this contact.
In the Item field, select existing inventory items or manually enter descriptions, quantities, and prices.
You can remove lines using the remove button or edit inventory items by double-clicking in the Item column and selecting Edit.
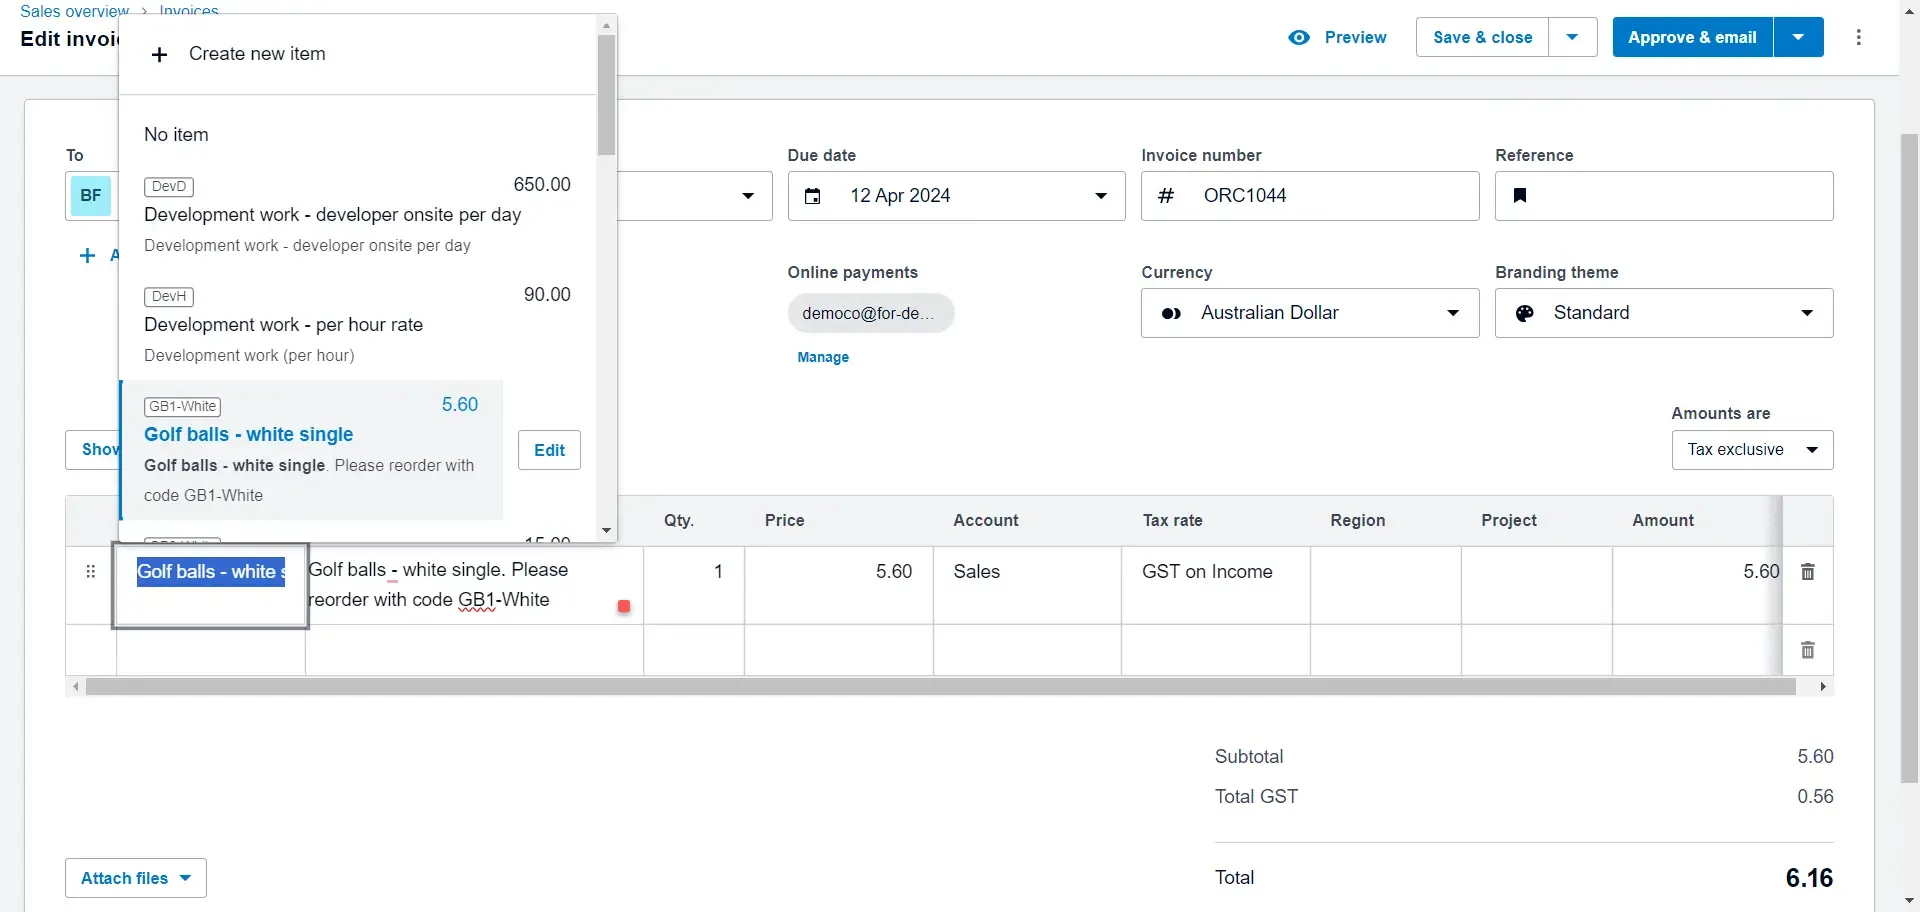
Reorder items by dragging and dropping them.
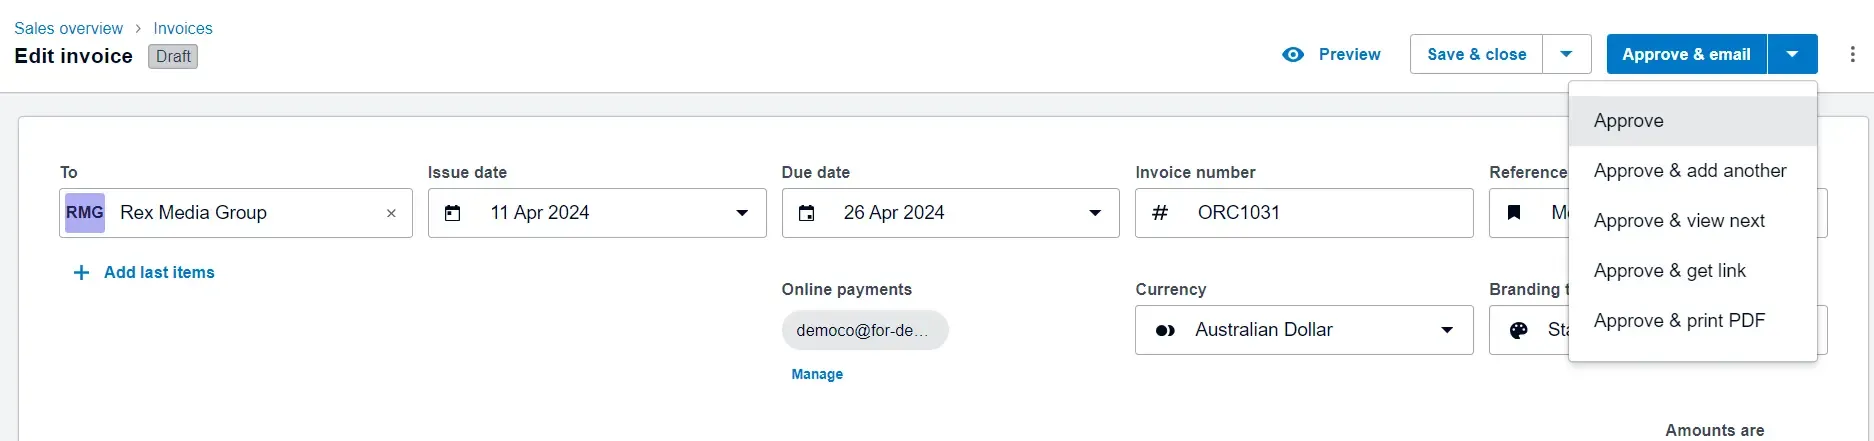
Click Save & close to save as a draft, Save & add another to create another invoice, or Submit for approval when ready.
Copying Invoices:
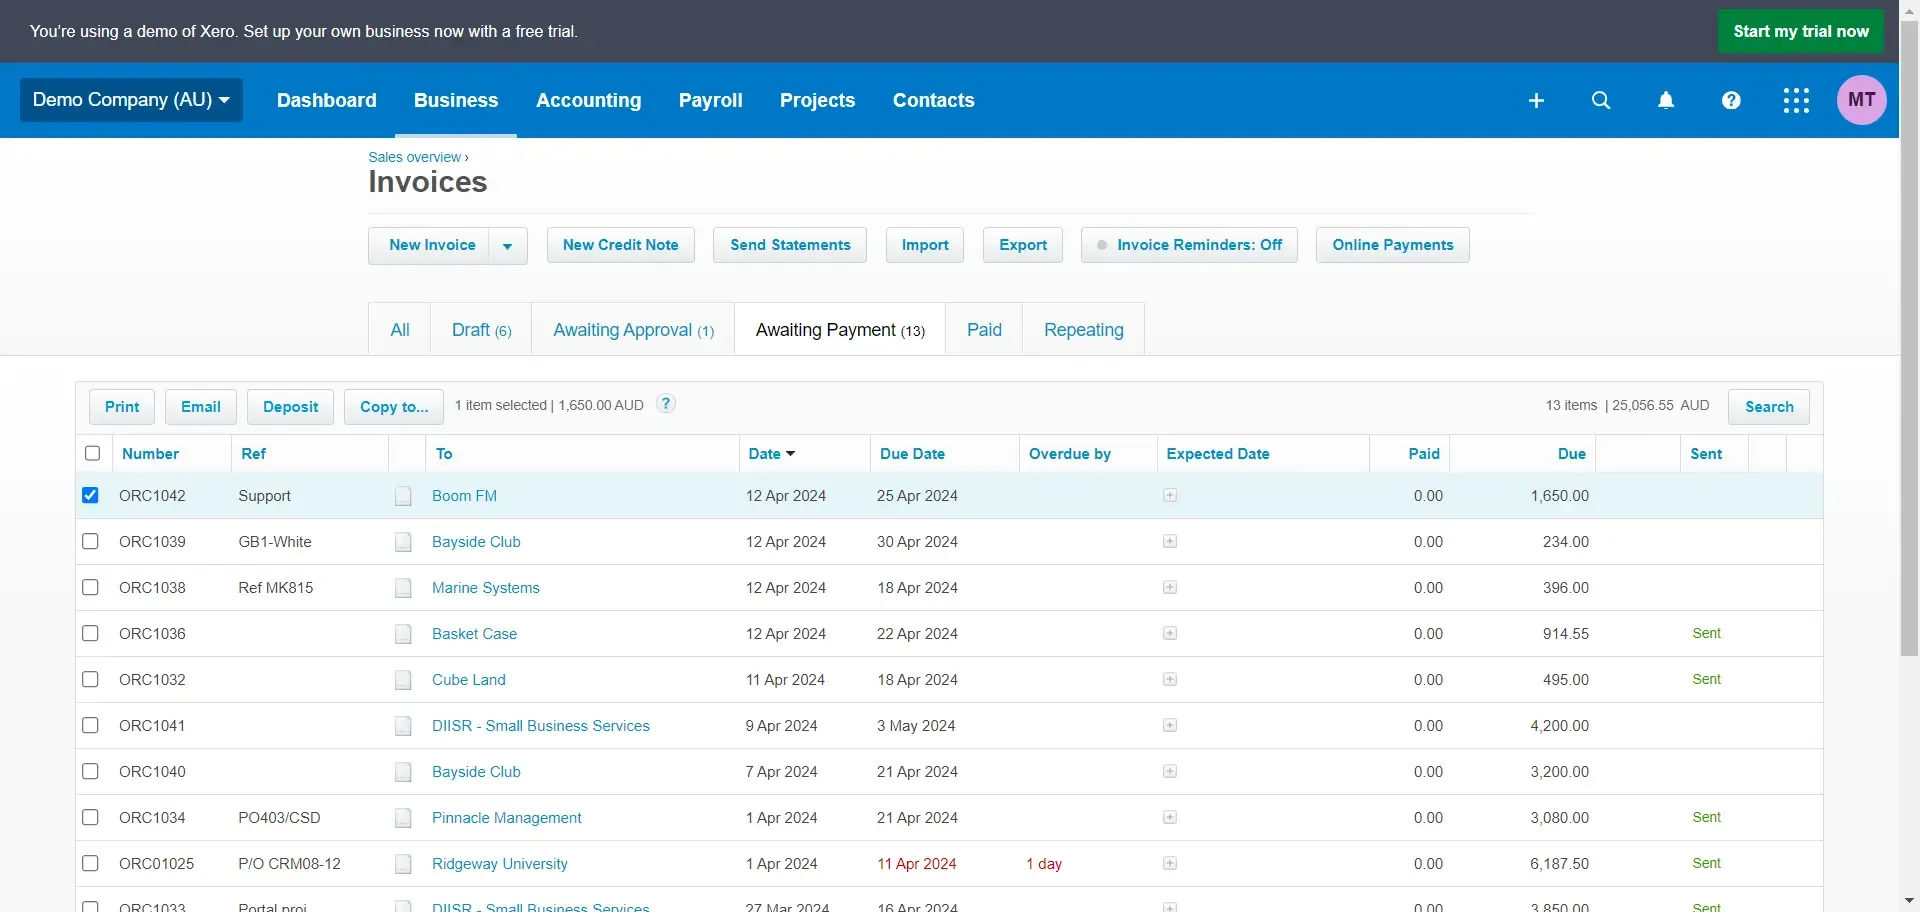
Go to Business > Invoices and select the relevant status tab (e.g., Draft, Awaiting Approval).
Check the boxes of the invoices you want to copy.
Click Copy to (or More > Copy to if reminders are on).
Choose Invoice and enter the customer's name.
Click Copy or Copy & merge.
Review and edit the new draft invoice before saving it.
Additional Notes:
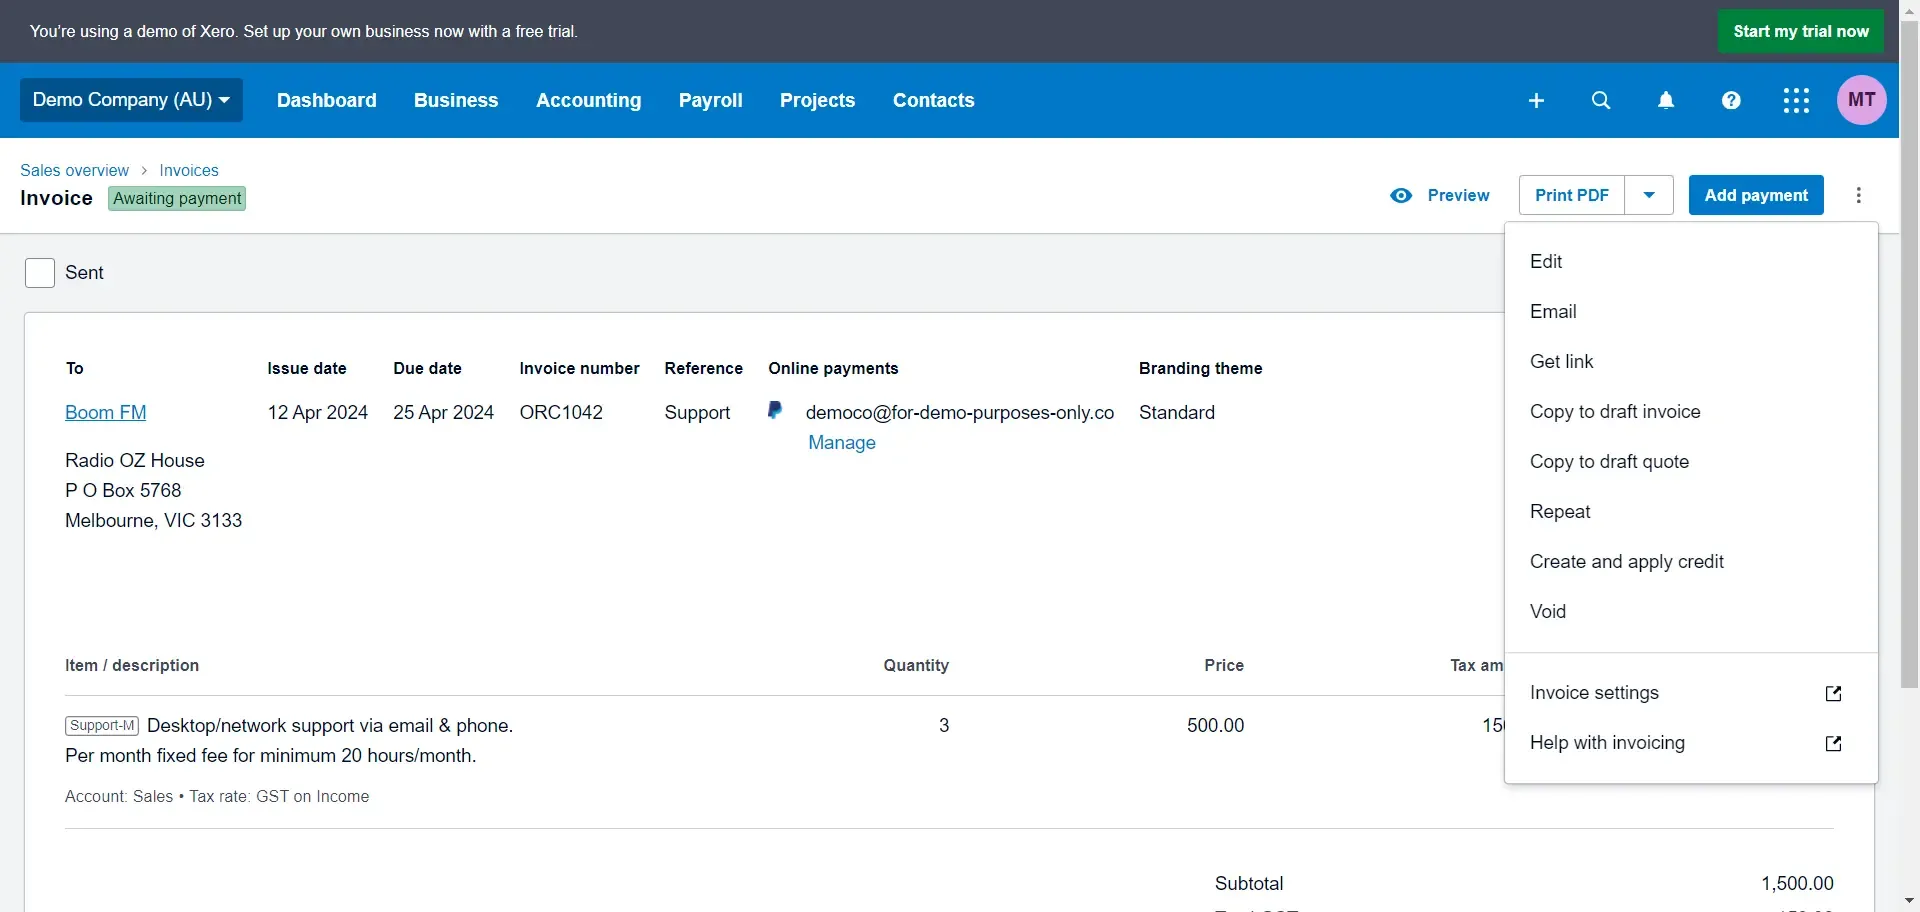
You can also copy a single invoice while viewing it by clicking the menu icon and selecting Copy to draft invoice.
Remember that copying invoices might alter specific details based on your organization, contact, or inventory item defaults.
By following these steps, your Xero invoicing system will be set up and ready to streamline your billing process. Remember to explore the various features and customization options to tailor the system to your needs.
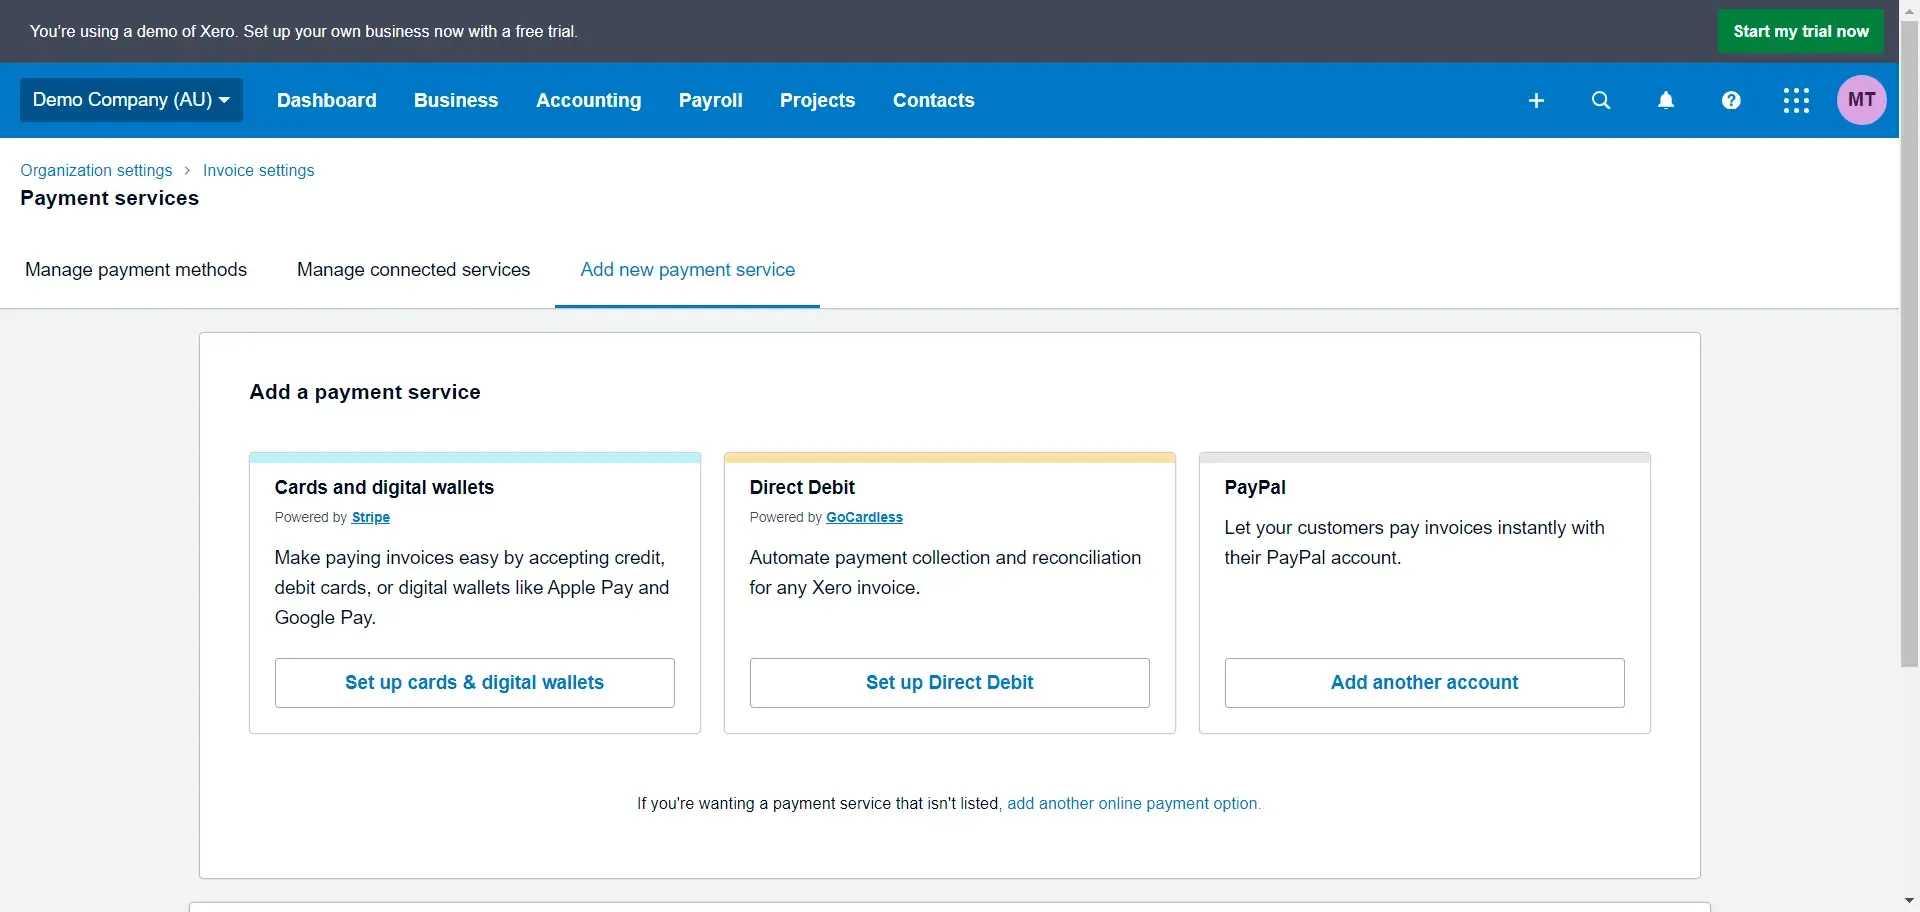
How to Add Bank Details in Xero
There are two primary ways to include bank details on your Xero invoices:
Method 1: Invoice Settings
Navigate to Settings: Go to Settings > Invoice Settings.
Payment Services: Find the section labeled "Payment Services".
"Add Payment Service": Click the "Add Payment Service" button.
Custom Option: A list of integrated payment providers will appear. Choose "Add a new Payment Service".
Provide Details: Enter your:
Account Name
Account Number
Any other relevant bank details (e.g., Branch Code, SWIFT code for international payments).
Online payment option: The ‘Custom Payment URL’ option also allows you to add a link to online payment.
Enable for Invoices: Ensure that the toggle next to your newly created payment service is activated to include it on your invoices.
Method 2: Invoice Template
Open Template Editor: Go to Settings > Invoice Settings.
Edit: Click "Edit" next to the invoice template you wish to modify.
Text Entry: Add a text box in a suitable location on your template (usually toward the bottom).
Input Bank Details: In this text box, type your account name, account number, and relevant bank information.
Formatting: Adjust the font and style of the text to match your invoice design.
Save Template: Save your changes to the template.
Important Notes
Invoice Terms: Xero allows you to include payment terms within your invoices' "Terms & Payment Advice" or "Terms" sections. This is a great place to reiterate your bank details if you add them manually within the template.
Online Payments: If you've integrated Xero with an online payment provider like Stripe or PayPal, your invoices might automatically display a "Pay Now" button linked to your account.
References
Xero Support: Add or remove payment details for invoices: https://central.xero.com/s/article/Add-adjust-or-remove-payment-terms-or-advice-on-invoices
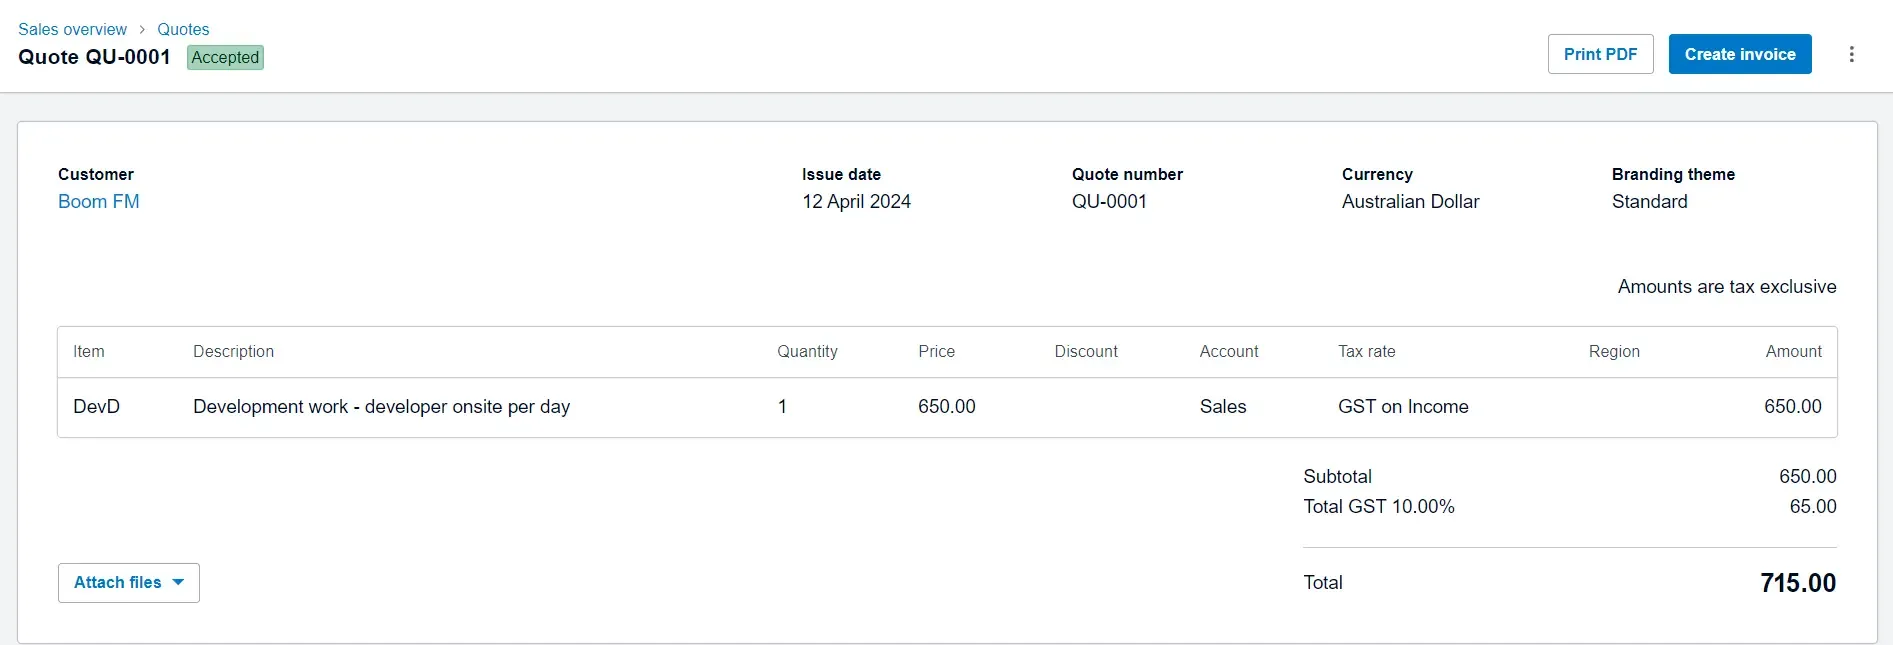
How to Convert Quotes to Invoices in Xero
Xero offers a seamless transition from accepted quotes to invoices, saving time and ensuring consistency in your sales records. When you convert a quote, Xero automatically transfers all relevant information, including:
Customer details
Items/services listed
Pricing and taxes
Any notes or references
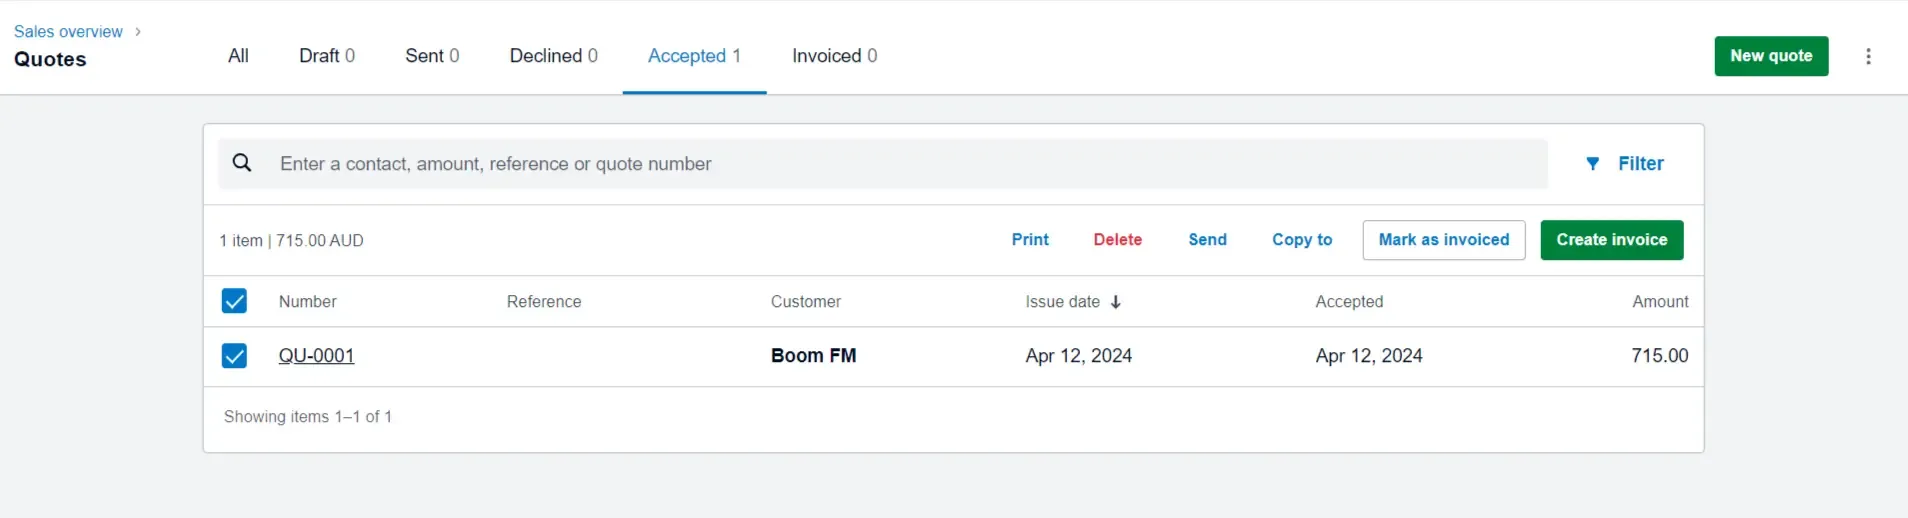
Method 1: From the Quotes Screen
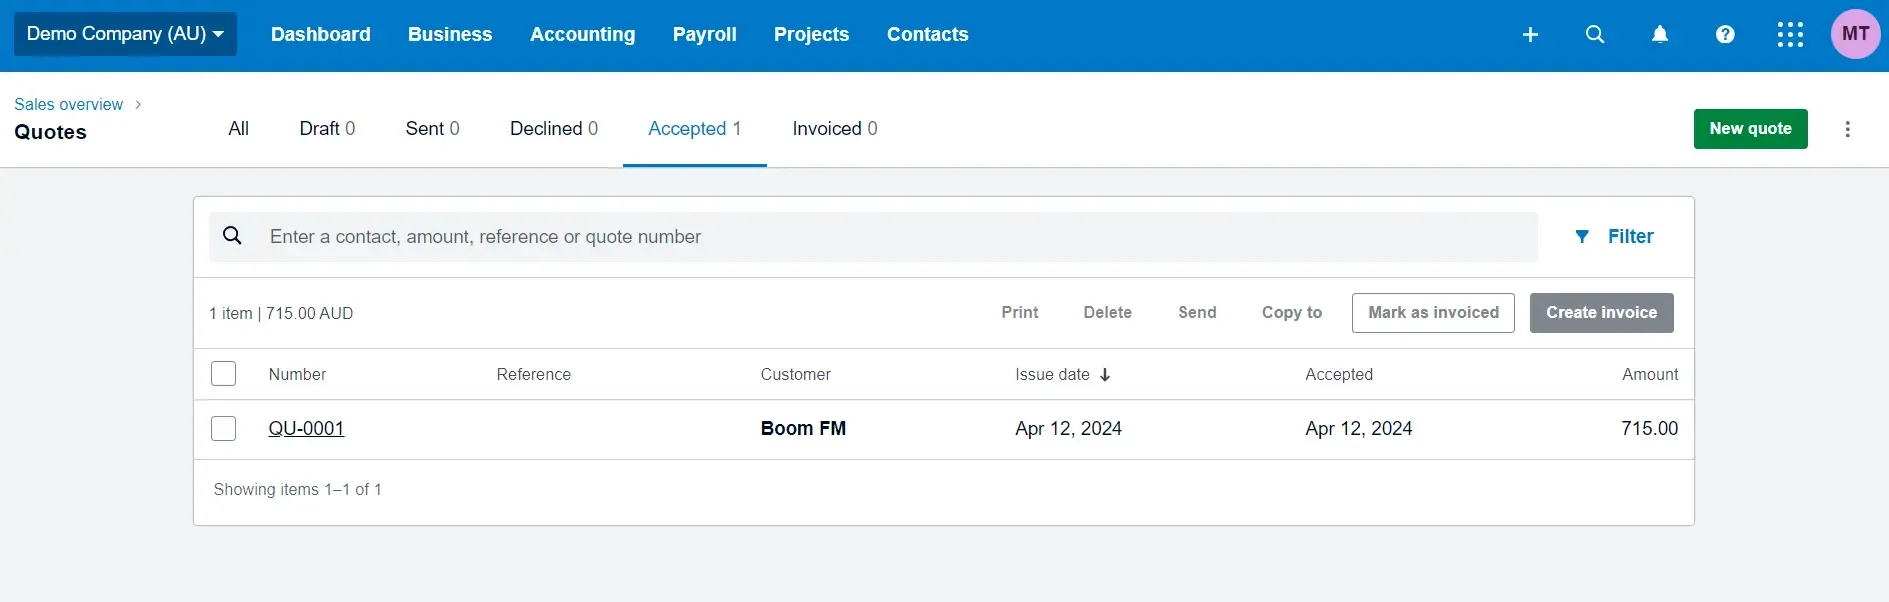
Locate Accepted Quote: Navigate to Business > Quotes and switch to the "Accepted" tab.
Select Quote: Click on the quote you want to convert to an invoice.
Create Invoice: Click the green "Create Invoice" button.
Review and Send: Xero generates a draft invoice with all details pre-filled. Review it thoroughly, then choose to:
"Approve" to finalize and send to your customer.
"Save as Draft" if you need to make further edits.
Method 2: From within the Quote
Open Accepted Quote: Navigate to Business > Quotes and open the accepted quote.
Create Invoice: Find and click the "Create Invoice" button within the quote view.
Review and Send: Follow the steps above to review, finalize, or save the draft invoice.
Additional Options
Mark as Invoiced: When creating the invoice, check the "Mark as invoiced" option to update the quote status automatically. This helps in tracking your sales pipeline.
Partial Invoicing: If you're only invoicing for a portion of the quoted goods or services, you can either:
Delete unneeded line items before converting to an invoice.
Clear the "Mark as invoiced" option and create multiple invoices from the same quote.
Tips
Review Before Sending: Always double-check the converted invoice to ensure accuracy and make necessary adjustments.
Establish a Workflow: Decide your preferred method for converting quotes and whether to automatically "Mark as invoiced" every time. This ensures consistency in your process.
Customize Templates: If you frequently use the same or similar items on quotes, create pre-defined products and services in Xero to speed up the process.
References
Xero Support: Create an Invoice from a Quote https://central.xero.com/s/article/Create-an-invoice-from-a-quote
Sending Invoices via Xero
After Approval: Once you approve an invoice, Xero gives you the following options:
Email: Click "Email" to open the email draft window (customizable, explained below). This is the most common method of sending invoices.
Print: Choose "Print" if you need a physical copy.
Download as PDF: Download a PDF version of the invoice for your records.
Batch Sending: To send several invoices at once:
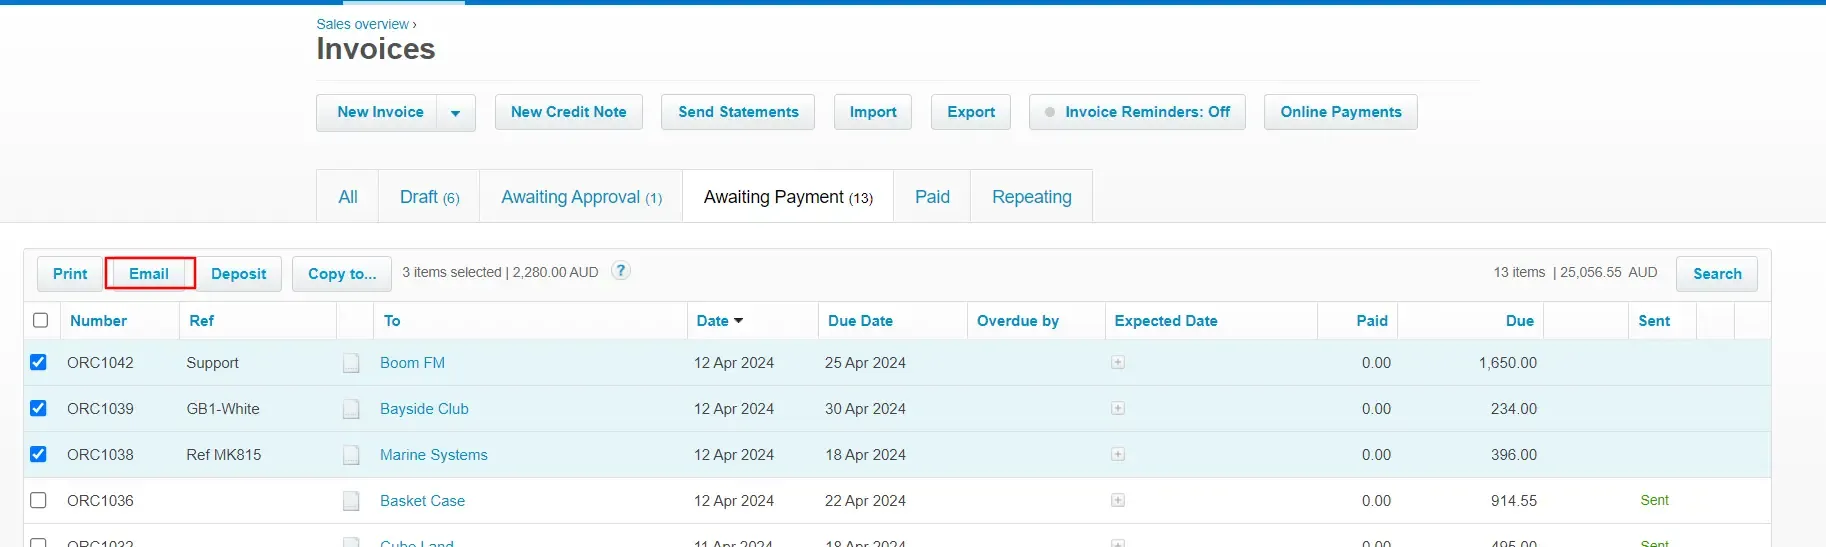
Go to Business > Invoices.
Select the invoices you wish to send.
Click Invoice Options and choose Email.
Customizing Invoice Emails
Email Templates:
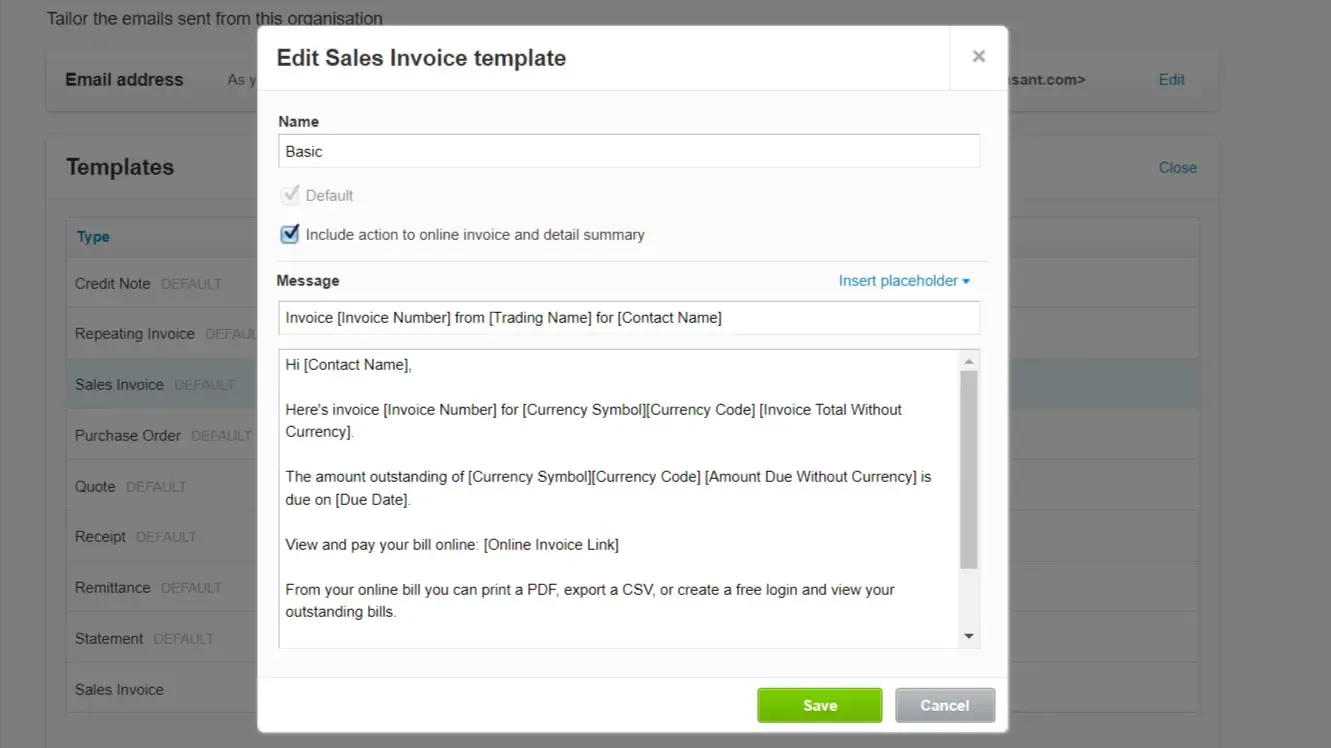
Go to Settings > Email Settings.
Find the "Templates" section.
Here, you can customize your default "Sales Invoice" email template. This controls what your customers see when you first send them an invoice.
Modifying per Invoice:
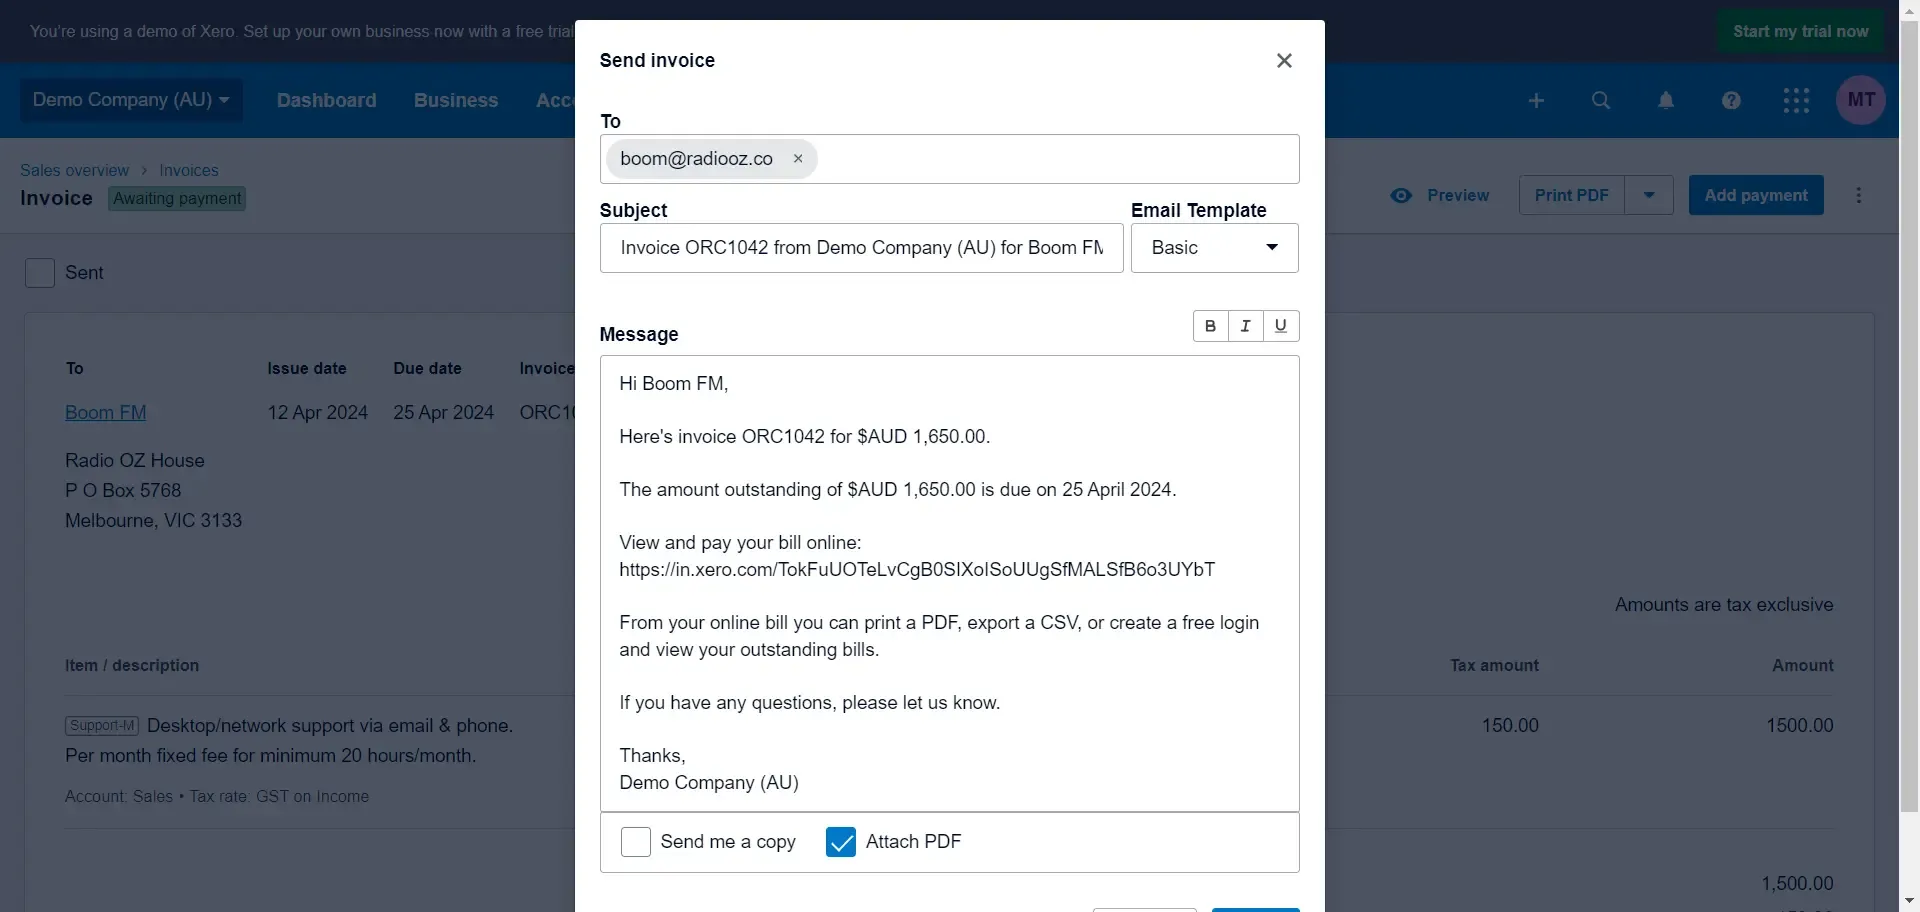
When approving an individual invoice, click the "Email" option to open a draft email window.
Before sending, you can edit the subject line email body further and choose to attach the invoice as a PDF or not.
Setting up Automatic Invoice Reminders
Invoice Settings:
Go to Settings > Invoice Settings.
Find the "Invoice Reminders" section.
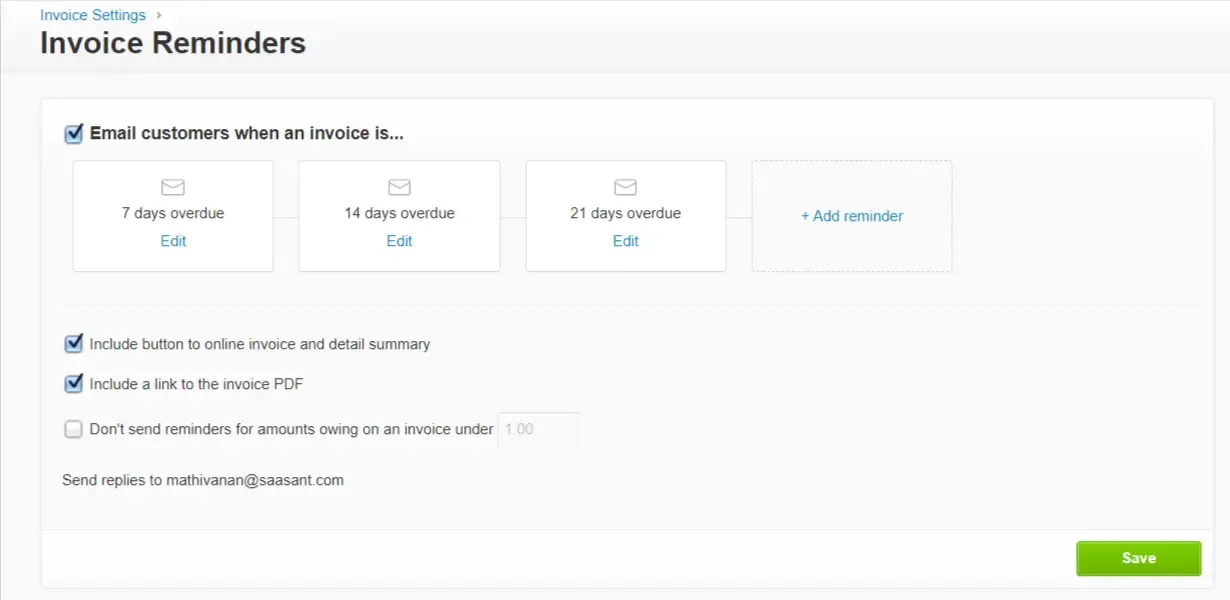
Toggle Activation: Enable reminders by clicking the toggle.
Customize: Set up multiple reminders before and after the due date, along with their frequency. Xero allows you to edit the email content for each reminder.
Important Notes
Xero Network: If you and your customer use Xero, consider sending invoices through the Xero-to-Xero network. This allows your customer to receive the invoice directly within their Xero account.
Automation: Invoice reminders save you time and help reduce overdue invoices.
Branding: Consistent customization of your invoice emails maintains a professional image for your business.
References
Xero Support: Approve and Send a Customer Invoice: https://central.xero.com/s/article/Approve-and-send-a-customer-invoice
Advanced Invoicing Features
How to Set Up a Recurring Invoice
Recurring invoices are ideal for billing clients regularly for the same products or services. Xero automates creating and sending these invoices, saving you time and effort.
You can create a recurring invoice in two ways:
Method 1: Creating a New Recurring Invoice
Navigation: Go to Business > Invoices. Click on the "Repeating" tab.
New Invoice: Click the "+ New Repeating Invoice" button.
Invoice Details: Fill out the invoice information, just as you would with a regular invoice:
Customer information
Items, quantities, and pricing
Issue date and due date
Recurring Settings: In the "Repeat this transaction every" section, specify:
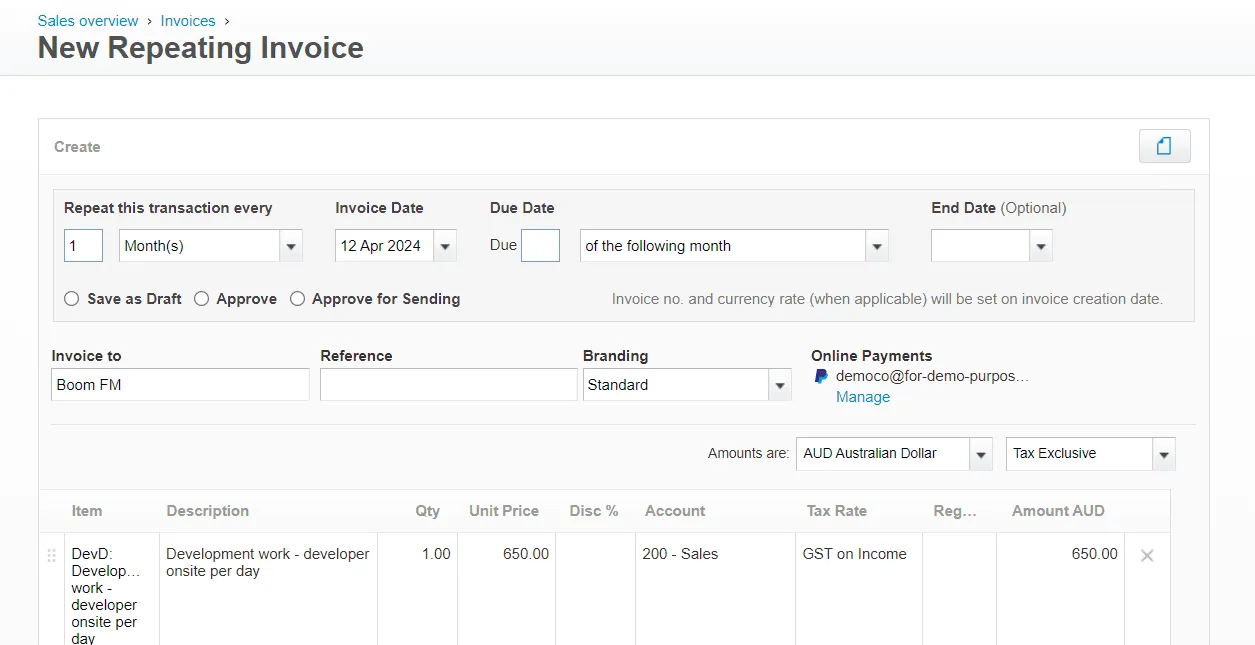
Frequency (e.g., weekly, monthly)
Start date
Set an end date for the recurring invoice schedule.
Save Options: Choose one of the following:
"Approve for Sending": The invoice will be automatically generated and sent on the schedule.
"Save as Draft": Create a draft you must manually approve before sending.
Method 2: Converting an Existing Invoice
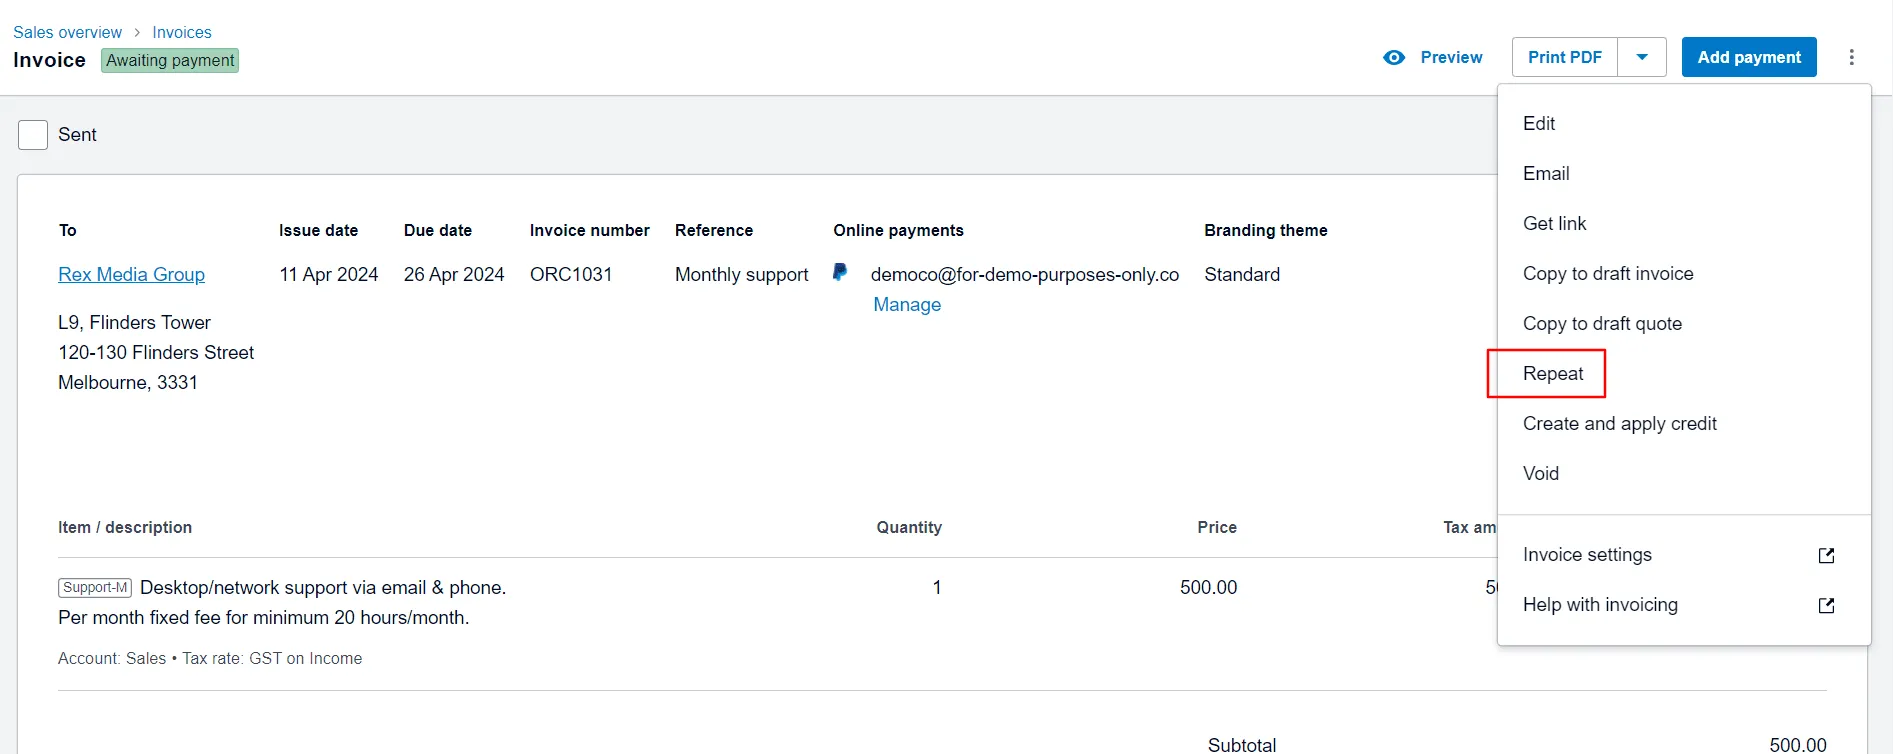
Locate Invoice: Navigate to Business > Invoices and find the invoice you want to make recurring.
Convert to Recurring: Click on Invoice Options and select "Repeat."
Recurring Settings: Set up the recurring schedule details as described in Method 1.
Save Options: Choose between "Approve for Sending" or "Save as Draft".
Important Considerations
Online Payments: Link Xero to a payment service like Stripe or PayPal if you want recurring invoices to offer online payment options for your clients.
Invoice Reminders: Consider setting up automatic reminders in conjunction with recurring invoices to ensure timely payments.
Review: Regularly review your recurring invoice list and make any necessary updates.
References
Xero Support: Add or edit a repeating invoice template: https://central.xero.com/s/article/Add-or-edit-a-repeating-invoice-template-US-GL
Creating proforma invoices
Unfortunately, Xero doesn't have a native feature to create proforma invoices with their specific functionality and labeling distinctions. However, here are a few ways you can effectively work around this within Xero:
Method 1: Using Quotes as Proforma Invoices
Create a Quote: Go to Business > Quotes and create a new quote.
Clarity: Label the quote as "Proforma Invoice" in the title or description field.
Disclaimer: Include a statement clarifying that this is NOT a demand for payment but an estimate of costs or a preliminary invoice for review.
Send to Client: Send the quote to the client as you usually would.
Convert to Invoice (Optional): Once approved, you can easily convert the "Proforma Invoice" quote into a proper invoice for payment.
Method 2: Customizing Invoice Templates
Branding Themes: Go to Organisation > Invoice Settings > Branding Themes.
Create or Edit: Create a new template or edit an existing one.
Label: Change the template title to "Proforma Invoice."
Disclaimer: Add a clear disclaimer at the top emphasizing its proforma status and that it's not a demand for payment.
Optional Fields: Consider removing fields like "Due Date" that aren't strictly necessary for a proforma invoice.
Method 3: Integration with Third-Party Apps
Xero's App Marketplace offers tools specifically designed for creating proforma invoices. These apps often include additional features such as proforma-specific numbering, advanced customization, and even seamless conversion into invoices.
Search the Xero App Marketplace using keywords like "proforma invoice" to find suitable integrations.
Important Notes
Clarity is Key: Whichever method you use, make sure your "proforma invoice" cannot be mistaken for an accurate invoice to avoid confusion.
Industry Practices: Consider industry-specific requirements for proforma invoices, which influence how you customize your documents.
References
Xero Support Discussion (Similar Question): https://central.xero.com/s/question/0D53m00006t2knRCAQ/how-do-you-generate-a-proforma-invoice-instead-of-an-actual-tax-invoice-thanks
Xero App Marketplace: https://apps.xero.com
Xero Advanced Invoice Templates
While Xero refers to their editable invoice templates as "branding themes," they are often called "advanced invoice templates" due to their customizability. Here's a breakdown of using them and the available features:
Understanding Xero's Advanced Invoice Templates
Beyond the Standard: Advanced invoice templates go beyond Xero's default templates, allowing greater control over your invoice's look and information fields.
Customization: These templates let you adjust colors, fonts, layout, add your logo, and include or remove specific information fields.
Not in the Invoice Creation Process: The advanced templates aren't directly used when creating a new invoice. Instead, they are the "styles" you select after inputting invoice details.
How to Use Advanced Invoice Templates
Branding Themes:
Go to Accounts > Sales Settings > Branding Themes. This is your central hub for managing invoice templates.
Create or Edit:
Click "New Branding Theme" and select "Custom .docx" to start a new template from scratch.
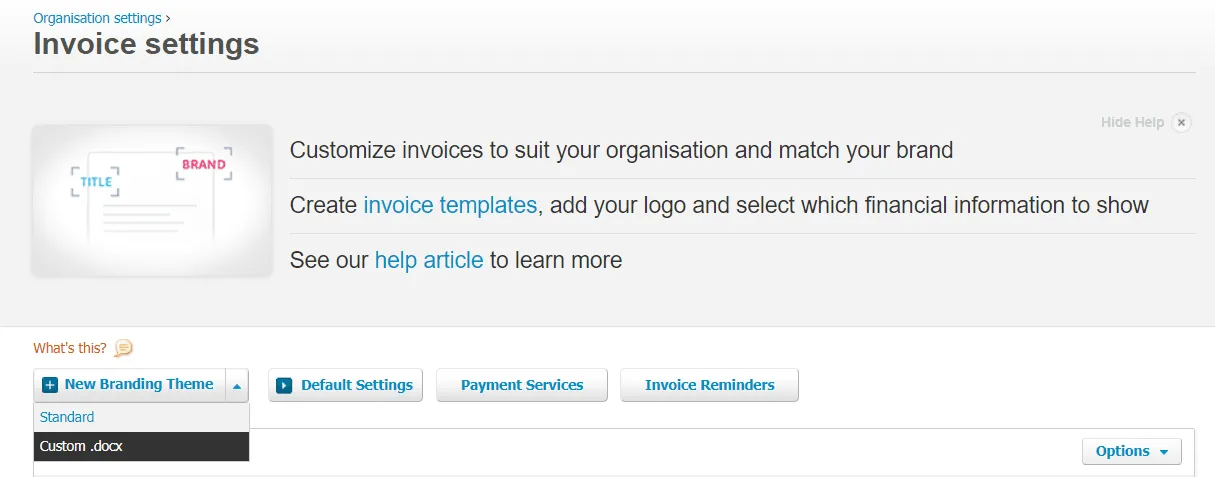
Alternatively, click "Edit" next to an existing template to modify it.
Upload to Xero (Custom Templates Only):
To use a template built from scratch, you'll need to download a ZIP file of essential template files to edit in Microsoft Word and re-upload it to Xero. Xero provides instructions on this process.
Apply When Creating Invoices:
When creating a new invoice, you'll choose the desired advanced invoice template from the available options after entering the details.
Customization Options
Within the template editor, you have flexibility in these areas:
Layout: Rearrange elements using drag-and-drop.
Colors and Typography: Match your brand colors and define fonts.
Field Management:
Add new fields (e.g., purchase order number, shipping information).
Remove unnecessary fields.
Logo and Branding: Prominently position your logo and adjust its size.
Terms and Payment Info: Customize your payment terms and include bank details for remittance.
References
Xero Support: Create an advanced invoice template https://central.xero.com/s/article/Add-move-or-remove-fields-in-custom-invoices-quotes
Xero Support: Invoice Templates Explained https://central.xero.com/s/article/Invoice-templates-explained
Tips
Start with an Existing Template: Xero provides pre-built advanced templates. Consider using one as a base for customization.
Consistency: Create multiple templates if you have varied invoicing needs, but ensure overall branding consistency.
Test and Preview: Always preview your invoices after applying a template to ensure the layout and information are correct.
Enabling Multi-Currency in Xero
Xero Plans: Multi-currency functionality is available on Xero's "Growing" and "Established" business plans.
Activation:
From your Xero dashboard, select Settings > General Settings > Currencies.
Click "Add Currency" and select all the currencies you plan to transact in.
Key Aspects of Multi-Currency Invoicing
Assigning Contact Currencies:
For each contact (customer or supplier), define a default currency.
Transactions default to this currency, but you can change it per invoice.
Real-Time Exchange Rates:
Xero automatically uses up-to-date exchange rates from XE.com.
You can manually enter an exchange rate if needed.
Invoices in Foreign Currency:
Choose the appropriate currency for each invoice.
Calculations (price, tax, line items) are all done in that currency.
Payments:
Customers can pay in their selected currency.
Xero will convert the payment to your base currency using the exchange rate when the payment is received.
Multi-Currency Bank Accounts:
Create separate bank accounts in Xero for each currency in which you hold funds.
Link these accounts during your initial Xero setup.
Reporting and Considerations
Multi-Currency Reports: Xero offers specific reports to track gains and losses due to currency fluctuations.
Base Currency: Your financial reporting (e.g., Profit and Loss) will be in your base currency, even with multi-currency transactions.
VAT & Tax: Tax calculations can become more complex with multi-currency. Consult a tax advisor if needed.
Receiving Payments and Managing Invoices
Let's break down the customer-side and business-side actions surrounding payment and invoice management in Xero:
From the Customer's Perspective: How to Pay an Invoice in Xero
Online Payment: If you've integrated a payment service (e.g., Stripe, PayPal) with Xero, the customer will likely see a "Pay Now" button on their invoice. Clicking this takes them to a secure payment portal.
Direct Bank Transfer: If you've provided bank details on the invoice, the customer can initiate a transfer from their bank account.
Other Options: Depending on your settings, customers may be able to pay by check or other methods. Ensure clear instructions are provided on the invoice.
From Your Business Perspective: Recording and Managing Invoice Payments
Automatic Matching: When you receive online payments through an integrated provider, Xero usually matches them automatically to the corresponding invoice.
Manual Recording: For bank transfers, cash, checks, or offline payments:
Go to Accounts > Bank Accounts.
Select the account where the payment was received.
Click "Manage Account" > "Reconcile Items".
Find the relevant invoice and mark it as reconciled.
Payment Status: Xero updates the invoice status as payments are received (e.g., "Paid," "Partially Paid.")
Managing Overdue Invoices and Automatic Reminders
Invoice Settings:
Go to Accounts > Sales Settings > Invoice Settings.
In the "Invoice Reminders" section, enable reminders.
Set the timing for reminders (before/after the due date) and customize their messages.
Overdue Review:
Business > Invoices > "Awaiting Payment" tab: Shows all overdue invoices.
"Overdue" Column: Quickly see how late an invoice is.
Individual Invoice Actions: From this screen, you can resend invoices, add notes, or apply payments manually.
Editing and Updating Invoices
Status Limitations: You cannot significantly edit an invoice marked as "Paid" or "Reconciled."
Editing Drafts:
If an invoice is in "Draft" status, it's fully editable.
Editing Approved Invoices:
Go to Business > Invoices > "Awaiting Payment" tab.
Click on the invoice.
Minor edits can sometimes be made directly in this view.
Consider voiding the invoice and creating a new one to make significant changes.
References
Xero Support: Get paid using online payments: [invalid URL removed]
Xero Support: Record a payment on an invoice: https://central.xero.com/s/article/Record-a-payment-on-an-invoice
Xero Support: Void an invoice: [invalid URL removed]
Xero Support: Invoice Reminders: [invalid URL removed]
Conclusion
Xero's invoicing capabilities provide a solid foundation for managing your billing process, offering customizable templates, automated reminders, online payment options, and more. By effectively utilizing these features, you can streamline your workflow, ensure timely payments, and maintain accurate financial records.
Enhancing Your Xero Invoicing Experience:
Explore integrations: Xero integrates with numerous business applications, including Saasant Transactions. If you require advanced features such as bulk invoice import or wish to overcome certain limitations of Xero's native invoicing, exploring integrations can provide valuable solutions.
Continuously optimize: Regularly review your invoicing process to identify areas for improvement and ensure you're maximizing efficiency.
Stay informed: Keep up-to-date with Xero's latest features and updates to leverage the latest advancements in invoicing technology.
By mastering Xero's invoicing essentials and exploring potential integrations, you can build a robust and efficient system that supports your business growth and financial success.